


Share your craft projects
Make new craft buddies
Ask craft questions
Blog your craft journey
41 Comments
This is great, Mike. I love watching the progress of an in-shop project. I made a table saw cabinet for my contractor saw many years ago, to put it on wheels. It’s been shifted (very heavy) around the shop by about three feet many many times over the years, and my corner joints are now failing, with all the pulling and tugging from one end. One day I have to take it all apart and reinforce those corner joints for the abuse!
Might As Well Dance : http://barbsid.blogspot.com/

Hi Barb,
Can I ask how you joined the corner joints that are now starting to flex/weaken? Any ideas on what modifications could have prevented this, or how you will modify those corners now?
HorizontalMike
It was years ago, but I remember I rabbeted the corner joints on 3/4 BBP, then added a triangular corner block on the insides. Not good enough at all. The inner shelves are dadoed in. This photo was taken about a year after the build, when everything was square. The cabinet is so heavy on the wheels I really have to jerk and pull it around to move it, so it’s been heavily abused, pulling at it from the top. The drawer is now showing a decided slant on its rails. I really need to fix this thing, but am too busy, as usual. The fix will mean removing everything, maybe adding metal angle brackets to the outsides of the joints, then long 2×2s to the inside corners for more stability. Bigger wheels would have helped, too. The small plastic ones were listed for the load capacity, but it would roll easier with wheels like you’re designing.
Might As Well Dance : http://barbsid.blogspot.com/
Thanks Barb. I was originally going to rabbet the sides to the top/bottom, but feared just what you are sharing. Now the plan is to butt join the sides on top of the bottom/floor with screws and glue. While I figure the back of the table will be protected from racking by the full-piece back wall, I am wondering about the front of the cabinet.
I am considering adding 2in wide vertical separators (facing) on both front sides and the two inner ones as well. My thoughts are that while I will lose some drawer/storage space, the 2in facing should help prevent some of the racking involved every time the loaded cabinet is moved. Is 2in enough on the corners? Maybe 3in wide, corners only, but inner facing still 2in?
I have not even thought about designing the drawers yet, so I am open to suggestions regarding the above.
HorizontalMike
The 2-3" variables I don’t know. One thing I’d suggest on your cabinet is an inset back of 3/4 ply to square it up. In fact, on such a large cabinet, full legs with inset panels may be the way to go. It’s a structural change, I know, but a leg frame and panels are certain to be stronger than any form of corner joints in plywood. Short of that, an inset back and an inset face frame may be enough. Just my opinion, and as I said, my own cabinet did not cut the mustard over time!
Might As Well Dance : http://barbsid.blogspot.com/
Looking good Mike.
Looks like having wide faces will be a reality. I just routed the top piece for my two internal walls and on one I routed on the “wrong side” of the line! Go figure… 8-(
Anyway, having a 2in facing will cover up that mistake and make the drawer spaces on both ends match side-to-side.
HorizontalMike

Good post Mike.
Good to see here too.
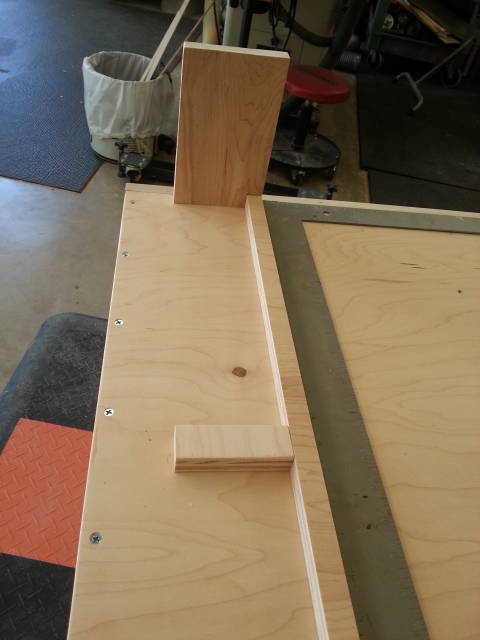
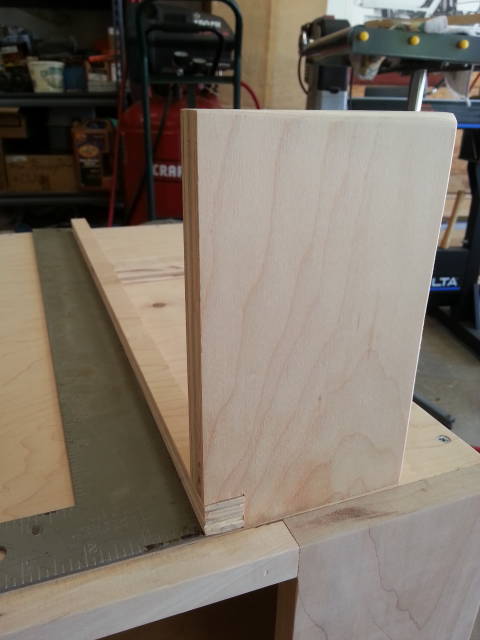
Question about your rabbet jig: I built the same one but when I used it my bit cut through it at the end, where I start or finish the cut.( the part with the knob which both halves together)
How do you avoid this issue?
Frenchy
Frenchy,
You don’t avoid cutting part of the jig (start and stop). You should be using 3/4in hardwood on the frame, and most dados are usually 1/4in or less deep, so there will still be plenty of frame left after “clearing” the ends. FWIW, I used 3/4in ply on the rest of that jig as well. What that means is that I have to set my 1/2in router bit a little more proud depending on how deep my dado will be.
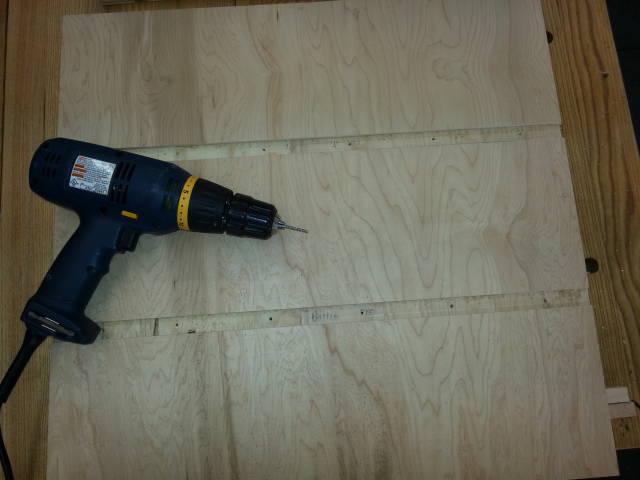
Picked up the needed 1/4-20 flat head screws at HD. Geez I hate having to buy screws 4-at-a-time! I needed 32 of them for my casters and was prepared to buy a box of 50, but NO! I had to spend over $10 just to get 32 of them! Grrr…
No picks today, as I am measuring and marking where my non-dado’d joints are, so that I can pre-drill and countersink the holes. Slow and tedious so I have the radio nice and loud… 8-)
HorizontalMike
Thank you Mike.
I normally cut my dado one 1/2 of the thickness of the wood I cut it into.
In 3/4 plywood that would be 3/8".
Is this too deep?
I buy my screws at Mc Feely’s or Mc Master.
Frenchy
Great Post HM…please continue as you go!
Mike
Mike

Mike,
Don’t know if you have Tractor Supply around you, but they sell screws buy the pound. Thirty-two 1/4-20’s would cost less than a buck. A lot of hardware stores sell them that way too.
The planer cabinet is looking good. I need something like that for mine. Right now, it’s occupying the end of the bench and blowing shavings all over the router table.
Where are the band-aids?---Pro Libertate!
I’m getting close, though a mistake cutting a shelf cost me another sheet of plywood,… grr. Got the main carcass together except the BACK piece. When I get the back, I will THEN think about drawers, or half drawers depending on how bad this thing looks…. Been a big challenge because of the year-old plywood that has already warped/moved to where it wanted to be. Sure been fun trying to get things where they needed o be….
I am trying to channel the Clydesdales rather than a thoroughbred , if you know what I mean… ;-)
Still need to buy another sheet of ply, since I screwed up on a shelf and reached for the WRONG piece of lumber to replace ( I am sure NO ONE has ever done that in the past). This thing is ready to roll for EXCEPT for my mistakes… TBC… ;-)
HorizontalMike
Looking good
Frenchy
I would like to build the same thing but I have no room to store it.
Where are you going to store it Mike?
Frenchy
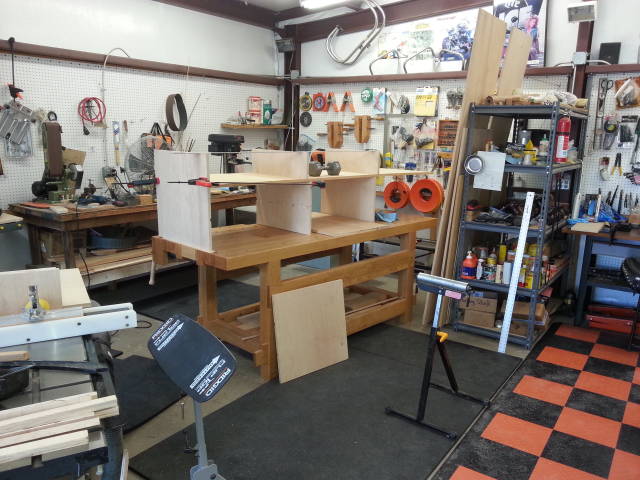
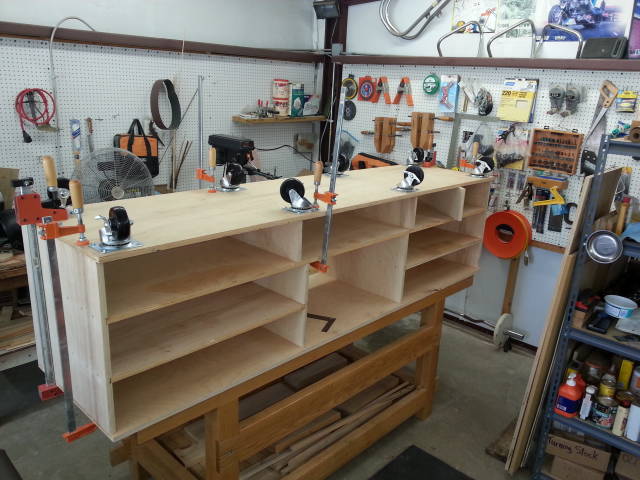
Well, I got the better half to help me wrestle this thing off of the WB this morning before she took off for work. Boy, this thing is heavy! And that is without the 1/2-sheet back and no facing on the front.
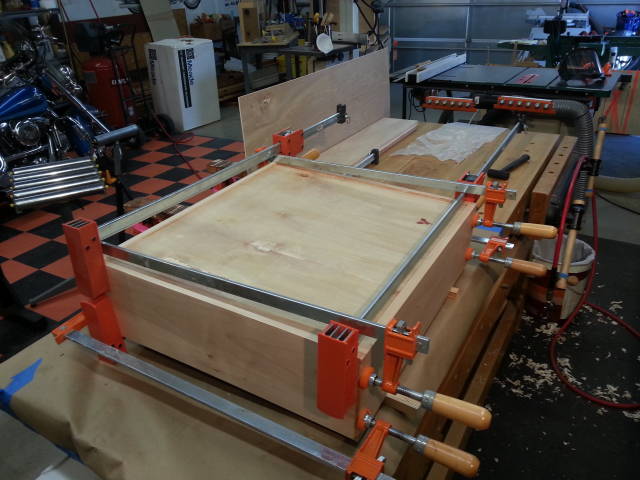
Found out quickly why having EIGHT wheels can be problematic, AND that storing your own Plywood for over a year (even vertically) can and does introduce warping in some degree or another. Just more things to work around ;-) Anyway, once on the wheels I could tell just how much the table warped from end to end. I have about 1/4" gap from one end’s pair of wheels touching the floor. The other six all match/roll.
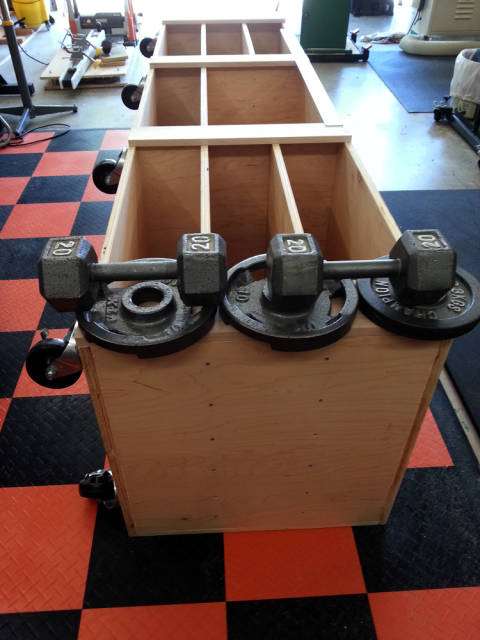
Adding weight/loading the ends does cause the table to flex, and thus far I am getting 7 of 8 wheels rolling (as you can see how I stacked the weights). I am hoping that by cutting the back piece nice and snug, while having the table flexed flat, that the back piece will help take some of that warp out of the finished product without the need for the added weight.
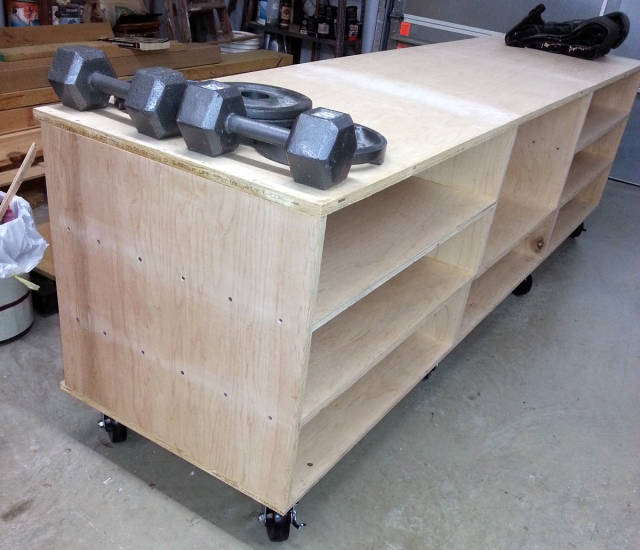
Long story short, I have about 250lb of weightlifting gear, plus another ~150lb of lead bullets (reloading supplies) that should more than take care of this relatively minor warp once stored in the bottom compartments.
FWIW, I used #8 1-1/2in wood screws spaced ~4in apart in ALL joints, including dados. By the time I finish, I think I will have used about 150-160 wood screws in total. Plus, the inside joints are all glued, with only the bottom/floor and the two inner dado joints of the top piece not having glue. Wrestling with bowed plywood by oneself pretty much determined when I had to skip the gluing procedure. Clamps got in the way of quickly removing and reinstalling some pieces correctly without help.
Got other things planned for the weekend, so I will be taking a break for a few days. After I pick up the extra sheet and cut it to fit, I will then start resawing/milling some 12/4 Maple that I have and install the facing on the front, and maybe add a 4-6in skirt around the base (more torque prevention).
Much later, I will be designing and adding heavy duty drawers. Thinking about actually cutting hand holes in the side runners to aid in lifting the drawers once they are opened.
Anyway TBC’d…
HorizontalMike
Frenchy,
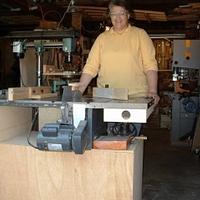
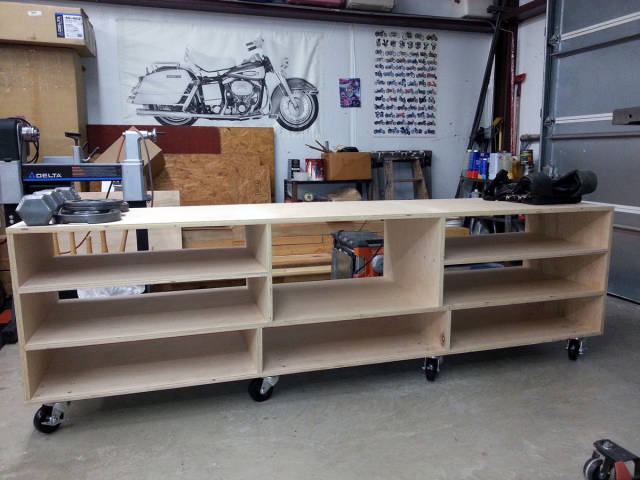
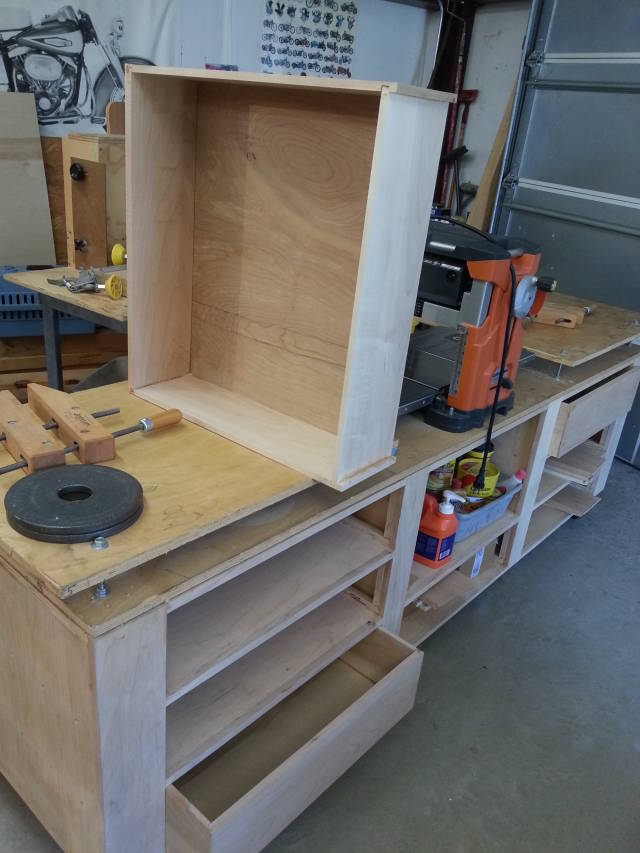
This thing will fit directly under the planer that you can see sitting behind behind it in the first of the two above images. It will be semi-permanently parked in that location, in front of my wood stack. I am thinking that this will give me an extra foot or so, because when the planer is not in use, I can roll the whole contraption up against the wood stack. More room to get the bike through when parking 8-).
HorizontalMike
Mike I am not trying to find fault with what you are doing but I was thinking about your design and I see a problem with it; you rely on your floor being perfectly flat and your caster being exactly the same ad to position your bench always exactly at the same location, to keep the in-feed and out-feed tables in line to obtain a straight surface when planing.
In case your floor is not perfectly flat or your casters not of the exact same diameter you are going to have issues.
If I was going to build such a bench, I would build the top part as a torsion box to keep it as flat as possible.
It might still be time for you to add a torsion box on the top of your bench.
Frenchy
My existing planer and ramps, as seen in OP have sat on the concrete floor for the past ~4yrs without an issue. There are weight plates holding the original 3/4 ply from warping ,but it conforms to the existing concrete slab.
I understand the technicality of your suggestion, however pragmatically it has worked for me. If you look at my ramps, they are each supported by 4-bolts and each is height adjustable. The only thing that needs to be flat (not necessarily level) are the ramp boards themselves. Those ramps are adjusted to the planer’s orientation only, and the table or concrete floor upon which they sit is of no real consequence unless there is a major change such as the concrete buckling and shifting. If such an event occurs, then the ramp adjusting bolts would need a new adjustment. This setup is quite flexible in that regard. Thanks for the thoughts though. I tend to do that also, more often than not.
HorizontalMike
Mike,
I did not know that you were going to re-use the ramps
Thank you for your reply.
Frenchy

Looking good Mike…should be a great set up when get it done….
Measure "at least" twice and cut once

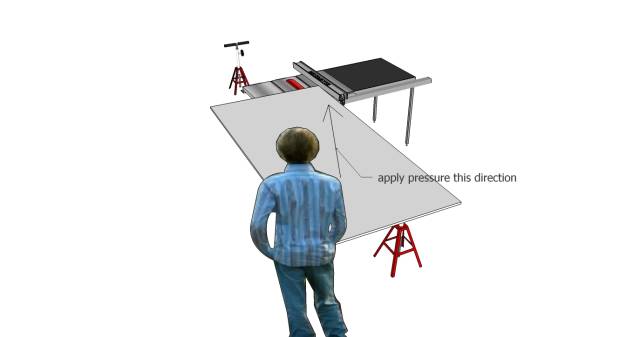
Mike, first I want to say I’m not telling you how to cut.
Whatever works for you is my motto.
But looking at the picture of you ripping the pc of plywood, I might suggest that you stand a little to the side and apply angled pressure as your pushing through the fence. This will give you better control making a straighter cut. Standing straight behind the wood makes it easier to wiggle side to side making a wobbly cut. Not trying to knock you, just offering a suggestion. Like I said, whatever works for you, but I find this better for myself.
Figuring out how to do something you have never done is what makes a good challenge.
That thing is huge Mike! I love it! I’m also very jealous of that jointer. Don’t get me wrong, I got my 6" Jet for a steal and it runs beautifully, but those extra 2" would sure come in handy.
Where are the band-aids?---Pro Libertate!
That’s looking good, Mike.
Might As Well Dance : http://barbsid.blogspot.com/
Nice catch Bently. That was actually a staged image for the camera without the TS running. I actually did and do as you suggest when not ‘posing’… ;-)
I still hate cutting sheet goods though. I have to rearrange the shop, shove the jointer out of the way, rotate the TS, all to get enough space before and after the TS just to make the cut. Even had the GF lifting the outfeed just enough to get everything on the rollers. In times past, I would just sacrifice the other 1/2 sheet by cutting proud with a CS and sizing later. This was too big a project waste so much ply. After this, I am going back to smaller projects… I promise!
HorizontalMike
Yeah, I’m getting to old to wrestle those full sheets on the table saw myself. I usually pull up one of my benches that’s the same height as my table saw, then push them through. It’s a lot easier that way, but then, I have a shop with plenty of room.
Figuring out how to do something you have never done is what makes a good challenge.
After the weather clears down here, I’ll head to HD or Lowes and buy the additional sheet of 3/4 that I need. Thinking seriously about just paying them for the cut on their panel cutter. Just need a 24in X 96in cut, and then I can trim that 24in down to finish size that much easier.
HorizontalMike
Mike, I believe that you are going ending up building an apron on each side of your bench,if not this thing is going to flex too much and you will never keep your in-feed and out-feed tables in line.
On each side 6/8 inches from the edge (as to leave like a shelf),I would fill the gap, where you want to put the top drawers, with 3/4" plywood all the way long and glue and screw them in.
That would add a lot of rigidity to your bench.
MY 0.02
Frenchy

* reached for the WRONG piece of lumber to replace*, I never done that before/again.
Enjoying the build, thanks for posting.
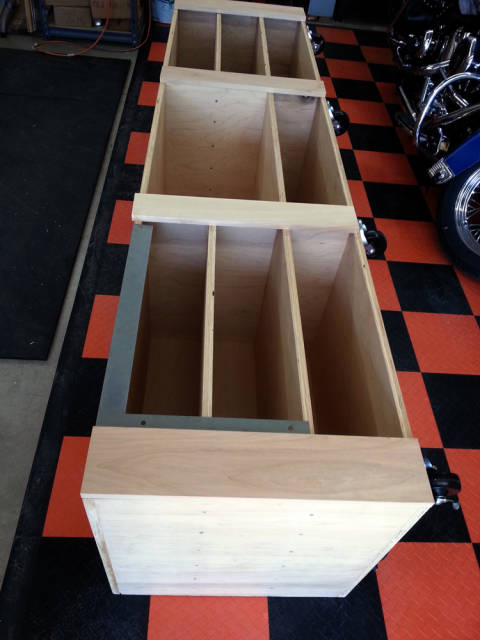
Well, I got busy the past couple of days and got the back piece of the cabinet put in place, though it took me 125 screws to do it! I almost felt like a ‘pocket screw’ master, even without using pocket screws! Total screws are now at ~250.
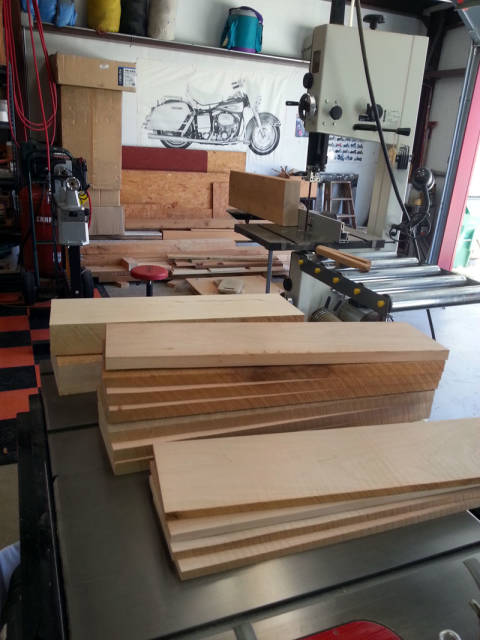
Spent the entire day cutting up 12/4 Maple to make the facing and drawers.

Had the better half help with placing the first big 12/4 board on the MS this morning, then had to handle a 12ft long 24BF’r by myself in the afternoon, with the above result. NO, that is not my attitude, just a blood blister under the fingernail. I am withholding judgement on just how that blood blister feels for now, though astute observers may surmise… ;-)
Below are my rough cut piles of 12/4, 4/4, and 2/4 for the drawers and facing.
QUESTION: Was planning on using 3/8 ply for the bottoms of the ~27" X 24" X7" drawers, so is that enough for such large drawers?
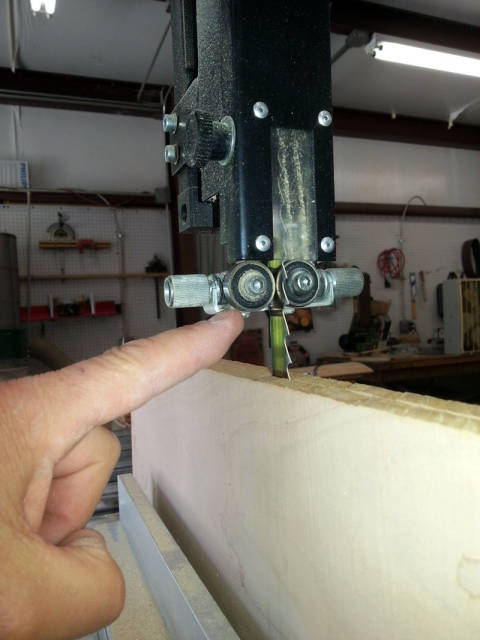
Then I had a bearing come loose on my BS and ruin a cut. Being in the middle of the cut, there was no way to stop so I just finished the cut and tossed the scrap. It was the upper left bearing that allowed the cut to wander to the left and mess things up.
Also had the BS belt jumping off the pulleys and had a time getting it to stay tensioned. Teaches me to let things stand idle for way TOO long, for sure… 8-(
Lesson learned, don’t neglect the shop or you will pay the price… ;-)

HorizontalMike
S**t happens.
Sorry for you.
About the thickness of the drawer bottom the main factor in addition of the size is the weight: what are you going to put in them?
They do not necessarily need to be all the same.
If some are shallower, you will have less weight= thinner bottoms
In general I make the bottom ones deeper for heavy stuff= routers/hammers/pry bars and so on.Then the bottoms could be 1/2"
Frenchy
All of the drawers will be approximately 28"X24" and 7" deep. That comes up to ~2.72 cubic feet of storage in each drawer. That is a lot of storage capacity and like just about everyone else on the planet… “If you build it, they will xxxxx [fill it] …"
;-)
HorizontalMike
What are you going to use for drawer slides?
Full extension with ball bearings?
Frenchy
No drawer slides. Going for simplicity, and since the shelves are 3/4" I don’t see them wearing out. Since I am planning on having 5" and 3" vertical facing boards to help with torque issues, I will probably lay down wooden guides along the sides where these overlap, just to keep the drawer movement square, but nothing fancy.
I may also coat the shelves with a wipe-on varnish to help with longevity and to minimize splinters, but that is about it.
HorizontalMike
Because of the weight in the drawers, no slide might make them very difficult to open and to close.
Frenchy
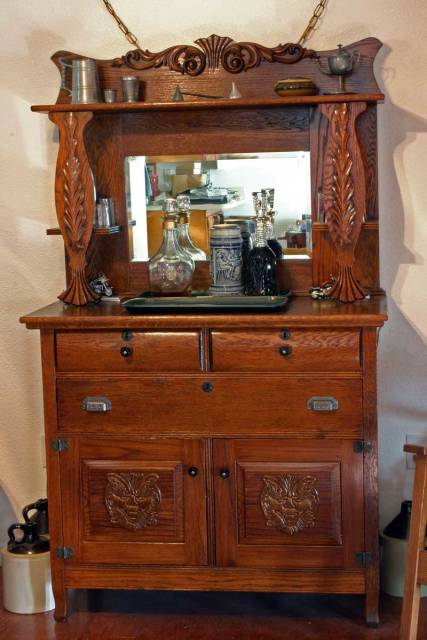
Our +100yr old bar/sideboard has a large ~34" wide drawer close to the size of those I am building for the planer table. None of the drawers in the old bar have drawer slides. It is just wooden drawers sliding on wooden frames and nothing more. Obviously I can see some wear and tear at this point in time, but it is amazing how well this system is holding up. 8-) Heavy yes, but not hard to open when loaded (just tipsy if pulled out too far).
HorizontalMike
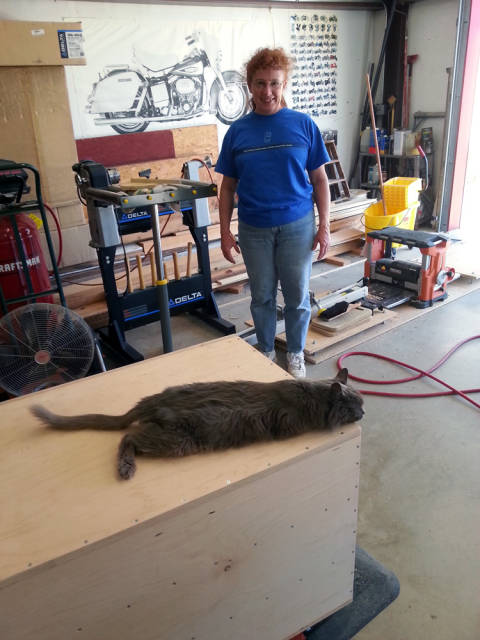
Well, after taking a few days off to do other things and pick up a couple of rare handplanes off of fleaBay, I got back to working on this. Took nearly two 30gal bags of planer dust to thin and shape my facing boards, but got’r dun… and started gluing them up. Due to size, I had to rely on weights instead of clamps on the verticals. * And yes, I scraped the squeeze out after it got tacky ;-)

When I got to the horizontal facing, I finally wised up and dug out the brad nailer. After cutting/sizing these the pieces decided to warp a bit. Nailing these down while gluing proved to be the best way to minimize drifting, as I nailed the glued ends first and then bent/warped the center into place and nailed a couple 1 1/4" final brads in the center to hold them there until the glue set.

By the time I got THAT done, my helpers put an end to my shop day and halted work. ;-)
I swear that Gray Cloud, the cat, is a boneless cat. No matter how you set this cat down, it just stays… and then falls asleep… Zzzz….
But anyway, supper was ready and Leslie wanted me to come eat. 8-)
HorizontalMike
BarbS: “…One thing I’d suggest on your cabinet is an inset back of 3/4 ply to square it up. In fact, on such a large cabinet, full legs with inset panels may be the way to go. …”
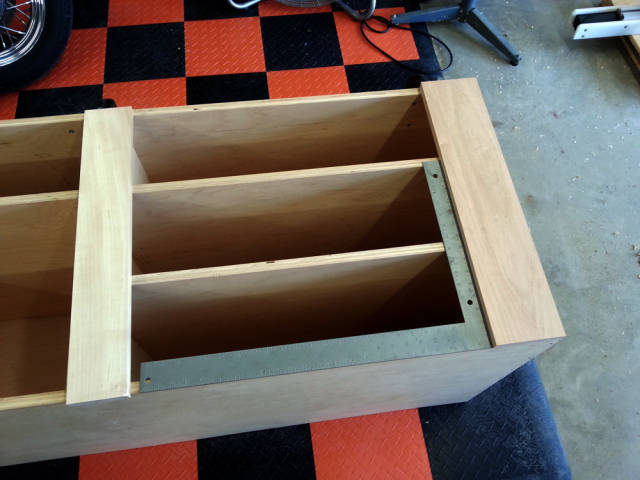
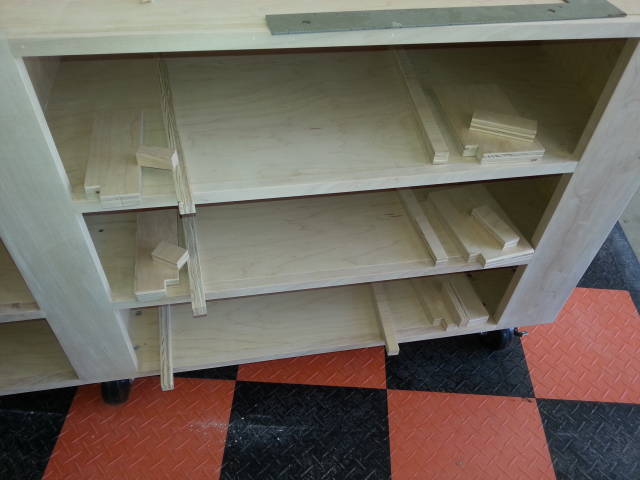
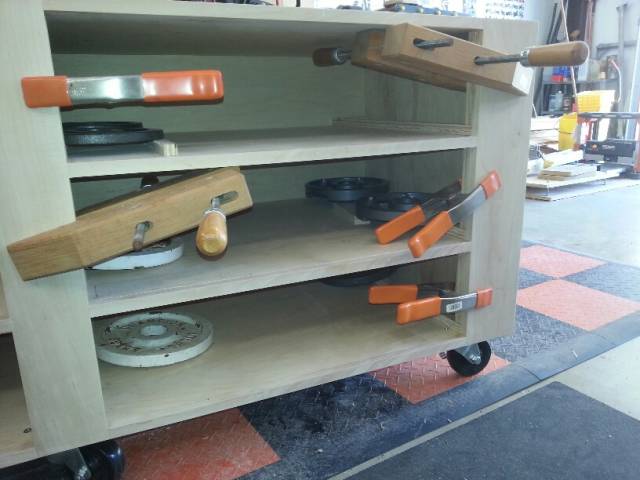
OK Barb, here is what I am doing as a “3/4in insert” right behind all of my vertical facing boards. I went with 5in outer and 3.5in inner verticals (because of available lumber. I am backing each facing with 3/4in ply on each shelf.
I barely got all of these cut and sanded when my 1/4 sheet sander decided to start throwing parts and locked up… 8-( …Still need to glue in place along with the shelve guides.
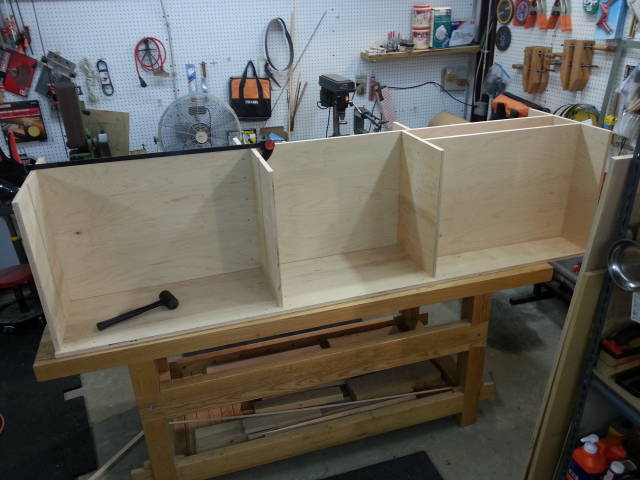
The first 2-images show the insert/drawer-guides setting on top of the cabinet, approximately how they will be glued in place behind each facing. That means that the front “pseudo leg assembly” will actually be 5in X 1-1/2in from top to bottom. Hopefully that should deal with any racking issues.
Last image are all the parts reading for a glue up. FWIW, each insert had a unique width since my vertical inner walls were offset for setscrews.
Overall, I think the minimal capacity lost is well worth the advantages of squaring this up nice and sturdy. Thanks for the idea Barb!
HorizontalMike
Looks to me like you’ve done everything you can do to prevent wracking, Mike. It’s going to be a Beast once it’s loaded with storage drawers. It might have the capacity to move, but it may take you and three others to move it! Looks great, though.
Might As Well Dance : http://barbsid.blogspot.com/
Hi Barb! I got your recommendations glued up in the internals. Been slow getting to the drawers, but will get there.
HorizontalMike
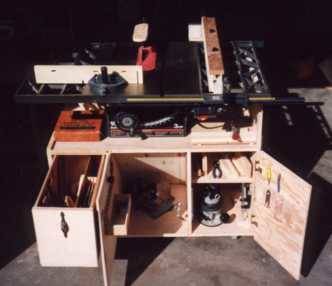
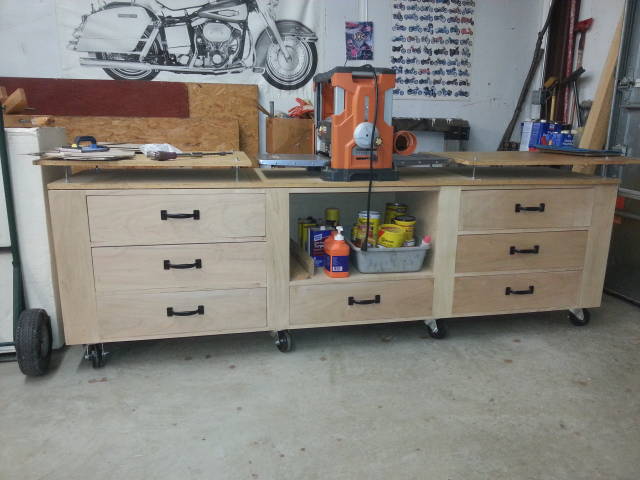
Yeah, I know that I started this blog TWO years ago… I did actually finish the drawers and put it to use in February 2014. I just never got around to posting it and I decided against putting any finish on it since it is/was shop equipment.
Anyway, here it is:
FWIW, I did dados on all four side/front and glued ALL sides of the 1/4" plywood bottom for added strength. The drawers measure 27″ × 24″ × 7″ and hold a lot. I have tried to limit how much brass and lead I keep in any individual drawer (reloading supplies) because of the extreme weights involved.
Got door handles on ALL sides and ends in order to be able to move this monster on 8-wheels. Added them after this image was taken… Heavy, heavy, heavy… My guess is north of 3-400lb, after all the cabinet is 2′×2′×8′ with my planer table on top of that.
HorizontalMike