Share your craft projects
Make new craft buddies
Ask craft questions
Blog your craft journey
14 Replies

Here’s an example. I think only one side of this octagon does not have a nail hole.
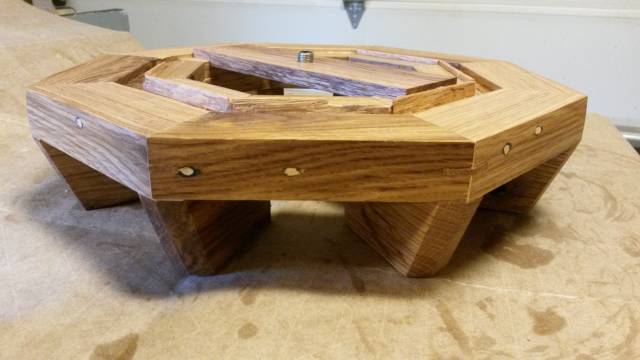
However, it sure finishes nice. This is just a coat of danish oil. The color sure came out nice.

On a side note, is there a clear finish that will make this thing sparkle? I seem to remember a friend using some kind of gel to get the grain to sparkle in the light. It was beautiful.
Losing fingers since 1969

Most people use pallet wood because of the distressed look that the color and nail holes give it. You are very brave for using a planer and jointer on this stuff even with a metal detector. They seem to get a little nail happy on the pallet assembly line. I will say, this is the nicest thing I’ve ever seen made out of pallets!

I haven’t worked with pallet wood…yet, but…if it’s reclaimed wood, are the nail holes such a bad thing? To me, they make the statement, “I’m made from a worthless old pallet, and here’s the proof.” As long as the holes don’t impede the structural integrity of the project, I would be proud of them. They make a great conversation starter too. “Why are there holes in that lamp base?” “Because it used to be a busted up old pallet I found.”
Of course, that’s just me.
Where are the band-aids?---Pro Libertate!
I hear you on the brave part. The metal detector works well. It picked up a couple of staples I missed earlier. I think the real danger is an embedded stone. Unless it’s mostly iron, the metal detector won’t pick it up. A thorough visual inspection is absolutely necessary. And thanks for the complement! I have to say, the picture doesn’t do the real color and finish justice. It nearly sparkles as is. I guess it may have something to do with the weathering of the wood. It sucked up the danish oil pretty well.
Losing fingers since 1969

If you can-not hide the holes then turn them into a design element. I did this some time ago.
http://lumberjocks.com/projects/82410
Tor and Odin are the greatest of gods.

I’ve never used pallets myself. I’m too chicken. From the possibility of tearing up your blades, to all the hoopla about chemicals and such in the wood (I hate wearing respirators, or even simple masks, though my wife makes me sometimes!). Also, most of the pallets I come across are just pine, and usually they are rotted. That being said, I don’t think its such a bad thing to have those nail holes. They don’t look bad. Show them off. Be proud of them. You’ve got that “reclaimed lumber” tag going for you, and the wood really is looking good!
If the nail holes bother you apply a molding or veneer .
I have some shelves full of pallet wood and sure comes in handy and the price is right .I only use the top and cut the pieces in between the skids that seem to solve the nail and rock issue but there is always the possibility of contamination so I look for pallets that I know what they have been used for and never use the wood for an item that will come in contact with food or be made into a toy .
All this applies to any lumber because you never know the complete history .

I think it gives a rustic look.
You making some good progress.
The glue up came out nice and crisp on the edges.
Abbas, Castro Valley, CA
Every time I fed one of those reclaimed 2×4 through the planer, I was scared it would ruin my blades.
Abbas, Castro Valley, CA
Madts and Keifer, both great ideas. Too late now but next time.
And that reminds me of doing some cabinet repair in one of the buildings I work at. There was a problem with a narrow cabinet. The horizontal pulls would hit the wall on one side and the microwave on the other and neither door would open fully. Nobody was willing to shell out for new doors so I turned the doors upside down and put the pulls in vertically, which allowed them to open fully. Only problem was the old holes, now at the top of the doors. I filled them with wood putty and then used these wax pencils minwax makes in different colors to match the veneer. Those holes became completely invisible after a quick wipe down with furniture polish.
Hehe… As long as I’m on the topic… In my home office, the desk top is solid oak and for the work surface I bought a glass table top from IKEA and routed the oak so the glass would sit flush. Well, as a newbie with the router, of course I took out a chunk that wasn’t supposed to be taken out. That would be a hole next to the glass. I was so upset over that screw up. It was big too – about 3/4" across. I filled it with wood filler and sanded it down thinking that it couldn’t possibly look worse than the hole. Then I remembered my cabinet repairs. I took a regular pencil and drew in the grain of the wood. After applying polyurethane to the top the hole repair almost completely disappeared. It’s camouflaged so well that nobody – even critical people – has ever pointed it out. LOL. Good save on that one.
Losing fingers since 1969
Ian, it’s not quite as crisp as it appears. There is a little wood filler in a couple of the joints. Getting a perfect fit is really difficult with so many pieces. If my jig is off by 1/100th if a degree, which it certainly was out much more than that, those tiny mistakes are multiplied by the number of pieces. And there’s no give with these blocks so wood filler it is. I wish at least it was out the other direction so the inner edge were the one with the gap instead of the per edge. :-(
Losing fingers since 1969
I have found that I can get perfect joints like yours, buy gluing it up in halves. Then hot glue the halves together. Find your narrowest saw-blade and cut the hot glue seam. Voila, all the seams are perfect.
Tor and Odin are the greatest of gods.
Brilliant! That is definitely going in the vault.
Losing fingers since 1969
Here is a board with a sanding belt stretched over it but sandpaper glued to a board will also work .
This could be used for your joint gaps by making two halves and then jointing them on this but the board has many other uses around my shop like leveling a box bottom or sanding small parts ETC.
I clamp my board on the extension table of my TS which has a vise .
The other thing you can do is clamp the pieces to a board and use a dowel saw and recut the joint kind of what Madts suggested .