Share your craft projects
Make new craft buddies
Ask craft questions
Blog your craft journey
Mike_190930
43 posts
and
4 followers
in almost 3 years
in almost 3 years
More from Mike_190930
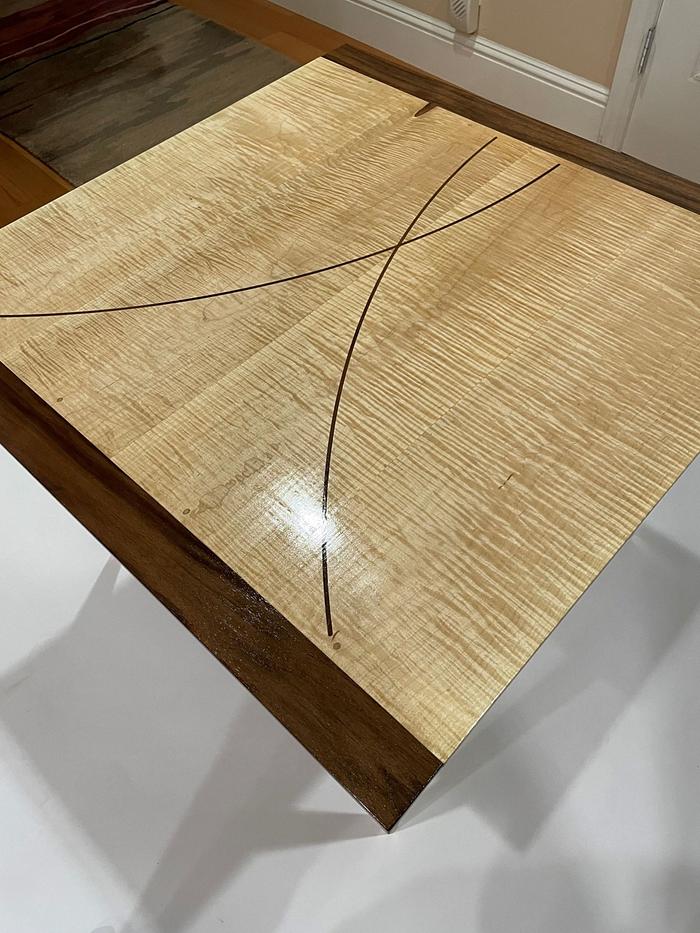
Corner Table in Walnut and Curly Maple
This was posted a couple of years ago on another forum, but it turned out so well that I felt compelled to share it here as well.
This was for one of the few occasions when I build something for my own house. A new end/corner table was needed at the junction of two couches that are positioned at right angles to each other.
Many years ago while at the lumber yard, I found a wonderfully figured piece of maple amidst a pile of normal 4/4 maple boards that I was purchasing for another project. When I pointed out to the yard worker that this board was not like the others, he just shrugged and stated flatly that if it was in that pile, then it goes for the posted price. Not one to quibble, I plopped my cash on the counter and ambled out with my haul. Since it was only 5/8" thick and highly figured, it did not fit in with the project at that time. It sat around for three years until a prospective customer wanted it for a project he was putting together. But he never seemed to be able to pony up the $100 down payment: a good practice when dealing with unknown clients so I can at least cover cost of materials if they ghost, and ghost he did. So when I needed this table, I decided to use this rare find for the build.
The dark woods are black walnut, the top is the curly maple, and the cat feet are white maple. The curly maple has a lot of high angle grain, so a combination of a Shelix carbide cutter in the planer, a drum sander, and some significant hand sanding afterwards got down to a smooth surface. The main top is glued up using 5 dowels per joint to pull out the slight bow the board had acquired while in storage. I used 1/4" dowels in place of biscuits since the board was about 9/16" thick after smoothing.
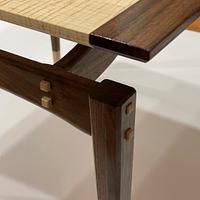
I used breadboard ends to additionally stabilize the ends of the thin top boards, and used (nearly) hidden 1/8" hard maple dowels to attach the walnut end to the curly maple. I wanted the strength of the maple for the dowels, and also did not want the dowels to show. So walnut dowels were out, and the maple dowels had to be on the maple side of the joint. This meant that the traditional breadboard mortise and tenon positions had to be reversed (tenon on the walnut side) so I could position the dowels on the maple side. This actually made cutting the long walnut tenon easier than cutting it into the table top. Two passes of the bread board ends through the table saw created the tenon. Similarly, a single pass of the table top ends on the table saw created the mortises one each end.
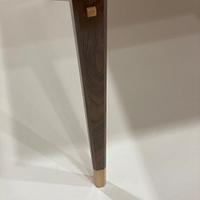
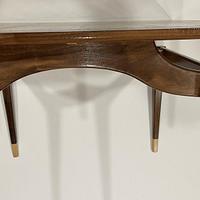
For the frame, the cross members and legs are attached with maple floating double tenons in thru mortices; the square "buttons" are actually the tenon ends. The cat feet (last two photos) are attached with internal floating tenons to strengthen the otherwise end-grain glue joint. I could have done the top inlay with a template and hand router, but opted to use the CNC router with a 1/8" bit in a single pass. The inlay is a strip of walnut thinned on the drum sander to 1/8" and sanded flush after gluing in place. The 1.25 degree leg tapers are cut on the table saw. Finish is 5 coats of wipe on Minwax satin Tung oil varnish.
Huh? Whadaya mean it ain't "measure once cut twice"?
10 Comments
love it mike, nice design and that top just glows. i sure would not have hesitated to snag that beautiful maple at a lower price.
working with my hands is a joy,it gives me a sense of fulfillment,somthing so many seek and so few find.-SAM MALOOF.
Great design features. It gets better the longer you look at it! Nicely done.
Ryan/// ~sigh~ I blew up another bowl. Moke told me "I made the inside bigger than the outside".
Awesome!
Musta hurt having to pay the going rate for standard maple when buying that "freaky" board 🤠
Great job on making the most of that great figure!
Musta hurt having to pay the going rate for standard maple when buying that "freaky" board 🤠
Great job on making the most of that great figure!
Wow - so nicely done! That figured maple is spectacular and your design highlights that so well.
Love the contrasts. I sorta like lift tables so it works for me all the way around.
Yeah, to have to pay going rate for that diseased board, there should be a law.
Nice work.
Yeah, to have to pay going rate for that diseased board, there should be a law.
Nice work.
Nice looking table, good design
Ron
I too like the design.
Really nice work.
Really nice work.
Petey
Beautiful design!!
Cheers, Jim ........................ Variety is the spice of life...............Learn something new every day
Mike,
Your table is fantastic. Your board pick was the chosen one.
Your table is fantastic. Your board pick was the chosen one.
daveg, SW Washington & AZ
Looks great Mike, nice use for a beautiful piece of wood.


