


Share your craft projects
Make new craft buddies
Ask craft questions
Blog your craft journey

Kaerlighedsbamsen
179 posts
and
13 followers
in over 3 years
in over 3 years
More from Kaerlighedsbamsen
Wegner inspired dining chair series #2: More testing and narrowing in + some toolmaking
This is
part 2
in a
6 part
series:
Wegner inspired dining chair series
-
Laying out the project
-
More testing and narrowing in + some toolmaking
-
Shaping the back seat
...
- Laying out the project
- More testing and narrowing in + some toolmaking
- Shaping the back seat
...
This summer i have succeeded in having a whole week with only me, my summer house and woodwork. No work, no children, no nothing. Oh bliss!
This week i intend to get as far as possible on my wegner project and also share the progress in order to pay back a little on all the great inspiration i get here.
It is now time to do a full scale prototype with turned legs and hopefully get some uncertainties cleared away and narrow the difficult parts down to a few. Lets rock:
Pulled out my UCCL (Ultra Cheap Chinese Lathe) and sharpened the chisels (are they called that..?) Despite being of questionable quality it works fine for turning between centers. Did most of the work with a skew chisel in order to cut the pine reasonable clean. For some reason i find pine really difficult to turn nicely.
Inspired by several others here i tried my hand at making story sticks for the measurements. Worked well and gave a pleasant relief from all the measuring and numbers often involved in prototyping. Will certainly be using more story sticks in the future.

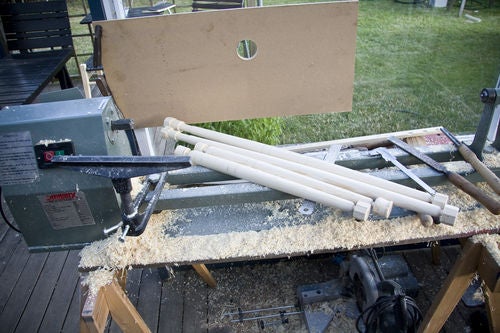
Then on to drilling. The drill-nerf-gun described in my last post worked ok but was a bit rackety so souped it up with doubble drawer guides and a steady base:

Made a center jig for the round legs and drilled away. Just eyeballed the center of the legs and that worked fine. But had trouble determining the not-quite-90-degrees angle to the other holes. For the final chairs i need to devise a manner to control that angle perfectly. Any ideas are welcome!

For the first prototype i just used dowels from the lumber yard and they are nice and just the right size (22mm). But I want to make this project out of elm and it is not possible to buy elm dowels and also i want to make them myself! So time to make a dowel making machine. For this project i made a woodgears inspired dowelmaker. But things are a lot different at 22mm and i had to do a lot of fiddling to get it right. In order to get a perfect cone shaped hole there was, as so often before, help to find at our own MaFe:

Tried at first to use the lathe to turn the wood and hold the cutter by hand. But this did not work so well and the cutter had a tendency to wobble and cut to rough (notice how worn down the plane blade is):

Much better luck holding the cutter in the vise and use the drill to turn the wood. Used a socket wrench as a driver:

This produced lovely pencil shavings by the bucketfull:

The result is much better but not super fine. After a sanding in the lathe they looked ok. Hope that elm cuts nicer than pine!

Then a testfit and a glueup. Looking good so far:

And weaving another seat. Getting considerably faster at it:

Status and lessons learned so far:
- Use story sticks!
- Got the angles of the legs right
- Think the legs need to be about 2 cm longer. And the back rest 3 cm lower than anticipated
- Still like the seat and material. But are uncertain if 22mm dowels are strong enough. Might need to go for 24mm and make yet another dowelmaker. Perhaps only thicker dowels in the top rails..?
- Prototyping is fun!
Think i'll end this part here. Next part is about getting the most difficult part right; the back rest.
Hope you enjoyed reading!
"The good chair is a task one is never completely done with" Hans Wegner
2 Comments

Welcome, Ty! It's a treat to watch your progress on this project again. Clean, precise work, and the portable drill press is ingenious.
Thanks Ross! It is nice to revisit this project for me as well. It was pivotal in my woodworking journey and set the standard and direction for a lot of my later work. - Did ditch the portable drill press though..
"The good chair is a task one is never completely done with" Hans Wegner