Share your craft projects
Make new craft buddies
Ask craft questions
Blog your craft journey
GeorgeWest
3479 posts
and
20 followers
in about 3 years
in about 3 years
More from GeorgeWest
Knife swap 2022 entry
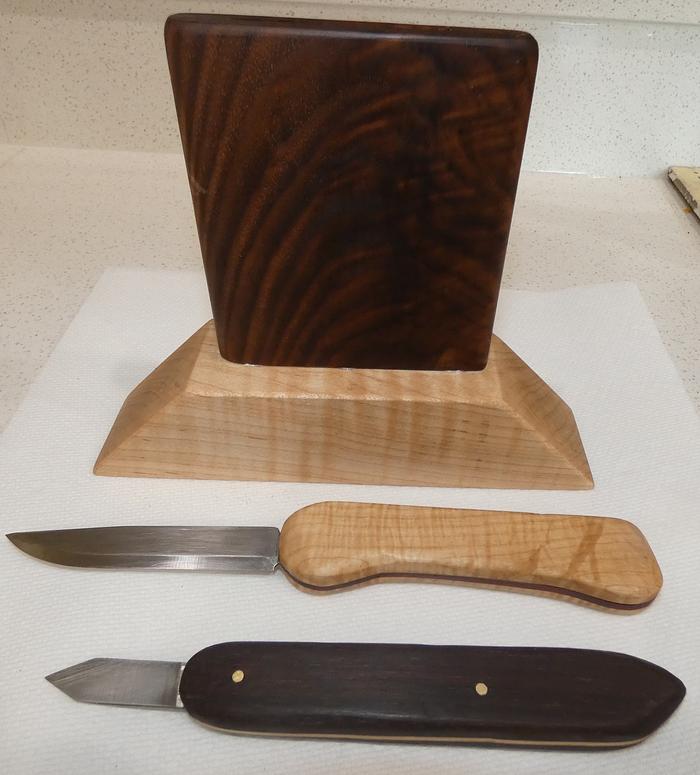
Over the years I have made many a sharp edge tool, but up till now all of them were of rudimentary design. Saw blades sawed to make scraper cards, a variety of crude holders to attach a scalpel blade to, things like that, so this swap was something new, to make a knife. So far I have made 11 of them now, and have about 16 to go before Christmas. Knives are to be the gift of the year for the guys. I did not, like some, make my own blades, rather I bought pre-made blades, and knife kits. Of those I did get quite the assortment. Hock's to lower priced kits off Amazon. A few Kitchen knives, mostly sheath knives, and work/shop knives. Much of this posting shows several Mora knife blanks turned to working knives, and a marking knife.

For my offerings, I was leaning toward shop use tools, and figured one to be a marking knife. I don't think enough good can be said about them. I sometimes use a pencil to roughly mark wood, but when I get down to finish cuts, I use a marking knife. They split the fibers of the wood, so when sawing through the line, you lose that frayed edge you often get on a crosscut, they leave a handy registration mark if you are using a chisel. Just do much more than a pencil line does.


Reading threads, and talk at the start of this I was pointed at a previously unknown for myself. The MORAkniv. Swedish steel, seemed very similar to the world-famous French Opinel, of the Pearwood handle, a folder that most of us has likely had at one time or another. These Morakniv blades and knives are often used for carving, and shop use. Certainly sharper than an Oplinel, as my slit fingertip can attest, just barely bumped it before I got the tape on. That is something you only let happen once.
I looked online, and most of the people making handles for a Mora were making a rounded handle (fat hotdog), and a lot of them were drilling out the end where the blank set in. I tried this on several and found it to be very hard to "drill" a proper mortise, Mine done this way are functional as knives, just not very pretty, so I only did a few that way.
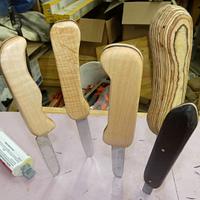
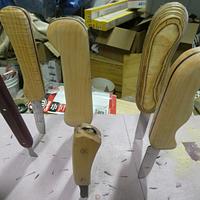
What I found that worked the best for me, was to make a standard set of knife scales, and have one for either half. Between them I would make a contrasting colored material, that approximated the thickness of the blades' tang, then traced out a rough outline of the tang, and sawed them out. A BS, Scroller, or even Jig saw, and I suppose a fret saw could be used. Plus I feel that they also lend themselves to a better feel in my hand, than the hot dog shape.

Here the outline of the tang really need not be perfect, because you are going to cover it with the scales, and the flare of the blade will cover the entry point. What worked best for me on glue up was to glue a scale, to the filler strip after shaping them to your final shape. After that glue/epoxy dried, then you could glue in the blade if you didn't on the first glue up. Last you could glue on the last scale. I found this kept the slipping and sliding to a minimum, and this can be a huge issue. Tape and clamps seem to increase the slippiness from my perspective, and if you trust them for location, and allow them to dry "goofy" you could have issues going forward. Using pins is the best way to hold things still, HOWEVER these Moraknivs aren't drilled for them, and the tangs are like a dogs hind leg, so alignment if you decided to drill their skinny tang yourself could be an issue.
It is this same dogs hind leg, that almost makes it mandatory to bury the tang of the Mora's into the handle though, or your handle would be very roughly made, and more stick like, than handle like. This is most seen on the Mora #1, and #106's sold at Amazon which is what I used the most. The Mora 2000 which has a bigger heavier blade, has a much more normal drillable tang. With a 2000 you could easily drill out the tang, and pin it like you can with so many standard knife blanks. Just something I didn't really appreciate, until I was dealing with it.
So essentially I just cut out some nice looking scales, and started making knives. Mostly it worked. I played with materials used, and found a few ways to make a really low cost, but pretty high impact looking knife, and I haven't even gotten to slicing scales at an angle, to make up some scales with a combo of woods, or materials. Thing is, there are so many different ways to approach this, deciding which is probably harder than the actual doing.

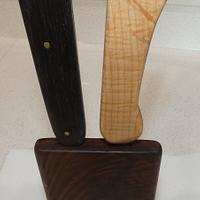
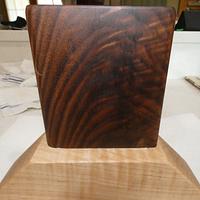
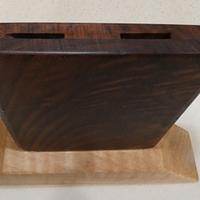
It was after I'd made a bunch of knives that I really ran into my first roadblock. I had planned to make Leather sheaths. I don't possess the DNA to do fine leather work it would appear. At least, what I was putting out was pretty disappointing to me, and I didn't want to send it out. Maybe Kydex would be kinder. So my sheaths are essentially knife blocks, that you could snatch up and bring to where you wanted the knife/knives, and they would NOT want to be rolling off your bench, then when you were done you could plop them back into their little keeper place. Sweet looking woods to the rescue...
About now I was ready to slap some finish on these pups. Mostly to "OIL" the wood, and get some pop going of the wild grain. A lot has been written recently about Tung oil. I went a different direction. I used 100% real Walnut oil. I have liked what it does for wood as a "wood conditioner" I used it on plane bodies, and other wooden tools I am trying to renew. The bottle in the pic is over 10 years old, and it looks full, however I have used it a number of times already, once on a LARGE tool chest of Walnut that had been stored in a working barn for something like 50 years before I saved it at an auction. The wood was Arid when I started. I wiped it down with a damp cloth, let that settle, and lightly rubbed it down with 320 grit. Then I tack clothed it off, and put a fine layer of the Walnut oil on. and it's been fine ever since. So that almost full bottle of Walnut oil has been used on a large square foot area, and is still as fresh looking, acting, feeling, and smelling as the first day I opened it. Meanwhile, I have the same sized Tung oil, that is only 3 years old, and in a conditioned space it has separated terribly. I'm not sure if I can still use it. Price for the 2 is similar.

The Walnut oil dries very fast, fast enough to recoat in 4 hours (70 degrees) if wanted, it dries off quickly, and once dry I use some Renaissance wax to give it a nice feel. For tactile stuff it's a go to for me. Over the years it's been good to me. My other is Howard's Feed and wax.

During my buying spree I also got some "do it yourself" kits from LV, and sent a few of them along to Dick. Something to do on a cold Winters night. I put together one of the kits I sent him. The wrapped Japanese knife, and it has a killer blade that could be a real helper in the shop. What I missed it has an almost childs like smallish handle. Useable, but I plan to add some bigger scales on mine once I get Christmas work done. The other is a big I dunno know. It is a folding knife, with a very small wooden handle (3 of them, you pick which to use), and it's gimmick is you can etch the blade. They send along a small battery powered engraver. The engraver could be fun, we'll see. From his comments I see Dick also thought about the same of the bonus gifts as I did. I think RE-GIFT is a possibility here.


The small knife in front is the Japanese knife assembled.

As has been my experience these swaps are some of the sites most active makers/users, sharing with each other their gifts, and we "swap" something that is predetermined, this go was knife/knives. I have been in several of them now, made a bunch of good friends, and had a blast every time. Highly recommending joining a swap if it's something you feel you can handle. A lot of folks say it stretches their past boundaries in the shop. The ONLY criteria is that you try, as hard as you can to make what the subject calls for, and play along in the discussion as the swap goes along. That and have fun.
I tried to write this for a how to, not so much for the guys in the swap, it's obvious they all have methods, likely better than mine on how to make a blade, and a knife. I was trying to help a NOOB to knives see into how I figured mine out. If you have any questions. let me know below, or PM.

Knives are those great kind of project that you can do while also doing a bigger project, but you start one, and a day or so later you are done, Quick easy, give that positive we get on completion of a project, and make good gifts, everyone uses knives.
9 Comments
Nice write up.
Half of what we read or hear about finishing is right. We just don’t know which half! — Bob Flexner
Nicely done!
Ryan/// ~sigh~ I blew up another bowl. Moke told me "I made the inside bigger than the outside".
These all look to be great gifts. Nice description of the process and sources.
Those are some nice looking knifes George, and the block is a great idea. I like your write up and description. Well done.
Main Street to the Mountains
nice batch of knives george.
working with my hands is a joy,it gives me a sense of fulfillment,somthing so many seek and so few find.-SAM MALOOF.
Nice, George. I left some comments on tricks I’ve picked up over the years at The Other Place. I’ll try to remember to bring them over here.
May you have the day you deserve!
Tricks are always nice to read, and learn from.
Main Street to the Mountains
Thanks everyone. I figured these knives, and "others" have occupied a lot of my recent shop time, so something to post about. I never imagined they would be as much fun as they have been. If you haven't tried one, you ought to give it a go.
Dave I read, and reread what you said, and likely because I am so sick right now, Influenza A, and a sinus infection, need a CXR to see if I also have Pneumonia, but they think so. Anyhow my brain is working like it's in quicksand right now, but I couldn't grasp what you were saying, maybe a pic?
Dave I read, and reread what you said, and likely because I am so sick right now, Influenza A, and a sinus infection, need a CXR to see if I also have Pneumonia, but they think so. Anyhow my brain is working like it's in quicksand right now, but I couldn't grasp what you were saying, maybe a pic?
Love the collection George and thanks for the detailed write up!
Quiet the range from an always handy marker to some nice stabby pokers.
Get better, being ill takes the fun out of the day!
Quiet the range from an always handy marker to some nice stabby pokers.
Get better, being ill takes the fun out of the day!


