GeorgeWest
in over 3 years
More from GeorgeWest
It was a lot of fun, Edited to add complete instructions
The first class was just a 6 to 9 PM deal, where he talked to us, and demonstrated making a number of pretty sweet bandsaw boxes. I learned quite a bit, and plan to start a few of them in 2025. I had been planning this, and seeing his class for them is what got me interested in attending. It was well worth the 25 bux it cost to me. He also has a great Facebook page for bandsaw boxes if you are interested. Once on FB, just look for Alex Snodgrass bandsaw boxes. This forum has at least 3 new projects a day, and there are a lot of folks on it willing to share the how to stuff. I visit daily, because it does move so fast, if you miss a few days it can take a while to catch back up.
The next day was a 9 to 5 class on making a 3D cutting board, also something I was looking into doing. In my distant past I had made several plain Jane end grain boards of just Walnut, or Maple, and we still have a few of them, though they are getting fairly worn. I evidently didn't have a good plan to keep them oiled, and the wood has dried out and suffered a bit for this.
Alex has some thoughts about end grain boards that are NOT what most making them subscribe to, but hearing his logic has made me a convert. First he only uses TBII glue on them, rather than everyone's favorite TBIII, for it's "waterproof" nature. Actually it's water resistant at best, but as it dries it is quite elastic, and on a board where it is going to face challenges of washing, and use that will stress the glue joints, he doesn't feel it lasts very long without big issues. They all involve movement of the joints, and a lot of boards, especially the 3D variety do have a lot of joints. SO TBII only. Plus after finishing a board he stops on a wide belt sander in the shop. Then 7 days later, AFTER the TBII had time to set, and dry completely, he gets after them with the ROS, and gets rid of marks left by the wide belt sander. For the week he wants them on their side, to allow for drying on both the top, and bottom.
His next treatment after the board has had plenty of dry time, is just food grade mineral oil, at least to start out. He won't wax them for several months of use. Like when you would normally think about re-applying oil, after using it, and hand washing it after use takes the initial oil out of the wood. Then he will re-oil, and after it is pretty much full, he will wax them. From then on he uses a oil/wax blend each time. He feels once the wax goes on, you don't get much oil into the grains, and pores of the wood, and he wants them pretty full to protect the wood. This where I failed on my boards all those years ago, and why they look as beat up as they are. He, and his Wife have several boards that are 25+ years old, and used daily in the Kitchen, his look good, unlike mine, so I think he's onto something.
He's an applier, not a dunker, feels dunking only gets the surface wet, but if you keep applying, unti the board is drippy, it's telling you it's pretty full. I'm seeing this on my second board, and my Sister who has the first board tells me the same thing with that one from the class, which I gave to her, much to my Wife's amazement. So I DID have to build another one, for my sweetie. I put on 2 coats of oil yesterday, and figure I have another few days of coats to get it to where I want it.
The only other thing remarkable about the class is there were NO table saws used. All saw cuts were done on a bandsaw. Actually we used two 14" saws. A Rikon, and a JET. In the past I did the boards on a TS, and much of the reason I did plain old boards is really tight bevel cuts on a TS, with skinny ass little pieces of wood, are not something I like to do. Between too close for comfort, and trapped missiles, I find those cuts some that I leave alone. On a BS, and I never considered any of the cuts an issue, and on the tightest of them you could use the wedge you were cutting 45's into as part of the safety device, and a push stick sent them through slick as can be. I think some of my past ts cuts will be done on a BS from now on. Eyes aren't as sharp. reflexes starting to suck, the BS really is a game changer for tiny bevels. I had never done them on one, thinking the saw not "accurate" enough, wrongo....
We used a jointer, planer, and wide belt sander, and the 2 bandsaws. There were 9 of us in the class, and never did we have a traffic jam, so it went smoothly.
OK, I have some pics. The "build" pics are from the class, and I don't have a finished pic of the first board, as it was given to my sister during that week of glue drying, and she and my BIL finished it. I won't see it till Christmas. My Wife and I did the second one last week, and I didn't have a camera in the shop. but we did the oil, and resting in the house, and I took some pics of that. Both of them were perfect, and looked the same to my Wife and I. Alex has a plan that is about guaranteed to make a perfect board, more on that later. Everyone in the class made a perfect board, it was pretty amazing.
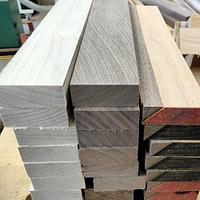
Alex, and the guys at WoodCraft had prepped the wood for the class, so we got a little pile of Walnut, Cherry, and Maple. The Cherry had a bevel we cut right at the start, and a small triangle of Walnut cam be seen on the edge. In all we did several recuts, and 7 glue ups. Stock started at + - 20" long x 3.5" wide, and it was all 4/4 stock. so around 1" thick.

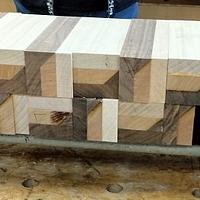
In the first pic, behind the wood, you can see off cuts from bevel cuts, so are about 1 1/2 wide, and some just little triangles. I'm gonna try to make a "chaotic" board with a pile of it I brought home, not many people were interested in the scrap, and I'm a hoarder, so I got a bit of it to work with.

The other shot shows the end grain look, and you can see the Walnut glued onto the Cherry
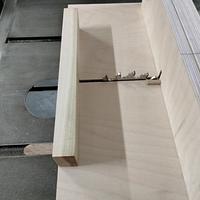
I got to gabbing with Alex, and classmates, it was a really good group, so I missed out on pics for a while, and didn't get back to them until the second to last glue up, shown below. These we put on a simple band saw sled, and cut them into 3 pieces each chunk, and these were then glued to make the basics of the board. You can see some of the effects on the ends. It was at this exact time, most started saying ohhhhhhh, ok.

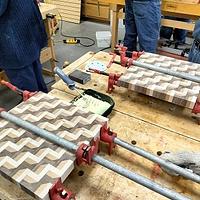
Then after they were cut, they got glued into strips, and then even the slow ones were like ummmmmmmmmm, dayuuummm, this is looking like the sample board. That last glue up, was a liquid mess. So much squeeze out, scraping and wiping, you can see the moisture on the board.

Almost the same shot, but you can see boards, and legs. Standing around waiting on glue to dry, so we could get them onto the wide belt sander. Almost done.

We were winding down, so again I forgot pics for a while, but coming out of the wide belt sander, they were flatter, but still kinda rough. Home to stand on edge of a week, in my case it was a bit longer, probably 10 days, we were waiting on Sis and BIL to come down, we figured they were gonna finish theirs. I've come up with a concept. I'll build a board, but you need to finish it, and keep it oiled, and out of the damn dishwasher. I figure if you understand the finish, and the work involved, you will be a better board owner.
Class pic.

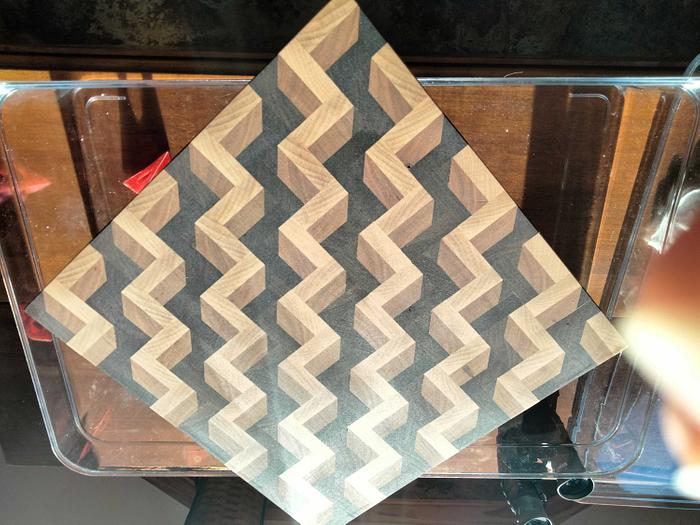
Now I typed this up back when I first finished the second board, which was done pretty soon after the class was over (Nov 22nd). I have been ritually applying more oil, waiting a few days (often ended up being a bit longer) but suffice to say a simple 2 second dunking like you see on all of the videos, only barely wets the exterior. I have 7 coats on all sides, then time to dry. Only after 7, when I added more oill did it act like it just ran right through the board. I can state emphatically the board is MUCH heavier now than before. The down side is pics of my Sisters board, prior to sanding really show the 3 colors of wood, especially the difference between the Maple, and Cherry. All oiled up they look a lot alike to me now. I still like the board, but the oil certainty darkened the wood a LOT.
Just off the wide belt sander, colors of Maple and Cherry very distinct. This pic was my class board that my Sis got

After the ROS, differences in Maple and Cherry a lot less, or maybe just the lighting? This pic is the board I made at home.

After some oil looks 2 tone.
After several coats of oil, abut the same. Tried to get it under a lot of natural light, so opened the shade on kitchen window all the way.

Meanwhile pic of Alex's sample board online, and an actual shot of it in the class.

He and I have the exact same Mineral Oil, IIRC it was the lowest priced 100% food grade sold on Amazoo

If I were to make another I believe I would take more time picking the Maple. What I had in the class was a lot whiter than what I used at home. I think this is much of why the Maple, and Cherry look same same. Or another really white hardwood, and maybe even a slightly darker middle colored wood, so the difference is notable a bit more????
I do know my Wife is very happy with her new cutting board. I am starting a few new Maple, or a mix of Maple, Walnut, and Cherry boards not so much 3D, just everyday user boards. I think this stairstep board may end up just being a display board. Probably NOT a meat cutter, maybe bread, or cheese, veggies??? Probably I will remake this board for her, and use some woods where you can clearly see to difference between all 3 woods, because that is what makes the magic happen.
I was at Alex's site today 1/30/26, and noted that now he has the complete instructions to build this board. Previously all he had was a teaser, this is "last years board" though, so looks like he has opened it up as a freebie for this year. Really fun to build, plenty of "glue up" experience if you need help in doing them, and at the end a heck of a gift, or user for your kitchen, and it isn't a hard board to complete, and using your bandsaw, I feel it's a lot safer than using a TS to make the smallest angled cuts.
36 Comments
working with my hands is a joy,it gives me a sense of fulfillment,somthing so many seek and so few find.-SAM MALOOF.

Good and thorough writeup GW.... I presume that when off the bandsaw, it's straight to the jointer? How is the thickness between boards/cuts controlled... drum sander?
From your description, the difference between an end grain and a charcouterie... other than the spelling... about 100 hours of labour.
If your first cut is too short... Take the second cut from the longer end... LBD
There's roosters laying chickens,and chickens laying eggs... John Prine
When I do end grain, I submerge my stuff in a tub of MO then into the veneer bag for a few cycles of vacuum and air pressure. Really gets into all the pores at depth.
Cheers, Jim ........................ Variety is the spice of life...............Learn something new every day
Ryan/// ~sigh~ I blew up another bowl. Moke told me "I made the inside bigger than the outside".
Ron
Good and thorough writeup GW.... I presume that when off the bandsaw, it's straight to the jointer? How is the thickness between boards/cuts controlled... drum sander?
From your description, the difference between an end grain and a charcouterie... other than the spelling... about 100 hours of labour.
Actually Alex, that is another aspect of Alex (hmm didn't think about 2 Alex's in the same statement.) Anyhow Alex Snodgrass on both his boards, and his bandsaw boxes advocates doing your glue up, right off the 2 cut ends of your piece. In use we found he was correct, and after cutting off a piece with a new, clean cutting blade, if kept in the same alignment as they came off the saw, Plus everything he does is based on his "perfect bandsaw" which he has free videos showing his set up method on you tube, and using his method, your saw will be optimal, you just need to watch the cuts, and if they do quit nesting well, it's a dull blade.
They should nest perfectly. Try it on some scrap with a good blade, I have to say I was walking around for 2 days pretty much with my mouth open, having a lot of old beliefs changed. So no, we just glued them up, no jointing edges first. It really matters on the BS boxes, because jointing them after a cut makes them shrink up, and your drawer fits are sloppy, with the board the size of it just shrinks.
Actually they had the stock prepped before the one day class started, For that they did a standard TS rip, jointer one face, one edge, and planer to consistent thickness. We went in around 8 to 8:30, class was prompt at 9AM, and all of us were done by 3PM, so in reality you could build 3 to 7 boards a day, if you got cracking, because as you go through each step there is a LOT more time waiting for glue to dry, then actually doing the steps. Being a newvb and by myself for much of the second build at home, I took longer, but I had to keep referencing back to his plan. After a few of the same plan, you would gain speed.
He sells these wholesale to a place in Virginia at $350.00 apiece, so if you found an outlet, woodworking really could pay you a living. He makes all year between shows, his Wife does the finishing. They only sell once a year a few weeks before Black Friday. He says a few weeks later the biggest account is already sold out, and begging for more stock, he just says next year. he has been doing that for 30 + years A few of us were guessing based on the numbers of boards, and BS boxes he was talking about that they probably pull in a Million or better based on his numbers. that is a pretty sweet paying part time job. But he is lightning fast, and makes NO false moves on that BS. Actually on his website Bandsaw Life if you scroll down the home page to where he has the spot about the "Bandsaw method tour 2024" he is sitting in front of a few of his Powermatic bandsaws. They and Jet are 2 of his main sponsors, and he gets every model of saw he asks for, and then goes about selling a LOT of them, so he has equipment set up for whatever job he wants them as, so he can change one out completely in minutes, or walk up to one perfectly set up, So his fast, and most peoples fast are some kinda different. His other site is also bandsaw life, just at you tube, lots of great videos. He truly is a bandsaw savant.
I think between a face grain, and an end grain is 2 to 3 glue ups, with a cutting of the parts in between each. A lot more flipping end to end, so you get rows of opposing patterns. He currently has DVDs sold through Carter products, for several types of boards, and his method of teaching is spot on. Like I said the entire class made a perfect board. Keeping in mind all of the different levels of years, experience, and abilities in 9 random people, that is a bragging type statement, but darned if everyone didn't finish, perfect boards all around, smiling faces everywhere. The person with the best board was Female, had 3 years woodworking experience, was a really sharp Woman, smart. Alex used her as his helper, and she did each step first, and though he coached her a bit more, he didn't just make her board, more like a bandsaw whisperer, and hers was biggest in size, and was a true winner. Best woodworking class I ever took, and I love me some Chuck Bender, Glenn Huey, and Marc Adams.
In your class, if I read correctly, and many woodies advocate the flooding method on your boards while TWW claims that is an unnecessary waste,
If your first cut is too short... Take the second cut from the longer end... LBD
I’ve also become a staunch believer that bandsaw drift is a myth. Sharp blades on properly set up saws just don’t drift (caveat that some really hard, wild grained woods might cause some deflection).
George, I’m thinking about you buddy. All the best. I remember the challenges you endured the first time around with the arm. You can do this!
Ryan/// ~sigh~ I blew up another bowl. Moke told me "I made the inside bigger than the outside".
No name noobie here

No name noobie here
Mike
New blades in any cutting are your friend, as is the correct tooth count, blade type, and all, will make your work easier, and with sharper edges. We used Carter blades. Go figure, Alex gets them all free. But we had 1/2" 6 TPI, and we did all the cuts on 11 of these boards, and he did a ton of check this out cuts, as we were waiting on glue to dry. At the end I started paying attention to the edges as they came off the saw, and to tell the truth they were as crisp as our first cuttings. Their blades do cost a bit more than a lot of them, but I may be a convert going forward. I still have several blades on hand, but when I need to buy. I think I may start getting Carter's. Alex, I bet gets 30% more use from a blade than I do, he is that much smoother with his cutting than me. I'm not a hack, but he is clearly smoother. A few of the folks in class didn't own a bandsaw, and their cuts were very jerky when we did do some curved stuff, and more than a few tried to back out of a cut with the saw running which lowers life of the blade by a lot of time. So how you saw matters.
Alex has a great smile, and he rolls it out talking about drift. He says it's absolutely true, drift is a real thing, gives you a thousand watt smile, and then says, it's the direct result of improperly set up saws, with weak guides, and bad/dull blades. An even bigger smile, and he says fortunately for you I am here today to show you how to eliminate all of that from your life. Begin Carter products sales pitch. I have been seeing Alex Snodgrass at woodworking shows in Ohio for almost the same amount of time as he has been doing them. I came to the first class already owning almost all of the products they sell, and have to say they all work as well as they are stated to, and I haven't noted any drift on my 14" Delta clone for ages. I did buy the 18" Rikon, just to do bigger work, and resaw, because while I can get that 14" saw to resaw. I cannot keep it resawing, unless I frequently go back and tweak it. That weak ass cast iron frame, just has too much flex to it, and quickly goes out of adjustment. Doing the scroll type cutting like a bandsaw box has, it can go much longer before you see issues, but I use that Carter small blade guide, and it does best with softer tension, than you need to resaw.
Doing that second board at home I used the Rikon. Already had a good blade for it, and it has zero flex on that heavy steel frame. Never have I seen drift with that saw. When you are seeing threads about drift almost all of the players talking about it being really bad, also have a 14" Delta, or a clone BS too. You just don't hear folks with new model BS's saying boo about drift. I think that more than anything speaks that drift is something that can be adjusted out. With those round top 14" saws, you just can't keep it that way. Even a cheap 10" saw with the steel frames, can keep adjustment better than the flexy cast ones, especially if you swap out the cheap guides, and components. Stuff they go cheap on are thumb screws, they have poor threads, and tiny little paddles to turn. For not a lot of $$$$$ you can buy really well threaded ones with big honking paddles. Difference in use when adjusting is night and day. Those Carter guides are top end, and would likely improve adjustment of any saw. I have no issues adjusting my Rikon, if I ever start thinking I do, I'll swap to the Carters. I have already swapped a few of the thumbscrews on that saw, ad my fangers love it.


