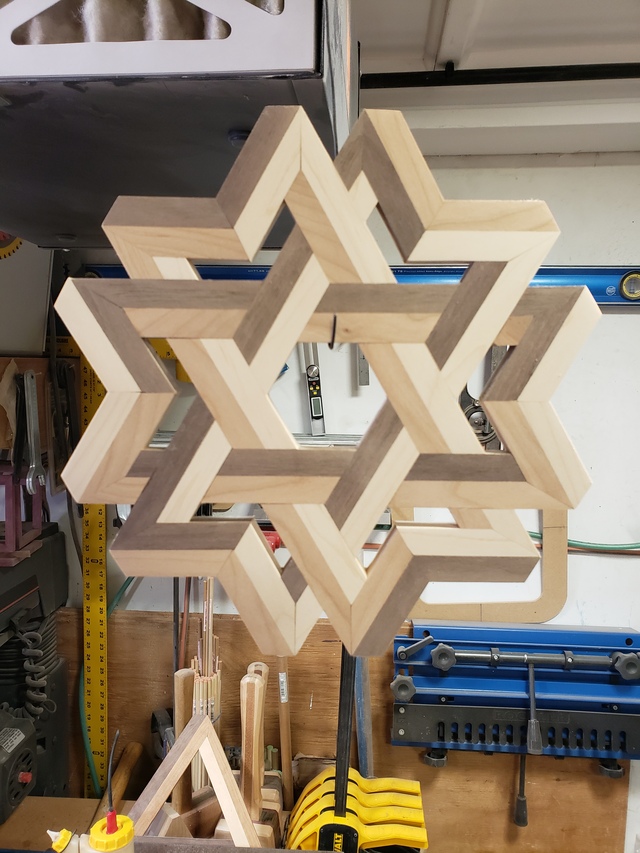
Ryan, I have an ancient piece of melamine that I use to draw the design in pencil. When complete I calculate the miters and factor which species for which location. I use the same melamine each time. This means for a new to be set in pencil, the old has to be erased. While I have made multiples of some, once the eraser is done no copy will be made. The answer to your second question is no templates are produced. Each piece is measured, mitered and fit independently. Some of my bigger ones have over 80 parts.
very cool man, i love this kinda 💩 welcome to craftisian man. i love your jumping in here right away. sad some have been here 9 years and never posted anything. hey join me and my friends on pottz patio joe.
working with my hands is a joy,it gives me a sense of fulfillment,somthing so many seek and so few find.-SAM MALOOF.
Cool stuff, Angles and tight joinery are sometimes seen at opposite ends, you have married them famously.
What tooling do you use in the cutting portion of the work? I think you would have some eager students to see you explain your process, and specifics like if a TS, or Miter saw, what blades, etc. Hand tools, what saw. I find most woodworkers are a hungry lot.
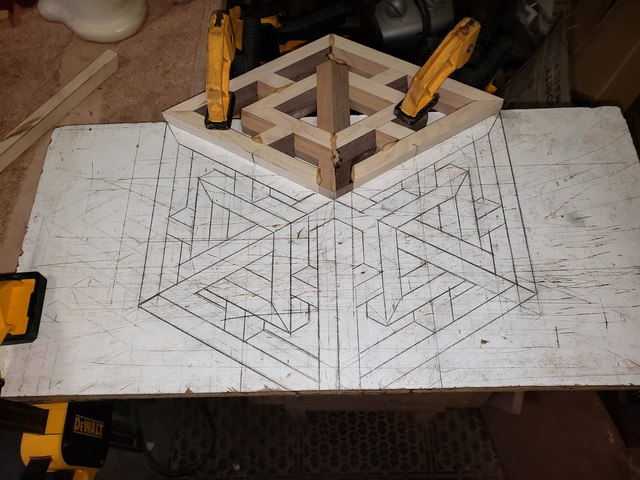
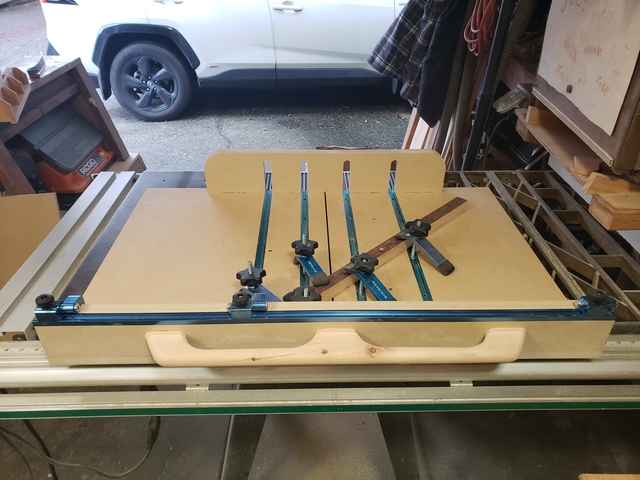
Thanks for the welcome George. Some months ago, I repurposed an old box joint jig into a precise 45-degree miter sled. It produced an experimental project that became quite popular. Having a shop that has a radial arm saw I never felt the need for a crosscut sled. Mine is set up for very accurate cuts at 90 degrees with clamp on jigs for common miters. The thought of a miter sled was never given consideration until I decided to try some interesting geometrical 3D experiments. Starting with a large format crosscut sled I inserted 4 T-tracks into the sled base. Using these I can orient angled "stops" to produce an infinitely selectable miter accurately and repeatably. What I have posted here is a small example of more than 30 designs that I have produced. I now try to incorporate only 2 miters (30 & 60) into my designs. This allows me to set the miter sled to 30 degrees and using a miter gauge on my stationary belt sander set to 60 degrees I can cut parts with a bit of XS and sand/trim them to an accurate fit.
I'm proud of you. Repurposed an older machine to work as you wanted. I was scared you were gonna say Kapex :-) From the grills on the side table looks like it may be an older Craftsman, or similar TS hiding under that sled. Certainly a Contractor style saw by the legs, so no zillion dollar saw needed.
I like your sled. I like your mindset as well, make something to hold your parts where you want them, cut only a few angle shapes so you can better zoom in on dead nutz, and finally use some manner to creep up on "exact" All that is left then is careful measurement, and always look twice, cut once. At first it is likely a trial, after a fashion it's just the next piece. For the cuts I like the sled more as I look at it. If you can eliminate creep, which locked down is the best way I know of, you can make crisp cuts. No matter what, movement during the cut is bad juju.
Cool, any special sauce for your saw blade, brand, geometry of the teeth?
The blade is nothing special, DeWalt 60 tooth. The saw is an old Craftsman 113 direct drive, heavily modified. Creep up is an apt phrase. A long time ago an old shipwright shared the secret to good fits. He called it "TNT", trim-n-try, it worked then and it works today. For gnats eyebrow accuracy a miter sled is hard to beat.