


Share your craft projects
Make new craft buddies
Ask craft questions
Blog your craft journey

BB1
4027 posts
and
38 followers
in over 3 years
in over 3 years
More from BB1


 - Project by BB1")

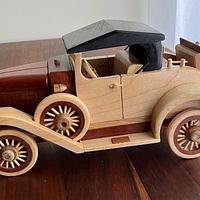
Bandsaw box #2


Second attempt at a bandsaw box. I wanted to make a container to hold my husband's "good" pair of glasses as he stored the glasses in a blue plastic container (sigh🙄). This one is walnut and maple.


Got one straight edge by taping a piece of plywood to the one side and running that along my bandsaw fence. Ended up fine for this purpose. Did this as I wasn't comfortable running a short piece on my jointer. Then cleaned up the other side.


I drew an outline of my intended shape on the block BUT then had trouble with keeping my blade on my line (need to put on my narrower blade) and veered off course. 🤦♀️Rather than scrap the project, I decided to simply call this a random pattern box. 🤷♀️ Moved forward with the drawer and various glueups.

The drawer pull was a cut-off piece that seemed to work. I had a small piece of maple/walnut as another option but decided to go with the walnut. Taped the area and used wood glue.

On the plus side, having my blade now at 90 degrees resulted in a good fit for the drawer from the start. Used router and then chisels in the corner to ease edges

I used the adhesive back felt again but struggled with the fit. I also put a piece of the felt on the bottom of the drawer so the drawer fits/slides nicely in the case. Finish is Odie's Oil.
His glasses fit just fine, and he says he likes the box.

For next time, I need to change the blade to the ¼ inch one I bought from Timberwolf. Plan to order some flocking materials to try rather than the paper. Also will better mark the pattern so I can follow the outline more accurately to what my intent is.
Once again, learning opportunities abound, but even with the oops and errors, these are pretty fun and don't take much time compared to some of my other projects. Need to start planning for #3.
Additional pictures:
Additional pictures:


The box and the blue plastic container it replaced - not too hard to improve on that!

24 Comments

Attractive box.
Ron

The shape resembles a sports car 🏎️
Nice looking box BB!
(zoom zoom!)
Nice looking box BB!
(zoom zoom!)

Barb, much nicer than the plastic box, Much much nicer. I like the free form idea, I've seen some more or less random ones that are some of my fav's. You are correct about total time, these are great as you can start, and finish one in short time. This is often the motivator I need to finally finish a larger, much longer project, that I get stalled out on. I'm on the fence about flocking. My best results are always with Black, and using the Vinyl paints instead of their goop. Colors always seem to have some sort of issue, or just poor coverage. Plus I think it's pretty expensive, versus what you get.
Lately I have been experimenting with Papers Etsy has a lot of sellers, so a huge variety is out there. My favs so far are either just what they call Parchment paper, random wrinkles is what they are, but I find corners disappear, my best other is Medieval Parchment Paper, a random pattern, filled with tons of colors, but if you stand away from it, looks like it's right. Standard Vinyl wallpapers, and self adhering felt. All of them have challenges, and definite pros over flocking IMHO. The one thing I have found consistent with all of them is cutting to fit is easier using a brand new exacto blade, and they have straight, and curved shapes, and all have pluses and minuses for each type of surface, But NOT to have to sand the insides of drawers is a huge plus.
Just know if you want to protect paper, it has to be absolutely dry after you print it or it will run. I usually let them sit about a week, and then bake them in the oven at 250 or so, on an old sheet pan I have over oven paper to keep them from seizing to the tray. I always use spray can shellac as a first coat, as anything will go over shellac, and later you can poly it if you want bulletproof.
Thanks Ron!
Splintergroup- thanks! Funny I thought it had a car-like look (not done intentionally)
GeorgeWest-thank you for that added info. I think if I traced my pieces on the paper before glueup I would have less hassle with cutting the felt paper (saw someone else do this on YouTube). Also, I just used a scissors - another clumsy way to make precise cuts.

Nice! I like it. 👍🏼
Ryan/// ~sigh~ I blew up another bowl. Moke told me "I made the inside bigger than the outside".

looks great barb keep at it.
working with my hands is a joy,it gives me a sense of fulfillment,somthing so many seek and so few find.-SAM MALOOF.

Totally can see the spoiler on that sports car!
Choosing the right bandsaw blade can be tricky on a hardwood block like that...I've made a few boxes and had similar trouble keeping those curves true to the pencil lines. Maybe not the shape you were planning on but it turned out nice!
Choosing the right bandsaw blade can be tricky on a hardwood block like that...I've made a few boxes and had similar trouble keeping those curves true to the pencil lines. Maybe not the shape you were planning on but it turned out nice!
Thanks RyanGi!
Pottz - already thinking about what to try next!
Tom - funny how others are seeing a car! I did too when it was done. 😆 I think the maple was hard maple - very very poor choice.
Pottz - already thinking about what to try next!
Tom - funny how others are seeing a car! I did too when it was done. 😆 I think the maple was hard maple - very very poor choice.
Wow that looks cute vs the standard square box or that old blue job. The hallmark of a good woodworker is not they they never make a mistake it's simply that they know how to recover.
And yes the learning never stops. George thanks for the comments about Flocking. I've had a look and like you felt it was a bit pricey. Cutting felt, velvet or anything else takes practise and I've found good shears help.
Well done BB
And yes the learning never stops. George thanks for the comments about Flocking. I've had a look and like you felt it was a bit pricey. Cutting felt, velvet or anything else takes practise and I've found good shears help.
Well done BB
Kerry - Working with wood, the smell the feel, is such a joy, its a meditation of sorts.
Aussie Larks -thank you! And appreciate the comments and encouragement about mistakes. I still get frustrated with myself, but getting better (I hope) about just working through/around the issue.
Got to thinking more about the "fixing" aspect and pulled up this prior observation from interview with Gary Rogowski in Woodcraft magazine several years ago. There was a Q&A profile that included this: "When you realize that errors ultimately guide you toward better work, you learn to handle failure in a positive manner." Well said.

Nice Band saw box, Barbara! They are easier with the end open like that!! Just a tip you might like to try for the flocking. Rather than buy one of those tubes they sell for blowing the fibers into the glue, I use a 2 liter plastic bottle and drill some good sized holes in the cap . I just squeeze the bottle and it blows the flocking into the glue pretty hard. With the small cap, it is easier to get into corners than the big round tubes they sell for that application!!
Cheers, Jim ........................ Variety is the spice of life...............Learn something new every day
Jim - thanks! Love your flocking applicator alternative. I saw one video where the person taped off the non-flock areas and then put the item in a baggie with the flakes after brushing on the adhesive, shook, and then left it overnight. That seems like a way to avoid mess if the item is small enough?

Very nice Barb! Layout lines on bandsaw boxes are just for reference anyway😉
HokieKen- thanks! Where I ended was no where near my intent so the line wasn't even a suggestion at a certain point, let alone for reference. 😬 I still had the blade that came with the bandsaw in place - hoping once I install the new Timberwolf, that I'll have better control (although I certainly am not ruling out operator error in my wandering way!).
Personally I have a 1/8” and a 3/16” blade I use for bandsaw boxes for the tight cuts Barb. You don’t need one often but it’s nice to have one on hand for that scroll work.
The new blade is 1/4" so maybe still a bit limited in the curves. Will be better than the one currently in place so will see how it goes and make sure the design is reasonable for what is possible. Steep learning curve right now.
1/4” will work fine Barb. You will probably just find yourself backing out of some cuts because it won’t make the turn in sharp corners. You’re well on your way to becoming a pro at these boxes so you’ll get the feel for it. Knowing you did that with a blade wider than 1/4” makes it more impressive! Something else to consider is that usually the smaller the blade, the narrower the kerf. So you get less gap.
Not sure how to measure these, but the 1/4 blade is much narrower than the original. 🧐 New blade is 8RK .025 and then the 1/4 width. Need to get a block glued up and see what appears for box #3.
Be careful on your tensioning, small/thin blades need much less force.
More from BB1