My first bandsaw box, and first real work on my new Rikon 10 inch 3061 bandsaw (this aspect turned out to be an issue!). Also used my larger Rikon 326 for sawing off the back and then the front/back of the drawer - thought that would be better with the resaw blade on that saw.
To start, I glued up some walnut and cherry into a block. I drew a shape on the block (no real pattern as I was fine with a "whatever" this would be!).
Worked on getting the shape cut out. That was a bit more challenging than the process appears in all the YouTube videos I viewed. 😬
Glueups followed.
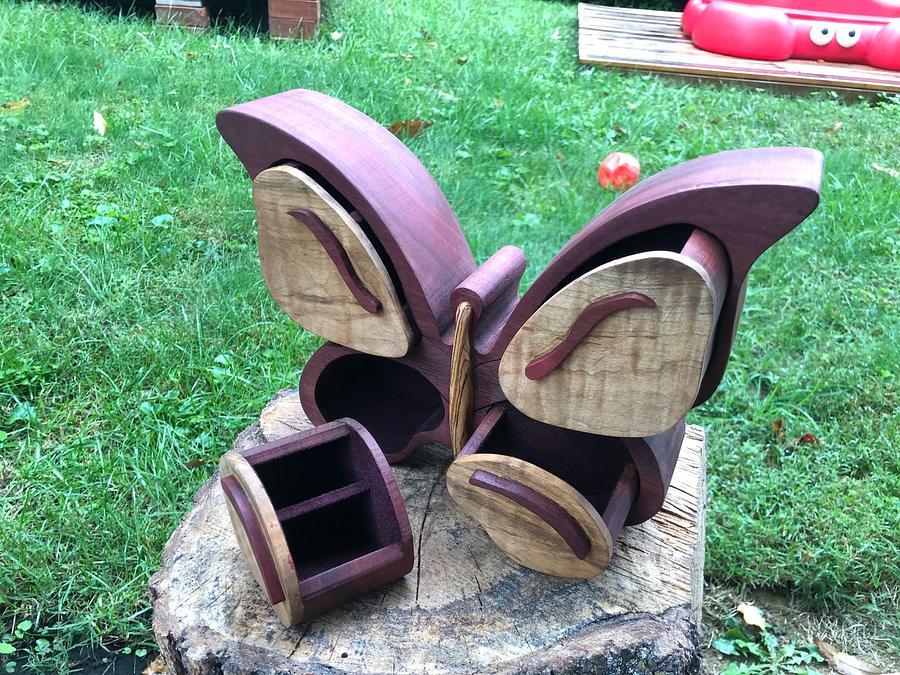
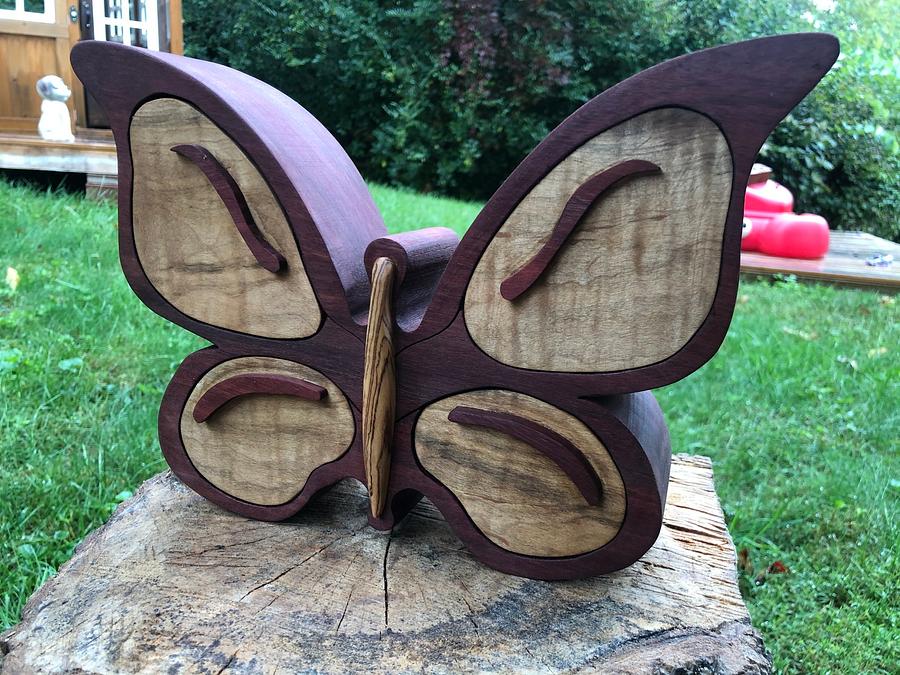
Then a major "bump in the road" on my journey to bandsaw box success. The drawer would NOT slide back into the case from the front. This is when I did a check on my blade to table position - and OH NO, it wasn't at 90 degrees. 🤦♀️ Sigh...I missed getting that checked and adjusted when setting up the 3061. I tried just sanding, and even pulled out a spoke shave, but resorted to going back to the bandsaw and trimming the drawer in the tight spots. Thus, to get the drawer in place, ended up a bit "roomy." 🙄 I also could see my entry cut in the side so did some rounding over at the router table and then decided to add some "texture" to the knob (walnut) and the front face to distract from the other issues. Worked more on the opening with sandpaper and file to try to get it smoother. Various pictures and final box:
I still need to add some lining to the drawer (should be delivered this week) and may add some drawer slide tape underneath to snug things up.
Finished with Odie's Oil. Learned a lot and already have a glueup ready for my next attempt.
Nice going, Barbara. Heck, the drawer always need sanding after cutting . You hid that cut on the front really well!!!!!!!!! Nice work on #1.. cheers, Jim
Cheers, Jim ........................ Variety is the spice of life...............Learn something new every day
Well done Barbara! Bandsaw boxes can be fun and easy projects but they also definitely present challenges! You discovered one, which is make sure your bandsaw is in tip-top shape for best results. And all bandsaw boxes have "sloppy" drawers, it's just the nature of the beast. One thing I've found that snugs them up is to widen the kerf going into the drawer and then glue the kerf closed after cutting out the drawer. This does mean though that (a) depending on the geometry, you may have to sand the drawers down in some spots to make them fit and (b) you will loose grain continuity when you reattach the back and will probably have to flush trim/sand it because it will have a little overhang.
Another way to close up the gaps in the drawers is to use a different material for the drawer fronts. When you cut the front off the drawer, use it to cut new fronts from a different material (or the same material if the grain continuity isn't an issue) that's slightly larger than the drawer and fits snug in the hole. When you do this, the drawer may sit crooked but you can either do the same thing for the drawer back or put some slick tape to level it up. Below is a box I did where I used this method. I really like the creativity that bandsaw boxes allow. But the gappy drawers really irritate the woodworker in me!
You can't tell it in the photos, but I used a "wine colored" flocking in the drawers. Instead of slick tape on the drawer bottoms, I flocked the inside of the drawer compartments as well.
Another thing I try to do when possible if doing drawers fronts by this method is to incorporate the kerfs into the design and not glue them shut.
Nice box for first try Barb. They have a lot of rules, and for 90% of them being square to the blade is a thing. Not being can make for some strange fits. That is unless that first cut is supposed to be angled as it is in this box, then ya gotta go with it, or it messes up. DAMHIKT.
So it is about how the pattern is laid out, but every type or style is kinda the same, but for it's one gotcha.
If you do FACEBOOK, look up, Alex Snodgrass Bandsaw Boxes, it is a busy group, and some really sharp minds. They are all about bandsaw boxes, and they can be a scream to make, or frustrate you to no end. If you go to Alex's group, look at the very top, and under "files" some nice folks have downloaded some plans/patterns. Another site I like a lot is from a guy who makes these plans for scroll saw use, but many are easily adaptable to work for a bandsaw. Some not so much, but it's a huge catalog, and they are free to download. I sent him some $$$$ via paypal, I use his site so often, but technically it's free. I am also doing more scrolling, and am currently smitten with making baskets, he has a bunch of patterns, with them because they nest, a blade angle is mandatory, so they will open and close.
On the fronts, and backs I usually use a 3/16" blade, with 4TPI, and I have a Carter small blade guide on my 14" saw, and it helps do the tight turns you sometimes need. I use my 18" Rikon, set up to resaw for all my front and back slab cuts, takes them off pretty slick. A trick is DO NOT sand them, and hold off gluing them back on until you are done with the all of the inside cuts. Then without sanding, approximate the back, so you are certain you have it facing exactly as it came off, and glue it back on, they nest into the same saw marks, and once you've held it a minute, a clamp will just keep it there until the glue dries. This is the best time to be using Speed set glue. Not sure why, but Amazon is 12 bucks on this, and Woodcraft is 6, same 8oz size? I'm lucky enough to have a store in Dayton, and Cinci where I can get mine.
This can be scaled up or down for size, seems the girls like it. I know all of the Niece's have one. Sanding them is a PIA though. :-)
Handles are another aspect that can become a lot of small work. An alternative is a hole in the back, where you can use a finger to poke the drawer out, instead of messing with a handle at all. One of the reasons I like them so much, so many different ways they can be done.
Many times the drawers are "tippy", and nothing you can do will change that. When that happens you may need to either use small shims to correct a droop, use magnets to do it, or just a bit of weight to balance them when sitting in the box. It becomes an each type of box design, may need a different fix to make them look right.
My last tip is sometimes taking out the drawer, makes the box look a lot bigger than the drawer you are left with to fill the opening. You can cut the box up the middle, and side to side, and doing this will shrink the box by the width of your blades kerf, each of 4 pieces, so kinda shrinks the box, to fit the drawer. As always try to make all the cuts into the grain, to camouflage them as much as possible.
Also make sure to keep track of which part came from where, and which direction. You will make more mistakes that way than any other if not, and talk about some funky boxes if you start gluing them in the wrong places.
Jim - thanks. The texturing was done to disguise various oops - my new slogan is when precision fails, try distraction 😉
HokieKen- thanks for all the tips and suggestion. Really like the one you shared. Right now I'm on the simple end of the continuum. Like the idea of flocking inside the case as well.
Pottz - thanks. I was so annoyed with myself that I didn't check the 90 - knew that was important and got in a forward progress rush (for no reason).
Ron - thank you! I can see these may be addicting.
RyanGi- thanks! Hopefully lessons learned will make the next one better.
GeorgeWest- thanks! Great suggestions. I'm on the Snodgrass FB group and I've watched several of his videos as well as videos by others. Everyone has slightly different approaches. Soaking in the info so I can figure out what works for me.
Gary G - thank you! I saw texture on another post and had used it on a sign for a wedding card box. I thought it would give this some interest, AND hopefully help cover the saw entry point (does not, but better than it was).
Steve -thanks. I wish the texture fully disguised my entry cut. The glue line is still visible but more for woodworkers than others.
Splintergroup- now that's funny! I expect you would have nested and hidden drawers with inlay and some other amazing design features.
Tom - thanks! I can see how I could definitely continue to "try this next time." I already have a walnut and maple block glued up - hopefully for an eye glass holder for my husband (shh...it's to be a surprise).
The lining arrived and I finally got it cut and attached. I used the drawer cutout to get the general shape for the sides and then fine tuned from there.
Also put some in the base to help center the drawer better (used a piece I miscut). Was easy to apply and could reposition and it seems to be stuck in place (used this product). Would like to try flocking at some point, but thus was pretty easy and definitely adds a nice touch.
Flocking is kinda messy but it holds up really well and is SOOOOO easy compared to cutting and fitting Barb. I highly recommend it if you’re going to do a bunch of these boxes. Looks like you did a great job on that one though!
I really like the color and the way that smooths out the unit!
I remember in JHS wood shop, flocking was the only method for applying a pad on the bottom of projects or lining drawers. We has a room dedicated to it as the "fluff" goes everywhere. I just remember it being super simple.