


Share your craft projects
Make new craft buddies
Ask craft questions
Blog your craft journey
Mike_190930
54 posts
and
5 followers
in over 3 years
in over 3 years
More from Mike_190930


Lithophane Exploration

This is ported from an earlier post in another place. It's about six years old, but new to here.
Lithophane is a technique that dates to pre-photographic days. An image was carved into a translucent piece of material, for example china ceramic, or soapstone, or onyx. Today you might choose corian. Thicker parts of the carving correspond to darker areas of the image, and thinner areas to lighter parts of the image. When backlit, the image appears as a black and white (aka grey scale) image.
Now, the tricky part is that light is adsorbed in an exponential fashion as it goes through the material, not linearly. So to get an accurate rendering of the grey scale from white to black, the carver had to compensate the thickness of the carving in a logarithmic fashion. If that's too much for you, and it is certainly too much for me, we can both be thankful that we live in a computer-rich era. (Well, thankful for that bit of it anyway, maybe not so much for some other parts.)
So with a little computer magic to transform a color photo into a logarithmic grey scale, and a CNC machine, we can do lithophane at home without serving a 25 year apprenticeship to a stone carver.
The images below are done in a half inch thick sheet of white translucent polypropylene (same plastic as a kitchen cutting board). I set the maximum depth of cut (lightest parts of the image) at 0.35", unencumbered by premeditated calculations; in other words, I took a wild guess.
Technique Details:
Converting the photo to lithophane file was done at https://3dp.rocks/lithophane/ , a free site. This outputs an stl formatted 3d model file. There are several other sites and freeware out there to do the same job.
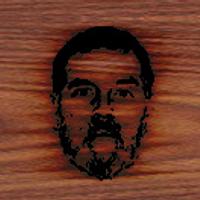
CAD program: I used VCarve Pro ver10.5 to set up the tool paths for the CNC using the stl file. I had to tinker with positioning the model near the top surface of the stock, and adjusting the z-scale to get the 0.35" or so model thickness. During import, the stl model needs to be inverted so that the 2D image looks like a photographic negative, like this.
Lithophane is a technique that dates to pre-photographic days. An image was carved into a translucent piece of material, for example china ceramic, or soapstone, or onyx. Today you might choose corian. Thicker parts of the carving correspond to darker areas of the image, and thinner areas to lighter parts of the image. When backlit, the image appears as a black and white (aka grey scale) image.
Now, the tricky part is that light is adsorbed in an exponential fashion as it goes through the material, not linearly. So to get an accurate rendering of the grey scale from white to black, the carver had to compensate the thickness of the carving in a logarithmic fashion. If that's too much for you, and it is certainly too much for me, we can both be thankful that we live in a computer-rich era. (Well, thankful for that bit of it anyway, maybe not so much for some other parts.)
So with a little computer magic to transform a color photo into a logarithmic grey scale, and a CNC machine, we can do lithophane at home without serving a 25 year apprenticeship to a stone carver.
The images below are done in a half inch thick sheet of white translucent polypropylene (same plastic as a kitchen cutting board). I set the maximum depth of cut (lightest parts of the image) at 0.35", unencumbered by premeditated calculations; in other words, I took a wild guess.
Technique Details:
Converting the photo to lithophane file was done at https://3dp.rocks/lithophane/ , a free site. This outputs an stl formatted 3d model file. There are several other sites and freeware out there to do the same job.
CAD program: I used VCarve Pro ver10.5 to set up the tool paths for the CNC using the stl file. I had to tinker with positioning the model near the top surface of the stock, and adjusting the z-scale to get the 0.35" or so model thickness. During import, the stl model needs to be inverted so that the 2D image looks like a photographic negative, like this.

CNC: I used the Woodsmith home-built CNC. The CNC is powered by Mach 4 software from Newfangled Solutions and a Warp9 Tech Design ESS motion controller. A 3/32" diameter tapered ball nose bit did the final cutting with a 15% step over.
Here is the finished product in top light:

Please excuse the faint blotches - these are spots on my old cellphones camera lens from some sort of moisture that got into it (please don't embarrass us by asking just how that happened). The blotches are not in the lithophane.
And here is the same piece in back light:

The cellphone photo only begins to do it justice. I am still impressed at the subtlety and detail the technique was able to capture.
The final cut needed a thorough cleaning because the polypro leaves a lot of attached cutting fuzzies. Next time I will use a more brittle machinable material such as corian or soapstone.
Huh? Whadaya mean it ain't "measure once cut twice"?
7 Comments


Damn M'190930, I have enough fingers in pies without another challenge to bite into my lifeline.
While I may never practice this "ancient CNC" technique, I'm sure you've provided enough info to whet the juices of other thrillseekers.
Good write up.
If your first cut is too short... Take the second cut from the longer end... LBD

The result is very cool, and the fabrication is interesting.

Interesting technique. Write up and method quite interestingly. Like the results.
Ron

It is sure nice to lean new techniques and have them come out so good. I have tried a lot of ideas and many wound up in the burn barrel!!
Cheers, Jim ........................ Variety is the spice of life...............Learn something new every day

Nice write up!
Ryan/// ~sigh~ I blew up another bowl. Moke told me "I made the inside bigger than the outside".

Neat!
Same process as macroscopic cross section from physics, who woulda thunk staying awake in physics class could help out in woodworking!
Same process as macroscopic cross section from physics, who woulda thunk staying awake in physics class could help out in woodworking!

Wow, woodworking and Rockeeet Science, whodathunkit.
Interesting project.
Interesting project.
More from Mike_190930