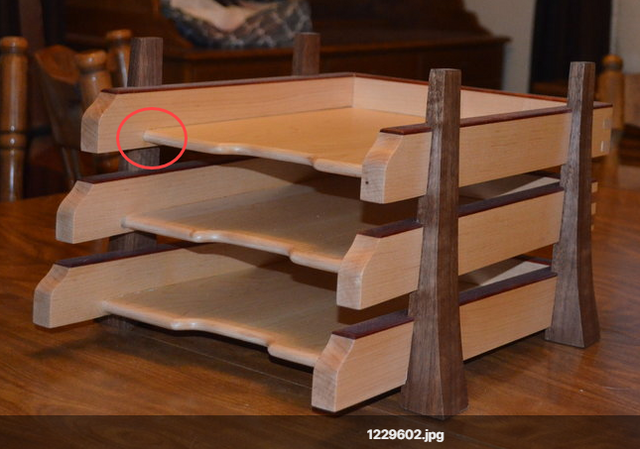
Hi Y'all I found a paper tray design (on the "old site") I'd like to copy, but I have a couple of questions about joining the bottom to the sides of each tray.
It looks like the bottom is just glued into a non-thru dado on the sides.
i) how do you get the fit at the end of the non-thru dado (in the red circle) to be perfect to the bottom? The eye will go to any gap immediately.
ii) how do you deal with wood movement here, given the bottoms are solid wood? The backs look like they are box jointed / glued to the sides.
I'm used to boxes with 4 sides and plywood bottoms - much easier.
Use an overhead milling machine with a 1/4" bit. Make bottom of 1/4" BB. Round over leading edge of bottom wit sandpaper.
If no access to OH Milling machine use a router table with stops set up. Slowly increase slot depth.
Pics seem to indicate bottom is solid sawn. Could round over leading edge of bottom with router and round over bit. Grain direction of bottom going from side to side makes rounding leading edge much less of an adventure. Leave glue off first 2 to 3 inches at panel ends, use dry wood both to help with shrinkage.
Dave has said what I was thinking. Routing a stopped dado that is deep enough to deal with wood movement side to side can work, but as Dave said you are better off having the bottom grain direction run side to side to deal with the movement.
I'd cut the stopped dados about 1/4" deep on the router table with a straight "up cut" bit. The bottoms would get the nose end rounded over with a round over or half round bit. If set correctly you'll get a tight fit at the point you indicate.
Benefit of having the bottom grain running side to side is the exposed edge will be long grain and leave a smooth finish.
The side rails can be glued to the bottom panel with glue applied to the first few inches at the front. This will keep the joint tight. The back rail will hold the rear end tight side to side. The bottom panel can be allowed to expand/contract by having it slide under the back rail and use a slotted screw hole in the center to secure the bottom to the back rail. You can get a "cleaner" structure at the back by just cutting a deep dado in the back rail that the bottom panel slides into. The depth should be enough so that the panel will not bottom out when at maximum expansion and not fall out at maximum contraction. Given the dimensions you'll probably need to make the panels from glued up boards unless you can find some that are wide enough.
Think of the tray as a drawer bottom. The slot will be as wide as the tray is thick. Grain is left to right. The tray can be made two ways. One is the same thickness from end to end, fitting into the slot. Or you can have tenons with very narrow shoulders.
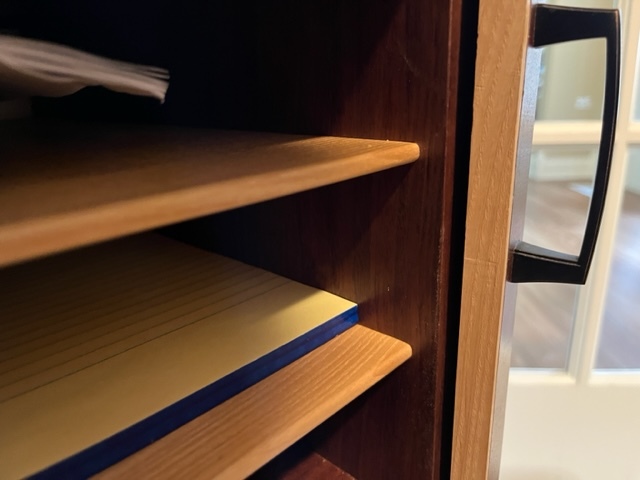
Thinking of the tenon approach you can cut back the tenons at the front side of the tray. This will create the illusion of a perfect fit. The picture below shows some trays I put in a credenza. These trays are the same thickness as the slot with the front edges cut back about a half inch. The slots are about 13" long while the tray is 13.5" front to back. In your project just cut the rear groove deep enough to allow for some wood movement
The perspective on the first picture is a bit deceptive; the trays will be say 12-14" deep and about 9" wide, so definitely deeper than wide.
Do you still think running the grain sideways for the trays will look OK? (I get the benefits in other respects - smoother front edge, wood movement etc). Seems to me grain usually is run in the direction of the long side ....
I agree with your comment as to appearance and economy of wood usage. With a design that expands along the width you will need to figure a way to allow the back rail to move at its ends. Basically anywhere two boards join that have perpendicular grain, there will need to be provisions for movement. This is where you could slot the back rail and glue in the panel at the center. Affix the back rail to the sides and have the slots in the sides deep enough to contain and hide the movement. Some method will be needed at the front to keep the panel and sides inline, possibly a dowel pin in through the bottom, through a slotted hole in the panel. Alternatively you also might be able to "hide" a thin cross rail for the front underneath which is attached solidly to the sides, basically a full-frame design.
This project is small enough that you might not need to worry so much, a lot depends on the wood species and the environment where the project will live.