


Share your craft projects
Make new craft buddies
Ask craft questions
Blog your craft journey
Kelly
935 posts
and
20 followers
in almost 12 years
in almost 12 years
The Ultimate Dado Jig
This is my version of a router dado jig. While it shares much in common with others dado jigs, I believe my modifications to the general design make it easier and quicker to use than most others. In part, this is because the jig does not require use of bar or pipe clamps. Instead, it uses four integral clamps.
Unlike several I’ve seen, this one does not rely on a given router base or on a given template guide. It does, however, rely on a pattern bit.
Using a simple book shelf as an example, the following steps are all you need to do to use it:
1) Set your router for the depth of cut you desire. The bit must reach down past the jig (mine was made using 3/4” plywood) and into the wood to the depth you have chosen for your dados.
2) Mark where you want your dados on the material you’re using for shelf sides. You can mark just the left side of the dado, or mark both lines of your dados, but, if using just one mark, consider putting an X where material is to be removed, to reduce the chance of positioning mistakes. After marking the actual dados, there is no more measuring or marking required.
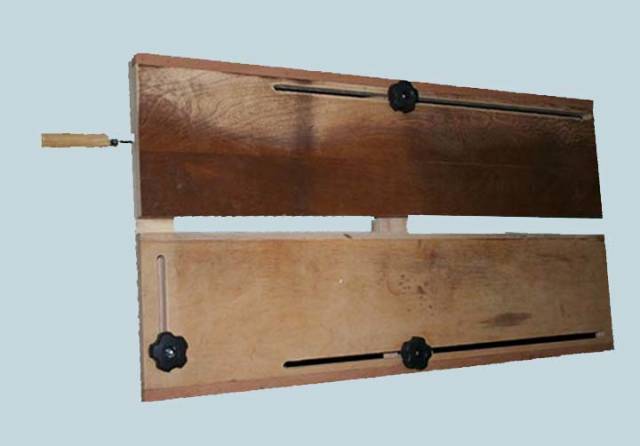
[Actual jig set up]
3) Set the jig on the the first shelf side, pushing it all the way back, so the front stop is against the shelf material. The right edge of the left board should be directly on the dado line you made, so the material to be removed is in the open area.
4) Pull the back bar down against your board and tighten only the knob on the back left.
5) Turn the front quick clamp until the jig is snug to the board and locked on the cut line. It doesn’t take much pressure to secure the jig. This will be THE ONLY ADJUSTMENT for each future dado cut for this project.
6) Set a piece of the shelf material, for which you are making the dado, in the center, then slide the right board against it and tighten the two knobs on the right front and back.
7) Double check your alignment and, if the edge is aligned with your line, make your first dado cut using a pattern bit (bearing on top and which will ride on the jig) to produce a cut of the exact opening you set.
8) Loosen the front clamp handle, move the jig to the next line, re-tighten the clamp handle and repeat you cut.
Setting the depth of cut, marking for the cuts, double checking positions and initial set up (steps three through six) aside, using the jig only requires three steps (i.e., loosen the front handle, move to the next cut, re-tighten the handle).
The width of this jig provides a wide base for support of any router base.
When cutting 3/4” dados, I use a half inch pattern bit. Making the actual cut, I run the pattern bit up the left side and down on the right side. When critical, to avoid blow out, I back the bit into the ends, before starting my main cuts.
To avoid damaging the guide portion of the jig, I use a fixed base router, or pre-set my plunge router and lock it in position for the cut. I, then, rest the edge of the base on the jig, with the bit back from the guide, and move it into the guide, rather than dropping the bit into the guide area.
The pattern bit will remove a little of material from the front and back cross supports the first time you use it.
Since the jig relies on the actual dado position marks, “what you see is what you get.”
When tightening the quick clamp, I’ve found only a little pressure is needed.
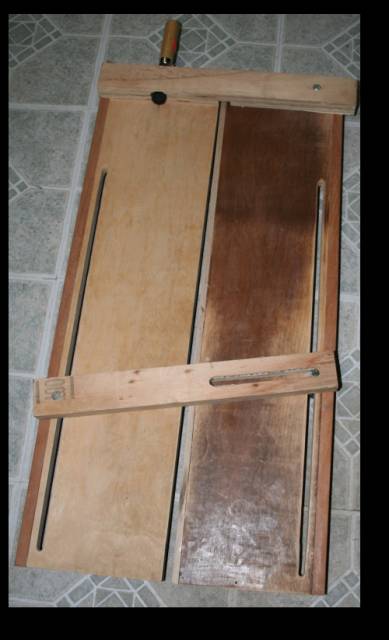
[CONSTRUCTION]
My jig will handle material up to 24” wide. Of course, smaller or larger versions could also be made. Both the left and right guides-bases are 3/4” ply cut to 7-1/2” x 30”. This provided ample rooms for clamps, without interfering with the router base.
My front and back stops are 2” deep by 16” wide and about 1-1/2” thick (two 3/4 inch pieces of ply glued face to face). Gluing two pieces of scrap ply together gave me ample room to drill for the quick clamp.
The jig uses four wood parts. Only the left support-guide and the front stop (in which the long handled clamp, or “quick clamp,” is mounted) are permanently secured together [at ninety degrees to each other]. The back stop and the right support-guide float, or move, relative to the left guide and the front stop, to sandwich the material being cut, as well as to cradle the dado area.
All slots can be made by whatever means best works for the builder. Mine were made by drilling holes at each end of each slot, just large enough to accept a 1/4-20 bolt, then finishing by joining the holes using a table saw, then a jig saw to complete the last few inches.
If desired, the back sides of each slot can have a second dado the width and depth of the bolt heads, to allow the bolt heads to recess into the jig and to stop them from turning when the knobs are turned. HOWEVER, then the heads might drag a bit when the back stop and right guide are moved into place. Since all the bolt heads are situated beyond the material being worked, this seems not necessary and just using a friction washer has proven sufficient.
[CLAMPS]
The top clamps are just 10-24 bolts, friction washers (on the bottom, at the bolt heads), and 10-24 knobs with large flat washers under them (on top).
The quick clamp, on the front, is made from an inexpensive, six inch bar clamp. To make it: I removed used a drift punch to remove the swivel, keeping the pin for re-assembly; I cut the clamp, keeping only the threaded rod and the part it threaded through; and I ground the cut to make it “relatively” round.
Before I permanently secured the left guide-base and front stop (ninety degrees to each other), I drilled the stop to for installation of the quick clamp. I did this on the side of the front stop normally resting against the material being worked. For alignment, I centered the holes in the thickness of the stop and what would be center of the left guide (presuming the left side of the stop was set flush with the left side of the guide-base), once installed.
The first hole was just deep and wide enough to allow swivel of the bar clamp to recess fully into the stop. I then switched to another bit and, in the same hole, drilled deeper and just wide enough to accept the female threaded piece of the bar clamp. Last, and again in the same hole, I drilled a through hole just big enough to allow the threaded rod to pass through the wood and the female portion of the bar clamp. Once the threaded rod was through the wood and female portion of the clamp, I reattached the swivel head.
A snug fit and the rough shape of the female threaded part helps stop it from turning, but epoxy could be added, to better secure it. The fit of mine is such that nothing more than pulling the female part into the stop using the handle has been necessary. Obviously, it’s necessary to mount the female portion of the clamp to the inside of the jig so the female threaded part is pushed into the stop when the clamp is used.threaded part is pushed into the stop when the clamp is used.
7 Replies

Surely you clamp the part/jig combination to your bench/table before actual routing, right? Having “launched” a part from an insecure clamp on my router mortising machine, I have found first hand how easy it is for a high-speed router to grab and throw things.
Interesting build. Thanks for sharing.
HorizontalMike
The dado jig I built will hold a piece of material up to twenty-four inches wide, so it, by itself, is big enough to stabilize a router operation, since it is clamped to the wood. I’d have no qualms about using my 3hp Porter Cable on it (other than it would be over kill and the thing weighs as much as a small VW).
The most common use for this would be to, for example, router a shelf three feet or more feet tall. I’ve used it several times and never noticed any inclination to wander in response to the bit. That said, I always use my 1-3/4 hp and I’m only going down about 3/8" or less at a time.
When I route, I usually have one hand laying on the table and the other pushing and pulling the router (I use a D handle for this). If it were inclined to move, it would be no more complicated to keep the jig still than to control the router, of course.
Ok for you to use one hand routing, but for me I prefer both hands on the beast… ;-)
HorizontalMike

Very creative ,this looks like it will make short work of dadoing.
woodworking classes, custom furniture maker
When I run my big boys, the Hitachi or the Porter Cable, it’s always a two handed job, but the D handle makes it an easy task to do single handed routing up the side of a board, or the dado jig.
I’ve been running routers, as both a hobbyist and a pro, for forty years and have never had one get away. Of course, my back trouble accounts for much of that – there’s a yellow streak up it about a foot wide when it comes to my woodworking equipment (it took me a week to get brave enough to turn on my first cabinet saw thirty years ago), so I usually have a death grip on whatever I running.
Kelly, Thanks for ‘fessin’ up though I truly would rather play it safe rather than “what-I-could-get-away-with” in the long run. And Yeah, I have danced with that devil on occasion when I felt the need… Still tryin’ to be a clean WW’r… ;-)
HorizontalMike
Just to clarify, when I talk about the big boys, I’m talking about my two and a half horse, or over three horse routers.
Running a 1-3/4 hp Porter Cable with a D handle using just one hand is the similar, but less difficult than running a worm drive. Both can kick back, but, if you know what you’re doing and pay attention, your control stops things from getting out of control.
Were I to chose to fight one of my worm drives or a router with a pattern bit set for a 3/8"-1/2" dado, I’ll take the latter every time. The bit would have to be dull or cutting pretty deep to compare to the bit of a worm drive blade.
The smallest boards I dado are usually four foot long. A two footer is rare. The weight of the jig and the board (remember, you’re talking a two foot by two foot, or better, project) is significantly more stable than, for example, a small plaque resting on an anti-skid surface and being routered with a cove or other shaping bit.
I just wanted to add these thoughts so others didn’t get the erroneous impression this jig required as much effort to use as others. Of course, the user can add (a) clamp(s) to the project material, if that is their want, to secure the stock to some other item. This jig will still require less effort to use than others. The clamps built into the jig secure it to the work and the single front clamp is all you have to consider, when moving to the next cut.