


Share your craft projects
Make new craft buddies
Ask craft questions
Blog your craft journey
Rich
1241 posts
and
28 followers
in over 3 years
in over 3 years
Lock Miter Router Bit Setup
Originally posted elsewhere Aug 9, 2017
-------------
This is one of my more popular—and controversial—blog posts. I still say I can get any joint set up perfectly in a matter of minutes with no test cuts.
First, a diagram (the numbers shown are for the Infinity Lock Miter Jr. Router Bit item #55-502). Note that the markings are for reference only and, particularly in the case of the fence location, don't precisely represent the actual set up. That is, the fence would never be set that far back.
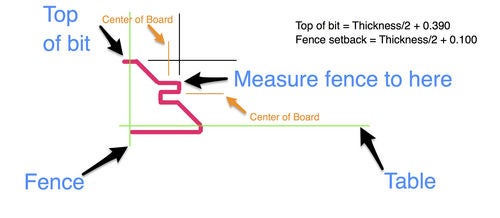
The key to getting a correctly aligned joint is to have the two orange lines shown on the diagram an equal distance from the outer face of the boards (outer meaning the faces that are on the outside of the joint when the boards are put together). Those orange lines mark the center of the bit both vertically and horizontally.
However, it is most desirable for the joint to be centered on the board, and it's also the best way to get an easy and consistent setup. By adjusting bit height and fence setback so that those lines match the center of the board, you will get a centered lock miter joint.
My preferred way to handle router bit settings is to pick a point on the bit and measure its height when the bit is properly adjusted. For example, on round over bits, once they are adjusted for a good cut, I measure and write down the height at the top of the bearing screw because that spot is most accessible to get a height gauge on. The next time I use that bit, I set the height to that value, make a test cut and it's ready to go.
The lock miter bit has an extra element though, because the fence has to be set correctly too, in order for the joint to line up. For getting it set, I use the top of the bit for bit height, and the tip of the lock groove cutter for getting the fence right.
As I said, the numbers in the diagram above are specific to that Infinity bit. But, you can apply the same technique for any brand by using test cuts to get the bit set properly, and then measuring the bit height and distance from the fence to the tip and making up your own formula based on the thickness of the board.
Remember that it's the thickness/2 that matters, so take the measurements you get for height and distance to fence and subtract half the board thickness. Those are the amounts you will add to thickness/2 for other board thicknesses.
Separate the fence position from the bit height
If you are having trouble getting a good joint on your test boards, the easiest thing to do is separate the bit height adjustment from the fence adjustment. That way you're not fighting two variables at once. To do this, take two boards and first run each edge with the board flat against the router table top. Flip one board and slide them together. If the faces are flush, the bit height is set properly.
First off, I've built a couple of fancy jigs for managing the boards that wound up in the trash. Ultimately, I found that guide sticks attached flush to the edge with double-stick tape does best.

Here is the routed board.

After routing the second board, when placed end-to-end, you can see the error.

The great thing about this is that the offset is double the error of the bit height. You can measure it and adjust the bit based on that.

Offset was 0.038, so adjust the router 0.019.

...and the alignment is correct.

Adjust the fence. Make two cuts with the boards flush to the fence. You can do the same measurement of the board offset, halve it, and get what will probably be your correct setting on the next pass. The fence is tougher to get set right since you have to move it by hand.

Be sure to measure and make note of the distance from the fence to a repeatable spot on the bit. Also note the height of the bit.

Good enough for government work.

You can now take the fence and height measurements, subtract half the board thickness and have the correct setting for other board thicknesses. Write those down and keep them with your bit.
Half of what we read or hear about finishing is right. We just don’t know which half! — Bob Flexner
6 Comments

Awesome write up. I just got a lock miter bit, but have yet to use it… thanks!
Ryan/// ~sigh~ I blew up another bowl. Moke told me "I made the inside bigger than the outside".

yeah i remember you had a few "disbelievers" as ill call em ;-))
working with my hands is a joy,it gives me a sense of fulfillment,somthing so many seek and so few find.-SAM MALOOF.

Nice write up - if I ever get a lock miter bit I'll need to remember this!
Great info Rich. Perhaps now would be a good time for me to take my bit out of the package and try it. It's been sitting in the drawer for close to 10 years probably. I even bought the fancy set-up block. I guess that's where I'll start and fine tune it from that point and record readings like you suggest. Thanks for the tips Rich.
I bought a setup block too and was very disappointed in it. It was nowhere near accurate enough. I wound up selling it.
Why this works is that the center of the cutter needs to be set to the middle of the board when cutting with the workpiece flat on the table. The problem is, it's very difficult to measure to that point. Instead, I use the top of the bit. The offset you see (0.390") is the distance from that center point to the top of the bit, where it's very easy to place a height gauge. I know that's the distance, because the joint was aligned perfectly meaning the center of the cutter was at the center of a board of known thickness, and I measured the height to the top of the bit and subtracted half the board thickness.
The distance to the fence is easy to measure. The 0.1" offset is because that face where the center of the cutter slopes slightly, and the exact center is 0.1" behind the tip where you can measure.
Half of what we read or hear about finishing is right. We just don’t know which half! — Bob Flexner
I'll use the set-up block as my note pad to write down the correct measurements. The shape is a good visual clue. I'll be looking all over for the measurements and when I give up and grab the setup block - I'll find the dang measurements. I think I have the Rockler bit so I don't have a ton of faith in how long it will last. So far it has lasted almost 10 years and shows no wear and is as sharp as the day I bought it, haha.