


Share your craft projects
Make new craft buddies
Ask craft questions
Blog your craft journey
Rich
1238 posts
and
28 followers
in over 3 years
in over 3 years
Using Epoxy Putty for Defect Repair
This one is from Apr 22, 2018:
When replying to posts about repairing defects or other voids in wood, I often suggest using epoxy putty. The problem with that is that unless someone has used epoxy putty before, it can seem intimidating. It's really simple to use, and once you play around with it a little, you'll find yourself using it more and more. It's also extremely durable and can stand up to wear and moisture.
Epoxy putty comes in a stick and is made up of two parts, as shown below. Think of it like a cannoli, only not as tasty. In order to use it, simply slice off a small piece, remove the plastic wrapping and knead it until the color is uniform. It helps to keep a small dish of water nearby to dip your fingers into. This keeps the epoxy from sticking to your hands.
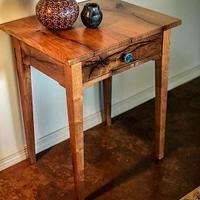
In this post, I am going to go from start to finish repairing a circular defect in a piece of cherry. I created the defect using a 1/2" brad point bit. It could be a knot, a deep gouge, a wormhole that you wish to hide, or an errant hole drilled in the wrong spot. Whatever it is, the considerations are the same. The goal is to fill the void in such a way that it doesn't stand out on the board. You don't want it to catch the eye of a casual observer. If you can tell someone that there is a repair on a board and they can't find it, even better. Ideally, if you point it out - as I'm effectively doing for you in these photographs - it should surprise them that it's there.
The first consideration is the shape of the void. A perfectly round hole like this one is virtually impossible to patch and grain over without it standing out. By making it irregular as I've done in the photos, it's much less likely that the eye will detect it without close examination. In other cases you'll need to make a similar judgment call. For example, a deep tear out might be irregular enough to begin with that all you need to do is sand it smooth to prepare it.
The next thing is color. Mohawk makes the putty available in 12 colors. I found it useful to make a small sample disk of each color so that I can compare the fully cured epoxy color to the wood. I also have needed on occasion to make a custom color by blending different epoxy sticks and sometimes a little extra pigment. I use Mixol pigments, and the numbers shown on the recipe for the sample piece represents the ratio of different putty colors and what Mixol colors are used. For this example, I am simply going to use the single Natural Cherry color of the putty. I'll address color differences and do the graining with Berol Prismacolor pencils and Mohawk Blendal sticks.
Here are the Mohawk epoxy putty sticks and sample disks I referred to:
When replying to posts about repairing defects or other voids in wood, I often suggest using epoxy putty. The problem with that is that unless someone has used epoxy putty before, it can seem intimidating. It's really simple to use, and once you play around with it a little, you'll find yourself using it more and more. It's also extremely durable and can stand up to wear and moisture.
Epoxy putty comes in a stick and is made up of two parts, as shown below. Think of it like a cannoli, only not as tasty. In order to use it, simply slice off a small piece, remove the plastic wrapping and knead it until the color is uniform. It helps to keep a small dish of water nearby to dip your fingers into. This keeps the epoxy from sticking to your hands.
In this post, I am going to go from start to finish repairing a circular defect in a piece of cherry. I created the defect using a 1/2" brad point bit. It could be a knot, a deep gouge, a wormhole that you wish to hide, or an errant hole drilled in the wrong spot. Whatever it is, the considerations are the same. The goal is to fill the void in such a way that it doesn't stand out on the board. You don't want it to catch the eye of a casual observer. If you can tell someone that there is a repair on a board and they can't find it, even better. Ideally, if you point it out - as I'm effectively doing for you in these photographs - it should surprise them that it's there.
The first consideration is the shape of the void. A perfectly round hole like this one is virtually impossible to patch and grain over without it standing out. By making it irregular as I've done in the photos, it's much less likely that the eye will detect it without close examination. In other cases you'll need to make a similar judgment call. For example, a deep tear out might be irregular enough to begin with that all you need to do is sand it smooth to prepare it.
The next thing is color. Mohawk makes the putty available in 12 colors. I found it useful to make a small sample disk of each color so that I can compare the fully cured epoxy color to the wood. I also have needed on occasion to make a custom color by blending different epoxy sticks and sometimes a little extra pigment. I use Mixol pigments, and the numbers shown on the recipe for the sample piece represents the ratio of different putty colors and what Mixol colors are used. For this example, I am simply going to use the single Natural Cherry color of the putty. I'll address color differences and do the graining with Berol Prismacolor pencils and Mohawk Blendal sticks.
Here are the Mohawk epoxy putty sticks and sample disks I referred to:

To begin the discussion, here is the hole I drilled:

As I mentioned earlier, a perfectly circular hole like this will be virtually impossible to fill and grain such that it's not obvious. To deal with that, I took two small gouges and made the area around the hole irregular. The gouges are about 1/4 and 1/8". Sometimes a V-groove is helpful as well.

To fill the area, first slice off a small piece of epoxy putty and knead it smooth. Use water to keep it from sticking to your fingers. Press the putty firmly into the hole and surrounding area.

Set a timer for 20 to 30 minutes. The reason is that at that point in the curing process the epoxy is firm, yet is still workable with cutting tools. Here I am using a block plane to thin down the layer in order to make sanding easier later.

Here is the rough cut after planing. Allow the putty to cure another hour or two.

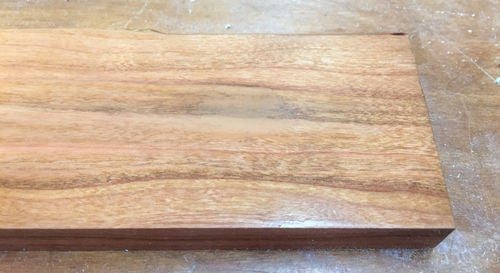
Here is the patch after sanding. Notice it's a pretty good color match. Generally a little lighter than the surrounding wood is best. Also notice that the work to make the hole irregular has already begun to obscure the patch.

Now, the fun begins. Using the Prismacolor pencils and Blendal sticks, I begin to blend the patch in with the surrounding wood. It's often not necessary to completely color the patch in - the goal is mainly to obscure the edges, since that's what will tend to catch the eye. This phase of the process takes some practice. The key advice I can give is to go lightly and gradually build the colors. If you mess up, you can wipe it clean with naphtha and start over, so don't worry about mistakes.

And here is the final result after a top coat of lacquer. It actually looks much better in person. The camera has enhanced some details that aren't as visible to the naked eye. Even so, I think it looks pretty good.
Note too that you can do a similar patch with Timbermate wood putty. It's not as durable as the epoxy putty, but for smaller defects, it's often easier to work with. Obscure any regular defect shapes and do the graining in the same fashion.
Half of what we read or hear about finishing is right. We just don’t know which half! — Bob Flexner
14 Comments

Good write up, thank you! I image the art of blending colors is where the rubber meets the road with this, but could be learned!
Ryan/// ~sigh~ I blew up another bowl. Moke told me "I made the inside bigger than the outside".

Excellent fix!
In my mind the key is the drawing in of the grain, 100% on your comments on tricking the eye 😀
In my mind the key is the drawing in of the grain, 100% on your comments on tricking the eye 😀

love it buddy.that can save the project !
working with my hands is a joy,it gives me a sense of fulfillment,somthing so many seek and so few find.-SAM MALOOF.

That's a pretty cool tip Rich. So far I have ended up using a router to get a hole of uniform depth and irregular edges. Then I hand fit a piece of wood of the correct thickness. I have to rely on grain matching to achieve "invisibility".
This seems much easier to get the colors & grain matched.
This seems much easier to get the colors & grain matched.
That's a pretty cool tip Rich. So far I have ended up using a router to get a hole of uniform depth and irregular edges. Then I hand fit a piece of wood of the correct thickness. I have to rely on grain matching to achieve "invisibility".
This seems much easier to get the colors & grain matched.
They're both good to have in your bag of tricks. Lots of other ways to do a repair as well.
Half of what we read or hear about finishing is right. We just don’t know which half! — Bob Flexner
i gotta say if i ever have a wood filler question about the best way to fix it,your my man rich. although i try hard not to need that kind of fix -lol.
working with my hands is a joy,it gives me a sense of fulfillment,somthing so many seek and so few find.-SAM MALOOF.
i gotta say if i ever have a wood filler question about the best way to fix it,your my man rich. although i try hard not to need that kind of fix -lol.
I don't feel any shame when I use filler. Often, it's to correct a defect that's not even my fault. Knowing how can save you money too, since you'll often be able to make an otherwise unsuitable piece of lumber usable, and increase the yield all around.
Some are definitely my fault though. Caca pasa.
Half of what we read or hear about finishing is right. We just don’t know which half! — Bob Flexner
yeah thats what i meant rich,the ones that arn't "my " fault 🤔😁
working with my hands is a joy,it gives me a sense of fulfillment,somthing so many seek and so few find.-SAM MALOOF.

Mohawk is the best that is all we used the owner was GR8 at it 😎
*TONY ** Denver * ALWAYS REMEMBER TO HAVE FUN

Can a dye or food coloring be mixed in to get a bright color that contrasts with the wood? Like the dots on LBD's Dice Puzzle. I.e. bright red, yellow, green etc. Maybe to show a colored line that contrasts.
Thanks for posting the Blog. Learned something.
Thanks for posting the Blog. Learned something.
Ron

Thanks, definitely bookmarking this. Wish I had read it years aso.
Can a dye or food coloring be mixed in to get a bright color that contrasts with the wood? Like the dots on LBD's Dice Puzzle. I.e. bright red, yellow, green etc. Maybe to show a colored line that contrasts.
I'd suggest something like Mixol. It's a pure pigment and won't affect the epoxy significantly.
Also, I've been using System Three epoxy paste quite a bit lately. It's easy to work with and I get good results with it.
If you use any other products besides the Mohawk shown above, the 20 to 30 minute period might be off for when it's gotten to a state where you can carve and plane it. What I like to do is keep a little of the epoxy I mixed for the fill on the side and monitor its progress every so often until I think it's ready.
Half of what we read or hear about finishing is right. We just don’t know which half! — Bob Flexner
I love those Mohawk Epoxy Sticks but I can't remember where I found them. Another product I like is FamoWood Latex Wood Filler. Again not as durable but comes in a variety of colors to match many wood species. Nice job Rich.
Thanks for the info on the pigment and coloring.
Ron