


Share your craft projects
Make new craft buddies
Ask craft questions
Blog your craft journey
DevinT
2622 posts
and
21 followers
in over 3 years
in over 3 years
3-Arm Kerfing Plane #3: Carcass
This is
part 3
in a
9 part
series:
3-Arm Kerfing Plane
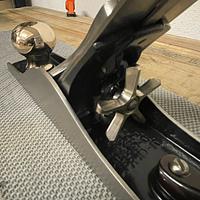
This plane is going to need a body, or carcass if you will. Something to hang the blade off of, optionally provide a handle, and allow for the 3 arms to attach, providing for a movable fence.
Previously we discussed starting with the Vaughan Bear Saw (available for under $20 on Amazon at the time of this writing). To retain the ability to flip the saw blade for rip- versus cross-cut, without having to modify the saw blade after purchase, some considerations had to be made.
The arms upon which the movable fence will be mounted cannot penetrate all the way through the plane body, such as a plow plane or moving filletster plane (traditional spelling of filletster as documented by John M. Whelan, well-known author and rhykenologist). Quite simply the saw plate, unmodified, obscures one entire side of the plane body for this design.
I could have come up with some way of butchering the saw plate to make a more compact, lighter-weight, and more laterally balanced design, but that would have meant more steps in assembly and a more complex process, and with that, potential for unsatisfactory quality control.
I also like to think of failure-case. If the saw blade becomes damaged through use, the owner can buy a new one and simply replace the old if I stick to the manufacturers design, unmodified. Hopefully I chose well by going with Vaughan and choosing the Bear Saw for its 2-sided profile and thin kerf -- but if it disappears, no biggie, I can just move things around in my design to accommodate a different blade. However, as we will see in future parts of this blog that my design can already potentially accommodate the blades of different manufacturers within a limited tolerance.
We had to go big.
The saw blade is big. How big?
Previously we discussed starting with the Vaughan Bear Saw (available for under $20 on Amazon at the time of this writing). To retain the ability to flip the saw blade for rip- versus cross-cut, without having to modify the saw blade after purchase, some considerations had to be made.
The arms upon which the movable fence will be mounted cannot penetrate all the way through the plane body, such as a plow plane or moving filletster plane (traditional spelling of filletster as documented by John M. Whelan, well-known author and rhykenologist). Quite simply the saw plate, unmodified, obscures one entire side of the plane body for this design.
I could have come up with some way of butchering the saw plate to make a more compact, lighter-weight, and more laterally balanced design, but that would have meant more steps in assembly and a more complex process, and with that, potential for unsatisfactory quality control.
I also like to think of failure-case. If the saw blade becomes damaged through use, the owner can buy a new one and simply replace the old if I stick to the manufacturers design, unmodified. Hopefully I chose well by going with Vaughan and choosing the Bear Saw for its 2-sided profile and thin kerf -- but if it disappears, no biggie, I can just move things around in my design to accommodate a different blade. However, as we will see in future parts of this blog that my design can already potentially accommodate the blades of different manufacturers within a limited tolerance.
We had to go big.
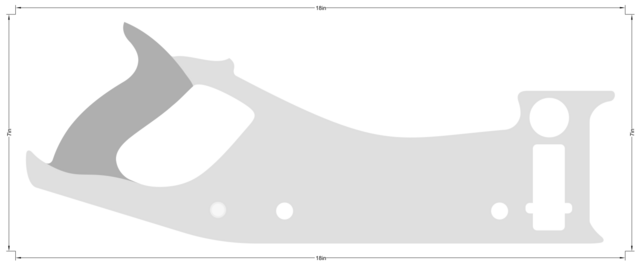
The saw blade is big. How big?
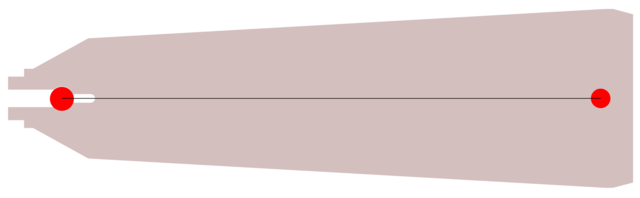
Width is 11.328" (287.734 mm)
Height is 3.25" (82.55 mm)
The distance between circle centers is 9.766" (248.047 mm).
The large circle/screw-hole [for handle] (at left) measures 0.434" (11.024 mm) in diameter.
The small circle/hang-hole (at right) measures 0.355" (9.017 mm) in diameter.
Now, we go slapping a handle on the body and the thing starts to get rather long. I thought about not putting a handle on it, like Tom Fidgen's kerfing planes and many others that lack a handle, but Dave P (if I recall correctly) told me briefly of an article that appeared in a magazine subscription he has access to (I have to wait 12 months for it to become free in the back issues). It talked of a "coffin kerfing plane" and it was long enough to accommodate both this saw blade (again, unmodified) and a handle.
But, what handle?
(3 months go by while I study tool ergonomics, build prototypes, test for repetitive stress injury potential, maximize efficiency saw horse height but also make it usable at bench height)
What I settled on was, perhaps unsurprisingly, was a Stanley hand plane tote for the handle. I was not satisfied with all the existing offerings for CAD, but I did like one template -- the Lee Valley schematic that was once freely available on their website (and is still hosted by them, but you need the link to it to access it).

I spent an ungodly amount of hours fine-tuning that handle. Not because I was going to make one, but because I needed the raw shape to incorporate into the carcass of my kerfing plane. If we are going to make a coffin kerfing plane with a comfortable tote, out of a single block of wood, I need to be able to "meld" that shape into the carcass. I was not happy with the job that Inkscape did on converting the Lee Valley schematic to Scalable Vector (SVG) format, so I basically had to build the thing myself. If anyone wants the file, I will give it to them. I think it's a beauty of simplicity with its 14 points -- that's it, just 14 points make up the entire shape.
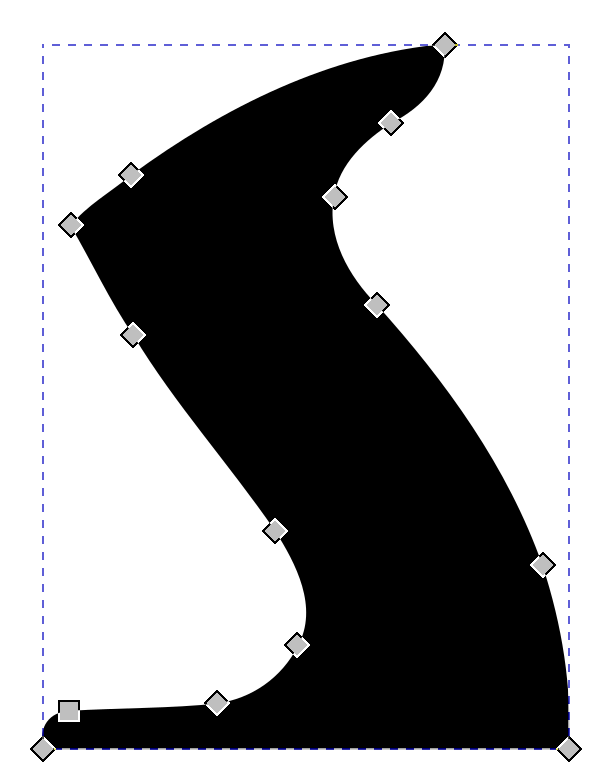
(counts them to make sure there are 14 -- yep)
But if we're adding this to a plane, that has a saw attached to it, and we want to keep our fingers away from the saw, how big is the tote? This is a standard tote like you would find on a No 5 through 8 Stanley hand plane. It measures:
Width: 3.516" (89.297 mm)
Height: 4.703" (119.46 mm)
And I believe most are 3/4" thick. Though correct me if wrong, I just decided I would make mine 3/4" (should it be thinner? thicker? let me know).
(baby woke up, more later, sorry, gotta go attend to the child)
(the next day)
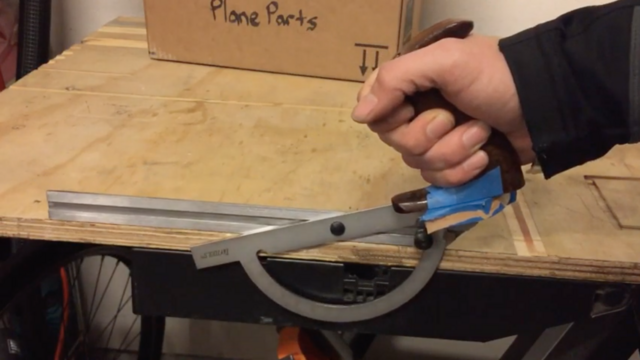
I then went to my scrap bin and pulled out 2 scraps of wood, grabbed the painter's tape, some super glue, and a protractor. I glued a spare plane tote to some wood scraps:

This allowed me to try various angles
From the absurdly comical (and quite painful):
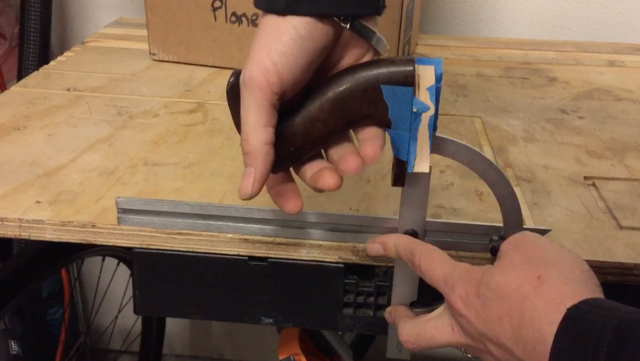
To the most comfortable position of 17-degrees which I continually returned-to for its ability to be driven by the arm with very little wrist movement (in hopes to minimize risk of repetitive stress injury).
At 17-degrees rotation, it feels so natural and works with such ease that my heart is aflutter just thinking about the final tool. It felt as though I had an amazing amount of control over the blade (as you can see toward the end of the video above; one-handed handling was incredibly natural). I would even be willing to go so-far as to question why backsaws or dovetail saws are not made this way. There is something magical about this configuration that I cannot quite explain. A discussion for another day. Let's get a move-on.
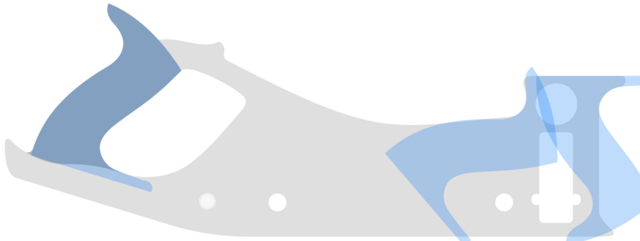
I took that most-desirable and supremely comfortable tote-angle of 17-degrees and baked it into the carcass design (revealed below).
This isn't your standard kerfing plane. The carcass above comes in at roughly 18" x 7". The actual design is:
Width: 17.366" (441.103 mm)
Height: 6.528" (165.809 mm)
Thickness: 1.5" (38.1 mm)
Perhaps you can see how the plane tote has been integrated into the carcass. But can you see it? I actually integrated tote ergonomics into two other areas.
I must have spent a good 4-1/2 months working on the ergonomics of this thing alone.
At this point, you may be looking at the carcass and wondering what all those features are. It sure doesn't look like it could accommodate a saw, I will admit, but we must explore this design slowly and methodically to truly appreciate its beauty, beyond its accepting grip and gentle curves.
The coming parts of this blog will, as more parts are introduced, continually return to the carcass to show how it assembles and functions.
To keep things simple and not overwhelm the reader, I will be separating the design articles from the manufacturing articles. That is to say that the material for this carcass has already been dimensioned into a blank ready to cut, but we will get to see the gorgeous waterfall Bubinga later (sorry to tease, but I need to keep your attention somehow, and I also want folks to skip the boring bits as they like).
5 Comments

child is always first dev,this will still be here tomorrow !
working with my hands is a joy,it gives me a sense of fulfillment,somthing so many seek and so few find.-SAM MALOOF.
Thanks pottz!
Updated.

It has to fit, and getting to that point takes a lot of trial, and error. I love some of the Veritas tools, and it seems like they just fit me like I was the model for them. I know talking to Rob that takes a lot of time.
Reading this after seeing the "kit" is interesting, you've kept it as you saw it.
Reading this after seeing the "kit" is interesting, you've kept it as you saw it.
Time well spent ;)