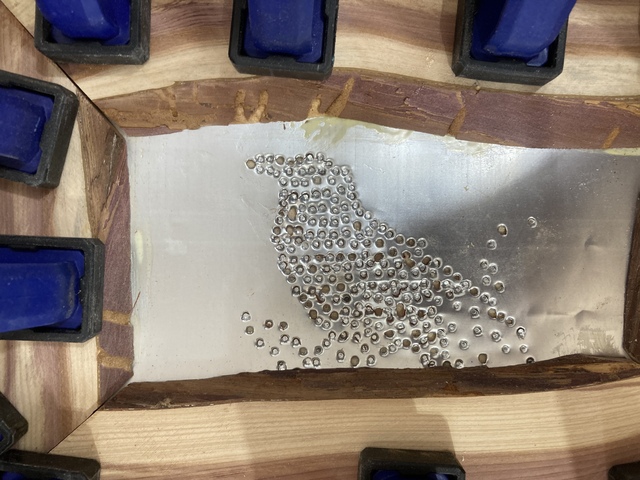
I’m not certain yet how it’s going to look when done, but I experimented a bit with punched metal this morning.
I printed this photo on a piece of paper, taped it to a flattened pop can, and punched things out with my smallest nail set.
The result… well, I think I need to use a smaller punch, but it shows some promise. Also, pop can might be a little thin, so I may try a food can instead. But I think it’s interesting, and I’ll play with it some more.
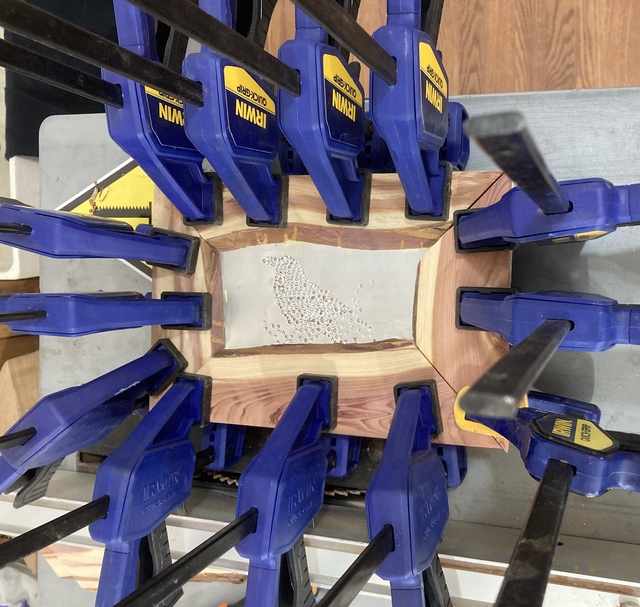
It’s mounted to a piece of ¼ inch plywood with fish glue, then I yellow-glued on some pieces of juniper to finish the “frame.” I think it’ll become the lid of a box.
Looks like you'll be adding another skill to your catalog Dave!
I remember doing that in grade school art class, never though about doing pictures vs. geometric patterns. Takes an eye for detail and a full assortment of brads and nails to get the variety. I see a "pie safe" in your future!
Once you are satisfied you need to go with copper 🙂
Trying to, Splint! I think it’ll be a while before I move to copper, but we’ll see.
Thanks, Jerry! I just used a nail punch and an 8oz hammer. In darker areas, I put the holes closer together, and in lighter areas, farther apart. But I need a smaller punch than a 1/32 nail set. Guess I’ll be making one soon.
Nice start, Dave! One of my sons did a pierced metal project in 2nd grade. I wouldn't let him use a screwdriver like the teacher called for. That chisel and hammer were ringing the whole time. My son came and told me it drove the teacher nuts. 😄
Thanks, Ryan! I’m going to try not to add too many tools, but we’ll see…
Thanks, Eric! I don’t know about a pie safe; there’s plenty of other tin work that’s typical in Northern New Mexico, including some modern artists. Don’t necessarily want to copy anyone, but there’s a lot more to be done than just pie safes.
Thanks, Steven! I backed the pop can with a piece of pine, so it wasn’t very noisy. And if I get my swing down so I don’t pierce the metal, it’ll probably be even quieter.
This is an interesting experiment, punched metal art has been around for a long time. I think consistency will be the key here, either all punched through holes, or just all divots. Whatever pleases your eye is the way to go. There should be plenty of material on the web that could provide tips and tricks on punched metal art. Like splinter said, reference material on making a pie safe maybe.
I love punched metal art. I used to have a super metal company and could buy good, commercial quality ones for examples and such. We're talking like five bucks for a wheat pattern critter 16" tall. So I bought a few, for inspiration.
I did a few, just tin punches because I can. I used flashing from the big boxes.
I bought a set of Harbor Freight cold punches and re-ground them for different effects.
This is a little like glass etch. You'll start looking through magazines and thinking in terms of silhouettes for patterns. Also, don't overlook leather work patterns.
Oh, and you're off to a GREAT start. Keep on keeping on.
Try something with a point. Even a sharpened nail, like a #16 my give you a more desirable look. I did some on copper, but it's been awhile. Great start to another fun project avenue.
Thanks, Kelly! I remembered last night that I’ve got most of a roll of flashing somewhere. I needed about a foot for a repair a couple years back, and it was cheaper to buy a whole roll mail order than try to get just what I needed locally. Now I just have to remember where that got to.
Thanks, Don! I don’t think I want to actually pierce the metal. I think (having looked at this some more) that I prefer dimples, which I why I tried the nail set. But we’ll see what I can produce consistently. It’s definitely going to take more practice.