Fake Beam

348
28
This was my New Years Job.
We're staring to remodel and update the entry way and get rid of the 22 year old castle wall look.

Nothing extreme,  just used 3- 1 x 12's pine, mitered the joints.
I used a wire wheel on a drill to rough it up a little. Stained and lacquered. I had the corbels left over from a Commercial Bar I built quite a few years back,  so decided to put them to use. 


Spent under $100.00. 
Made the wife happy, and got to cross off another item on the "honey do" list. 
Win, win...

Figuring out how to do something you have never done is what makes a good challenge.

28 Comments

Nice dress-up!

Wall looks fine to me, but then again I have an old soul 🤠
Looks great!  I've made some false beams to conceal wiring and I had a heck of a time getting tight miter joints on those long boards.  It looks like you've got that down pat.  👍🏼
Well Done Bent!  Looks awesome.

Mike

looks good and a happy wife, win win !

working with my hands is a joy,it gives me a sense of fulfillment,somthing so many seek and so few find.-SAM MALOOF.

Nice!

Ryan/// ~sigh~ I blew up another bowl. Moke told me "I made the inside bigger than the outside".

Did you lock miter them or normal miters?
looks really nice bro GR8 JOB 😍😎👍

*TONY ** Reinholds* ALWAYS REMEMBER TO HAVE FUN

Thanks All!
Lock miters are for rookies....  lol  (not really)
I just miter them, and use the tape trick. Using the tape trick, the trick is, get good straight cuts from the beginning, but use 3 layers of tape over the joints.  This pulls them tighter. That's how I do them anyway.

Figuring out how to do something you have never done is what makes a good challenge.

With the tape - do you only go around or do you also have tape lengthwise?  For small boxes, I have used tape lengthwise for the initial positioning and then across for the final.  Trying to picture how to do this on such a grand scale (no beams in my project list to this point).

And, of course, this looks really nice.
Looks like a real one to me. Nice work!!

Cheers, Jim ........................ Variety is the spice of life...............Learn something new every day

BB1
Trying to picture how to do this on such a grand scale
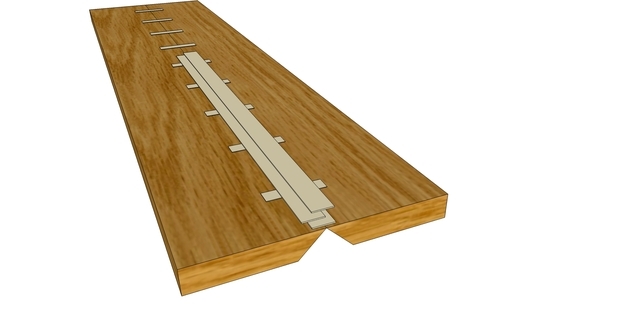
Thanks BB1,
I start at one end and with 4 or 5" pieces of tape, I hold the joint tight and stitch across the joint, then apply a long piece along the seam. I do this in about 16 -24" sections. After going the full length of the joint I will run long pieces of tape all the way down the seam (over the previously sectioned pieces).  Then I  apply a couple of more pieces offset from the first piece but still covering the seam.
I don't always use 3 lengths,  depends on what I'm doing. 2 is enough for most stuff.
Here is an example,  visual is so much easier for me to show. (love sketchup)


Figuring out how to do something you have never done is what makes a good challenge.

Thanks for the explanation and visual.  Funny that with small boxes I typically do the opposite order.  May need to try a switch...

And, I appreciate your taking time to reply.  This is why I like this site - learning methods that I can use down the road. 
I have learned a lot from Benrly. He has a lot of tips and tricks to male things easier. 
Next time I spend an hour setting up the lock miter bit I'll be thinking about the rookie comment.
YW BB1..

Corelz,  who's this Benrly guy you're talking about?  :)
To be honest,  I have never used a lock miter bit so I have no clue how they work.  Could be 100 times easier, but I'm too stubborn to try it.

Figuring out how to do something you have never done is what makes a good challenge.

Happy spouse Happy house 
That looks very classy 

Life’s Good, Enjoy Each New Day’s Blessings


Cool job Bent...

However how'd you do that with bloody SketchUp,

every time I try it,

my tape keeps curling up.  Maybe I should tack cloth my model and cross stitch.

If your first cut is too short... Take the second cut from the longer end... LBD

You need to buy SketchUp tape.  Sticks to anything.  :)

Figuring out how to do something you have never done is what makes a good challenge.

Happy New Year all.
That looks good Bently, it's the little things, like mitering the joints that make all the difference. I bet you were pleased to find a use for those left over corbels.

Doing the best I can with what I've got

Thanks Mark,
Yeah, had them laying around for a while. Too big for much else.  I still have one more left.  Thinking of making a small half round table to put on top and mount it in the entry way to go with the beam.
Happy New Year.

Figuring out how to do something you have never done is what makes a good challenge.