Rich
in over 3 years
More from Rich
Front Entry Door
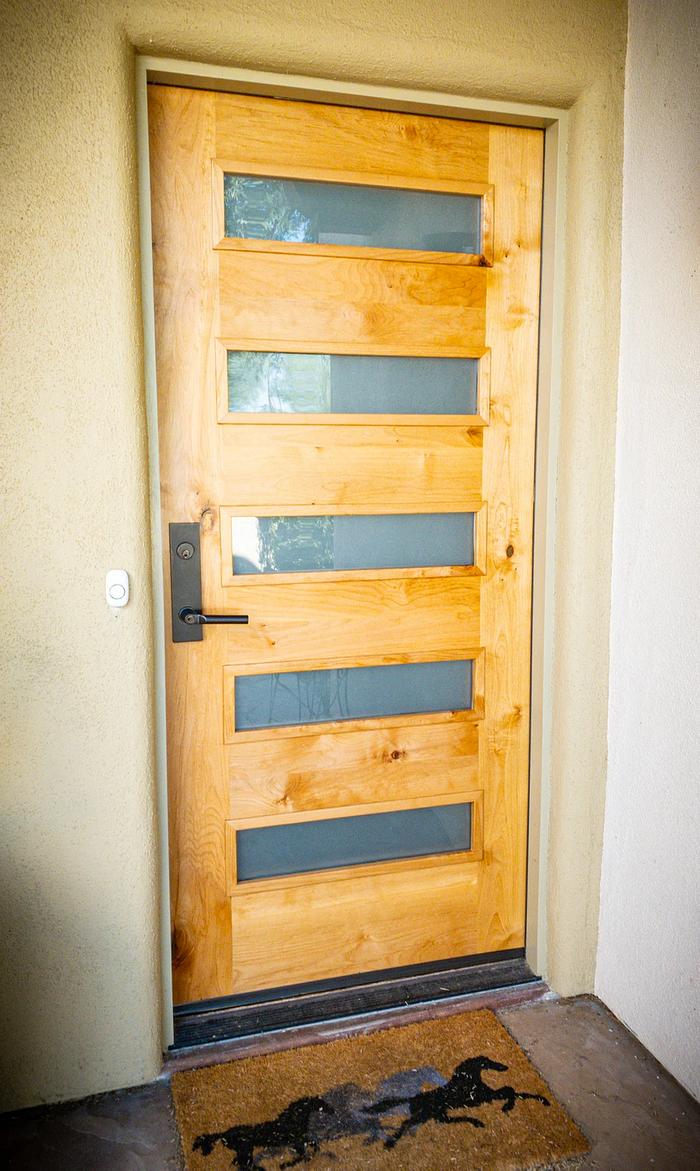
Well, it's done and in place. Here is the story.
We'll start with the finished door.

This shows the pieces that went into it. Rails, stiles, and loose tenons.

To cut the mortises for the loose tenons I made a guide to use with a router. It fits over the 1 3/4 inch rails and stiles. It was designed to work with a 5/8” OD guide bushing and a ½ inch up spiral router bit.


I needed a guide for the 6" mortises on the 8" center rails, a 4" mortise on the 6" top stile, and a 2" one for the bottom rail. I didn't want to go longer than 6" on the tenons, so the bottom rail has two, and only one is glued.
I made stops so the one guide could be used for all of the mortises.

I also made a spacer for the glue up. It is cut to 1/8" larger than the glass to allow room for the glazing tape.
(BTW, the flattest surface I had for the assembly was my kitchen island)

After gluing the top rail perfectly square to the stile and allowing it to set for a day, I proceeded to use the spacer to attach the rest of the rails with the proper spacing to accept the glass.

Here's a better shot of the spacer.

And more of the joinery.

The door came together nicely.

I don't try to cut the pieces to length. I prefer to build it top to bottom and then cut it square.

I needed to cut trim pieces for the glass. I used the Festool track saw. It was a good way to do it since the off cut piece was under the track and held in place. Much safer.

And a bunch of them.

The track saw setup to cut the trim. I wish I'd gotten more track saw photos. It was a big part of the project.

I used glazing tape around the perimeter of the glass, and on the outer edge.

Here is another interim shot of the assembly.

And that's it. Door done.
Needless to say, I skipped over a lot of details on this write up. If you have any questions, feel free to ask.
Half of what we read or hear about finishing is right. We just don’t know which half! — Bob Flexner
12 Comments
working with my hands is a joy,it gives me a sense of fulfillment,somthing so many seek and so few find.-SAM MALOOF.
Main Street to the Mountains
Great work, except for the track saw stuff, should probably delete those pics... lol j/k of course
Figuring out how to do something you have never done is what makes a good challenge.
Ryan/// ~sigh~ I blew up another bowl. Moke told me "I made the inside bigger than the outside".
Half of what we read or hear about finishing is right. We just don’t know which half! — Bob Flexner
-- Soli Deo gloria! ( To God alone be the Glory)
Half of what we read or hear about finishing is right. We just don’t know which half! — Bob Flexner

Dr. Quackner
I just don't understand Dr Quackner post on this??????????????
Cheers, Jim ........................ Variety is the spice of life...............Learn something new every day
Half of what we read or hear about finishing is right. We just don’t know which half! — Bob Flexner


