


Share your craft projects
Make new craft buddies
Ask craft questions
Blog your craft journey

HokieKen
8746 posts
and
55 followers
in over 3 years
in over 3 years
More from HokieKen


Cantilevered Storage Box


A couple of years ago, I started dabbling in whittling/carving. Since then I've been picking up knives and tools here and there and other odds and ends like stones and strops, small vises, BAND AIDS, finger-guards etc. For the past year or so, I've been storing all of it like this:
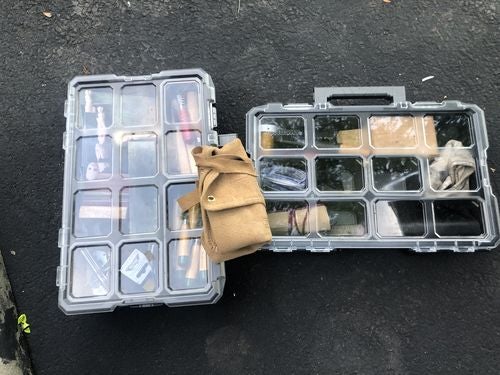
That was a temporary solution until I could decide on a more permanent one. I saw lots of totes that really seemed to be the simplest and most accessible option but couldn't really convince myself it was a good solution for me. When we take vacations or long weekend trips, I like to take my carving stuff. I also carry it in my truck so I can fiddle around with it during my lunch breaks when it's nice outside. So, I wanted something that I could keep closed and that would sit flat and not topple over in my back seat. I also wanted something that grandkids couldn't easily snatch something out of and make blood ;-)
When the Coronavirus first really hit the US and people were starting to have to stay home more, Woodsmith was awesome enough to give out a free plan to us woodoworkers. (As of now you can still get one at that link. Go on. I'll wait.) When I was browsing their plans, the Box-Jointed Craft Center jumped out and said "Build ME!" At first I wasn't sure what I would use it for, I just liked the compact design and that there were multiple small boxes rather than one with trays or drawers. Then it dawned on me that it would make great storage for my carving tools and would be portable as well as stable and fully enclosed. It's been a while since I got as excited about a project as I did this one. Not only would it be a solution but it could let me show off some of my mediocre woodworking skills in a unique package. Plus, it just looked like a fun build ;-)
I haven't had any time off work and with it being springtime and yard work needing done, I definitely haven't been getting any excess shop time. Rather than letting limited time be a damper on the project, I decided to splurge and buy some Cherry boards that were kiln-dried and already thickness sanded to the 3/8" the plans called for. I ordered those, a piece of 1/8" BB ply for the box bottoms and some 3/4" binding posts for the pivot joints and got to work.
My Incra I-Box made quick and accurate work of the box joints. Unfortunately, after I had cut the first 3 boards, I realized I hadn't moved the backer boards after final adjustments. So there was a lot of tearout at some of the joints that I ended up spending a couple of hours filling with sawdust and CA after all the glue-ups were done. You IBox users, remember to make sure your backer is in the right place ;-) As far as the construction of the individual boxes, I pretty much followed the plan exactly. I glued up the large bottom box first and somehow let it get a bit out of square. Rather than trying to fix that, I ended up gluing up the rest of the boxes working from the bottom up and making them fit with the box below on all sides rather than trying to keep everything square. This was actually a good way to work. Everything is nearly square but everything is flush on all sides so everything looks truly square.
Next was the handle. Again, I followed the plans on this one because I thought it looked like it was strongly constructed and it also looked cool I used hand planes to dimension a piece of Walnut to 1" x 1-1/4" and then cut to lengths. I joined the three pieces with box joints. FYI, the I-Box isn't intended to cut 1" deep joints. Mine does now though :-/ Glad the jig is aluminum and not steel and glad my table saw isn't a SawStop ;-) After the joints were glued up, I laid out the handle shape and cut it on my bandsaw. Then I used my belt sander and OSS to finish shaping it. I kind of wish I had selected a lighter colored stick of Walnut so the box joints would stand out more. I think the curved surface with the interlocking fingers looks awesome. I'll definitely keep this handle construction method in mind for future projects.
Next up was the lids. The plans called for this whole thing to be made of Cherry but I already knew I was using Walnut for accent pieces. I couldn't decide whether to make solid Walnut lids or make Walnut frames with Cherry panels. Then inspiration struck and I reached out to my buddy MikeACG. Mike is a wizard with his CNC and his laser so I asked him if he could make me an acrylic template I could use with my Whiteside router inlay kit. He jumped on it and had it in my mailbox (with a few tasty Michigan brews to boot!) before I even got around to needing it THANKS MIKE!! So, as you can see in the fifth picture, I inlaid Walnut into Cherry panels to make my maker's mark in the lids. Since the piece is so symmetric overall, I mirrored the pattern about the center. Now I can tell it's mine from both sides ;-)
The plans called for a mitered frame on the lids. I thought box joints would be better since everything else is box jointed. But, in a 3/8" thick lid, that wasn't really practical. So I cheated and just did half-laps at the corners. I fit the lids and hinged them with some small brass hinges I found in my hardware drawer.
Finally were the pivot bars. I cut them to size per the plans and drilled the holes and then drilled the holes in the boxes in the middle row and attached the bars there. After that, I had to carefully mark, check, fit, erase, mark, check, fit and finally drill holes. One side ended up binding and having a gap when closed so I ended up remaking a few of the pivot bars and shifting the centerline location of the holes. I'm sure the tedium of fitting these bars all originated with my original sloppy glue up. Had all my boxes been square to begin with, this part probably would have gone faster. All's well that ends well though. It opens and closes smooth as silk )
Finally, finishing (this post and the box). Everything got two coats of BLO and week to cure. After that, The pivot bars got a coat of paste wax and everything else got 3 coats of Arm-R-Seal.
Thanks for looking! Questions and comments welcomed as always!
25 Comments

i thought it was awesome when i saw it posted on that "other" site and it's still awesome. beautiful work kenny. hey you should enter it in the contest ?
working with my hands is a joy,it gives me a sense of fulfillment,somthing so many seek and so few find.-SAM MALOOF.

Love that build. I’ve looked at it a couple times and tried to find an excuse to build it. Really cool!
Ryan/// ~sigh~ I blew up another bowl. Moke told me "I made the inside bigger than the outside".
Ok Ken...now your just showing off! That awesome and extremely functional...good job!
Mike

Great job !!! To me all those angles would be a nightmare. Mike
That is one cool box!!! I love it. That's furniture.

That is a great looking and functional box, great solution to store the carving tools and such. Awesome build.
Main Street to the Mountains

Excellent work!!

Really fits your propose nicely. And looks great on top of the functionality!

Looks great, Kenny
Don't anthropomorphize your handplanes. They hate it when you do that. - OldTools Archive -

Real nice looking box Kenny
Ken
That is beautiful!
That is beautiful!
Petey
Thanks for the comments all! My carving tools have sorta outgrown this box now but it's still one of my favorite builds and I still keep all my sharpening supplies and smaller tools in it. And it's always my traveling box when I want to take some carving on vacations and such :-)

Sweet box, the makers mark inlay brings it way over the top.
Lincoln - "Give me six hours to chop down a tree and I will spend the first four sharpening the axe." Dave in AZ
Sure wish I had a shaper for my inlays…

Bucket list, storage box for my Wife's jewelry making supplies. What are your dimensions?
I’m about 6’1”, 250#, 38” waist, 32” inseam… OH! You meant the dimensions of the box!! I’ll e-mail you later today. I have detailed drawings ;-)
Ken
I remember that project. That is really a good one
I remember that project. That is really a good one
Petey
Still love that box Kenny. This is a good move from over there....
Still awesome!
Ryan/// ~sigh~ I blew up another bowl. Moke told me "I made the inside bigger than the outside".
well yeah, it's kenny !
working with my hands is a joy,it gives me a sense of fulfillment,somthing so many seek and so few find.-SAM MALOOF.
More from HokieKen