Share your craft projects
Make new craft buddies
Ask craft questions
Blog your craft journey

RyanGi
8959 posts
and
60 followers
in over 3 years
in over 3 years
More from RyanGi
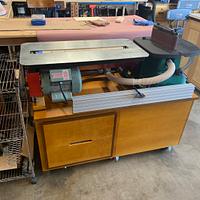
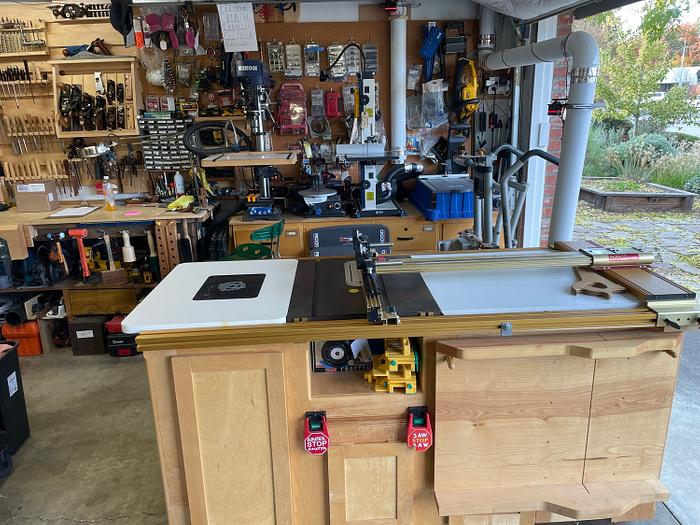
Table Saw and Router Table surround
This is a long post about a build I did a couple years ago. Unfortunately, no matter what I've tried, I can't get these older pics to rotate to the correct orientation. So tilt yer head a bit!… apologies in advance.
I've had a couple requests for more info about the table saw/router table cabinet build I did several years ago. Let me start by saying very few measurements were used in the making of this project. I pretty much just laid out what I had, marked along the edges and cut to fit. All my shop furniture is a 'practice run' for me to learn techniques, styles and finishes and this was no different. I wanted to try to copy the custom cabinets we had built for the remodel of our house many years ago, so I set out to do that.
The face frames are maple. I sealed everything with Crystal-lac before spray finishing with 4 coats of NC lacquer. I know the pore filler wasn't really necessary, but it sure makes the frames silky smooth!
The saw is an old 113 that I inherited from my father-in-law on a stoutly built rolling cart with a bit of storage underneath. I hung a set of Incra rails on it with the intention of having the router table on the left wing and a table extension off the right wing with storage under neath that. The router table was double thick Formica panels with an Incra Mast-R-lift router lift and a dust box. Surrounding the router table I wanted storage for…well…router stuff. Originally the right wing storage area was fitted for a flip top cart with a planer mounted on it. The idea was that the planer would store upside down and the whole cart would store out of the way under the right wing. I planned to put faux matching doors on the side of the flip cart so it matched the cabinet doors around the rest of the assembly. Later on, after I acquired a jointer, I mounted that on the other side of the flip top and moved it elsewhere in the shop. I removed the faux doors and hinged them for real onto the cabinet frame under the right wing, storing my basic shop-vac dust collection system there. All the ducting ran out the back of the cabinet and through a series of paths to my other tools. When I upgraded to a Supercell, that storage area became jig and fixture storage for the table saw.
Here's the basic tool layout before the build:


I laid out tape lines on the ground that coincided with the edges of the tables by using a plumb bob and painters tape. I confirmed the measurements against the table the cut up 3/4" ply for the floor. I attached a bunch of poly casters to effectively create toe-kick space:


From there I built up an interior framework to provide storage for the area under the router table, as well as to tie together the controls for the table saw and the router. These interior components were tied into the cart under the table saw as a way to stabilize the whole thing….lots of pocket screws here made for a very rigid interior skeleton:


Next, I built a series of face frames sized to the ply baseplate already in place. There ended up being a couple different sections that I tied together on assembly. I built these including the detail that I wanted to include to match our home's cabinetry because, again, this was a learning project for me. After a complete dry fit, I spray finished all the pieces assembled in the largest chunks I could handle assembled, all the face frames were built and assembled with pocket screws:


Then I fitted the frames to the baseplate and tied everything together. At this point, I finished the install of some of the interior storage parts and test fit the stuff I wanted to put in there:


Lastly, I sized, built, prehung, finished and then hung the cabinet doors. This was my weakest element as I built them rail and style, but didn't have a jointer and some of my edges just weren't up to par. They all worked out and function, but I'm still unhappy when I look at a couple of the joints. The panel inserts were simple sande ply, which I would also not do again as they didn't take finish as well. Live and learn. I did find some awesome little black rubber balls that fit in the panel dado to hold the panel nice and tight, so that was a cool win:


That last pic shows the faux doors installed on the flip top. Makes it look like it's just part of the cabinetry!
Some great learning points and I'm happy with the final product. The Incra products works flawlessly with it, allowing to simply unlock and slide the carriage further down the rails for use with the router table. My shop limits the amount of outfeed I have, which is why I didn't add an outfeed table, but in a large shop that would be a great addition. It fits my needs, so I don't worry about it. Hope your neck isn't too stiff from looking at the pics, but thanks for looking!
Ryan/// ~sigh~ I blew up another bowl. Moke told me "I made the inside bigger than the outside".
6 Comments
nice setup but never been a fan of TS and router table combo's but if space is tight it does solve a problem quite well. hey whats with the sideways pic's man.you wanna piss off the duck ? i thought we left this stuff back "there" !!!!
working with my hands is a joy,it gives me a sense of fulfillment,somthing so many seek and so few find.-SAM MALOOF.
Yeah, well, space is definitely the issue. Although I do like how I can use the Incra Fence on both tools with a simple adjustment.
The pics…yeah…um…I don’t have any idea what’s happening there. Honestly I think the files are corrupted or something. I rotate them and they never stay in the new orientation. No idea.
The pics…yeah…um…I don’t have any idea what’s happening there. Honestly I think the files are corrupted or something. I rotate them and they never stay in the new orientation. No idea.
Ryan/// ~sigh~ I blew up another bowl. Moke told me "I made the inside bigger than the outside".
Good setup Ryan, I just turned an old Craftsman TS into a cabinet saw with a large top surface, Still need to tweak it, but it's going to be a great addition.
Main Street to the Mountains
Dandy set up thanks for sharing. I have been thinking about moving my Touter setup to my table saw extension.
-- Soli Deo gloria! ( To God alone be the Glory)
You and Eric have a nice set up. Even with a full size cabinet saw I keep adding larger runout tables etc.
Ron
Thanks! I’d love to have a run off table behind it as well, but space just isn’t there. As it is, in my shop, I have just enough room to cut up 4’ stock on the TS. Anything longer and I use a track saw. Just don’t have the space…someday.
Ryan/// ~sigh~ I blew up another bowl. Moke told me "I made the inside bigger than the outside".


