Having seen Dennis Zongkers recentpost about a set of ‘Sexy legs’ for a musical box he is making, I thought I would post a couple of my old musical boxes that were first shown on that other site. They both feature marquetry designs on the outside based on works by Gustave Klimt.
The Outside This one use ‘The Kiss’, for the top of the lid, arguably Gustav Klimt's greatest masterpiece. It was painted by thim in 1907/8 and is thought to depict him with his life-long lover Emile Floge.
The inspiration came from a holiday to Japan in 2014 where I came across a small three-dimensional sculpture of The Kiss in the gift shop of the Open Air sculpture park in Hakone. While looking at the small sculpture, I had the idea that with so many straight lines, rectangles and circles, all-be-it small, it might just be possible to do a marquetry version. The seed of an idea was sown.
Back home I looked at a book on Gustav Klimt's work that my wife had bought several years earlier, and yes I decide a marquetry version of The Kiss was possible. Never one for just doing a marquetry picture I needed something to put it on. A box!
While The Kiss could go on the lid of the box, the marquetry panel had to be big enough so that the scaled down small detail could actually be made. So, with The Kiss going on the lid, what about the sides of the box? In the Klimt book I found pictures of his working drawings for another of his famous works ‘The Fulfilment ' that formed the dining room frieze in the Stoclet Palace. The frieze was commissioned by a wealthy Belgian Banker, Adolphe Stoclet, who was building his Stoclet Palace/Mansion in Brussels.
You can see 'The Tree of life' on each side wall together with 'The Embrace'. 'The Knight' can be made out on the back wall.
The finished frieze is 14 meters long, and around 2 meters tall. It is made of marble and inlaid with copper, silver, corals, and semi-precious stones. Klimt designed it in collaboration with the Viennese Secessionists group who installed it in the ‘Palace’ in 1905/6. Always enjoying a challenge I decided it looked just possible, with some modifications to reduce its size, to suite four marquetry panels for the sides of the box. The main problem I could foresee was cutting out the Tree of Life which forms the background for most of the frieze. I couldn't contemplate cutting the tree out by hand as it would require one extremely long continuous sinuous saw cut, which would be very, very fragile. But could it be cut by laser technology? Discussions with fellow FWWA member, Len Starkie, suggested it could be done one his laser CNC. The technology would allow the tree and the background to be cut to different sizes so take up the ‘kerf’ left by the laser.
I painstakingly traced the Tree of Life into the computer to provide Len with a MS Word drawing file that he could convert with ‘Coral Draw’ into a vector file for his laser. This would be the front panel of the box.
I did the same for the side panels. With Lens help it worked first time and I had the two pieces of veneer - the background with a tree shaped hole in it, and the actual Tree of Life to fit into the hole!! With these fitted together and taped up I then cut all the other flowers, buds, leaves, rose bushes, figures, birds, and butterflies by hand with a fret saw. At that time I hadn’t seen a chevalet, though Paul ‘Shipwright’ suggested it would have done the job!
So the elements of the frieze represented on the box are: The Tree of life which wraps around the front and sides of the box, with Rose bushes on each side panel.
The Dancing Girl, representing Waiting, is on the left – should have used veneer with a great contrast!! The Embrace representing Fulfilment, is right front.
The Knight, which is an abstract design taken from the back wall of the Stoclet’s dining room, on the rear of the box. Some of these motifs are then repeated on the interior of the box.
The outside of the box with its marquetry designs and the use of light coloured veneers was a change for me from the usual dark figured burl veneers often found on boxes, and which I started off my box making ‘career’ with.
The Inside So we have the five outside panels – the lid and four sides. Next, was what goes in the box. I had long marvelled at some of the complex auto-opening boxes from the mid-Victorian period. The ones I liked most were by George Betjemann & Sons which I found on Daniel Lucian's Antique Box site. If you’ve not seen them then do have a look here https://daniellucian.com they are amazing! These patented complex mechanical designs allowed their boxes to automatically open as the lid was raised, with the compartmented sections of the sides of the box cantilevering out. They usually also incorporated a few secret compartments for good measure. I couldn’t work out the auto-mechanism, so mine requires you to open the sections manually!! But I eventually found fellow LJ, Brice1 who had worked them out and made some. Checkout his automated boxes here: https://www.lumberjocks.com/members/brice1.67546/#sc_items truly amazing!
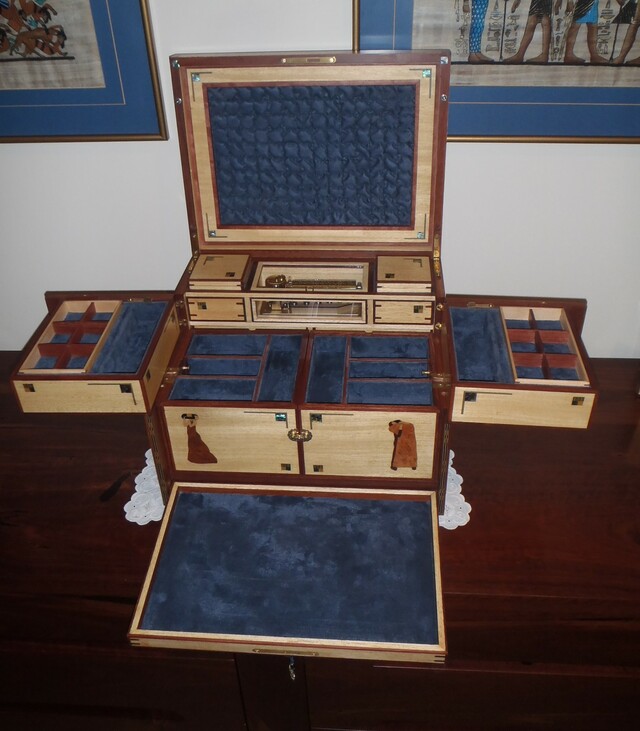
But to my box, and Dennis inspiration that prompted me to post this. I decided to include a 50 note, 3 tune Sankyo musical movement into the design. With the lid open and the front down you can see it at the back under the glass. Glass helps to resonate the sound, amplifying it considerably.
Either side of the Musical movement are two small removable treasure chest. In front of these and the musical movement are two compartmented sections with ring slots and removable earring trays. These can be rotated out at right angles and in this position it is possible to access the secret trays that are hidden in the compartment’s bases.
Opening the catch holding the two lower sections together now enables these to be rotated out at right angles, which in turn rotates the top two trays a further 90 degrees.
Access to the drawers in these lower sections is achieved by raising the knob on the sliders at the back of each section. This brings a set of rare earth magnets into play. As the sliders are moved up the sequence of magnets in the sliders changes from attracting the drawers to repelling them so forcing the drawers open.
Now that the box is fully open, five rear drawers are seen below the musical movement with a tray in the floor. Removing this tray reveals a false floor.
Under the false floor are two trays originally used for holding gold sovereign coins. I went for Australian 2 dollar coins - a set of every one that had been minted up to that point in time. Removing these coin trays and their surrounds gives access to a further three small secret drawers hidden in the back of the box!!
In the original post I added some extra information about a few of the innovative things in the box - well they were innovative for me!!
- In the marquetry I added quite a few small circles and triangles of coloured veneer. I cut the holes and the pieces to fill the holes with a leather punch - they worked well.
- I also used some jewellery findings in the form of different brass beads. The beads were set in just proud after the panels had been pressed and were then filed and sanded flat. - I also made my own edge banding put of blue and yellow stained veneer.
- The 'knobs' for the five drawers at the back of the box needed to be very small, to avoid then catching the four rotating compartments once they were closed. In the past I had used dolls house furniture doorknobs, but these would still have been too big. So, I used glass beads, brass earing findings and necklace cord to make some drop pulls.
- The opening of the drawers in the fold out compartments I’ve already mentioned used rare earth magnets which I thought was a neat alternative to the spring mechanisms used in many antique boxes.
- To raise the false bottom and to give access to the coin trays I did use a spring mechanisms bent up from some old band saw blade with the teeth removed.
- The quilted fabric effect inside the lid was produced using some ‘shrink’ fabric, The blue leatherette and its simple square pattern was sewn onto an over size piece of the blue material which was backed with this shrink fabric. Once done the blue leatherette was ironed which caused the backing fabric to shrink and so produce the pattern. I’ve not used it since but you could sew any pattern and shrink it to produce a whole range of effects.
The light coloured wood of the interior is paulownia or kiri. But I decided that it lacked something so came up with a range of things to add more appeal. Most of the kiri was veneered onto the drawers and compartments after they had been made and glued up. I then added the dark splines, followed by the dark stringing around the edges.
There was still something missing so decided to put small versions of The Fulfilment and The Dancing girl on the lower rotating compartments and came up with the small square motif of blue and yellow veneer that I used to make the stringing around the lid and some and pau shell squares. All these provided more visual appeal to an otherwise plain interior.
Barrel hinges were used for the rotating compartments so that nothing was visible on the outside - boy are they hard to fit..... though if you drill a hole for them in a wide piece of wood and then saw it in half, your holes are bound to match up, and you just glue each piece onto each side of the opening.
Andrew Crawfords hinges and a lock were fitted to the main box. Looking back it would have been good to try the mechanisim that Brice1 made, so that everything opened up as you lifted the lid. Perhaps next time!!
Very awesome workmanship! Even with the lasers help, you must have spent a long time doing all that work and your eyes are probably stuck at that focal distance!