


Share your craft projects
Make new craft buddies
Ask craft questions
Blog your craft journey

gdaveg
572 posts
and
21 followers
in over 3 years
in over 3 years
More from gdaveg


New Crosscut Sled for AZ Shop


Over the last couple of weeks I built a large sled for the AZ shop. The old sled was getting loose in the miter slots and fence and base slots were no longer zero clearance.
The base is 23” x 40” x 3/4” BB plywood. The push fence is laminated mix of Maple and Cherry. The back fence is BB.
For runners the 18” Rockler Aluminum Miter Slot bars were used. They are adjustable for width with nylon tipped Allen set screws. Very easy to adjust to the slot and slide freely.
Link to runners: https://www.amazon.com/Rockler-36-Aluminum-Miter-Bar/dp/B0052KF7LA/ref=asc_df_B0052KF7LA?tag=bingshoppinga-20&linkCode=df0&hvadid=80607997944701&hvnetw=o&hvqmt=e&hvbmt=be&hvdev=c&hvlocint=&hvlocphy=&hvtargid=pla-4584207577420554&psc=1
The fence was locked in position to hold the base in the correct relation to the blade. (2” to the right of base center). The runners were shimmed up with a 1/8” thick strip of wood so they were above the table saw top. They are attached to the sled with a full length strip of double backed tape which is cut out at the three tapped screw holes. Three 1/4-20 x 1” SS Flat Head SS Allen Socket screws were added to permanently secure the runners. The procedure follows below:
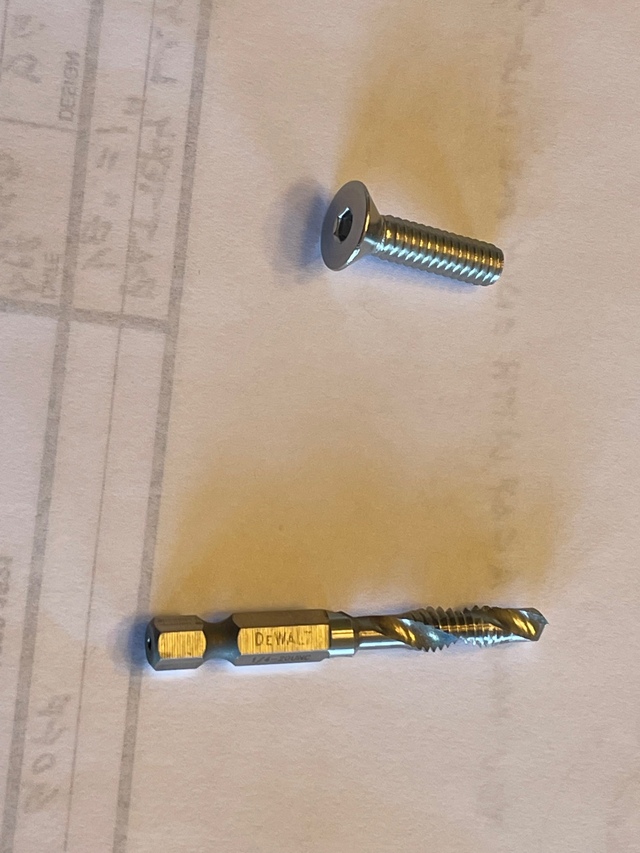
To drill accurate holes through the plywood base a Drill / Tap was turned by hand using a tap T handle, Do Not use a Power Drill. Drilling through the Rockler runner first, the lead end drill bit cut about 1/2” into the BB base while still leaving tap threads in the runner. A #7 drill was carefully aligned to drill the rest of the way through the plywood base utilizing a drill press, the middle runner holes had to be drilled by hand after the drill/tap started the hole. The base was flipped over and the top holes were counter bored. On the Amazon site where the drill / tap was obtained most of the one star reviews warned that the Dewalt bits had a nasty habit of breaking.
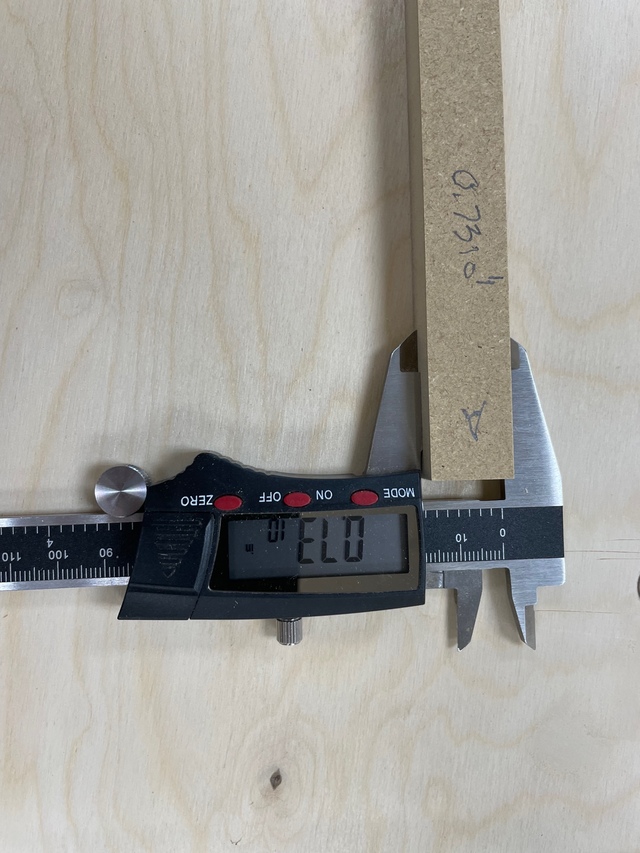
The sled was dialed in using the 5 Cut method to square a crosscut sled per William Ng’s YouTube Video which is revisited every sled I build, a link to Mr. Ng's video is in my other sled built for the box swap, linked below. A 1/2” x 20” square of MDF was used for the 5 cut strips. This sled’s current accuracy is very good.
Initial fence alignment was set using a Wixey Digital Protractor between the blade and push fence. Two fence adjustments were made. Final accuracy was 0.0000292 “/“. I am sure a bit of luck was involved.
The aluminum runners will be able to be readjusted to take out future sled “wiggle”. When DW & I return to AZ I will verify whether the fence needs to be readjusted.
I hope this write up helps others to build a crosscut sled.
Edited 2-4-2026:
You can find both the 1/4 20 tap drill and 1/4 20 SS Flat Head Hex Drive Screws on Amazon.
Edited 2-4-2026:
You can find both the 1/4 20 tap drill and 1/4 20 SS Flat Head Hex Drive Screws on Amazon.
daveg, SW Washington & AZ
13 Comments
Here is a pic of the screws and drill/tap. And pics of alignment strip 5 ends A & B. Watch the William Ng video.

daveg, SW Washington & AZ
Here is a working link to the Rockler runner bars.
https://www.rockler.com/rockler-18-24-aluminum-miter-bar
https://www.rockler.com/rockler-18-24-aluminum-miter-bar
daveg, SW Washington & AZ

nice right up dave.
working with my hands is a joy,it gives me a sense of fulfillment,somthing so many seek and so few find.-SAM MALOOF.

Good shop project Dave! Every one need a version (or two) of these sleds.
Forgot to add, love how your sled, a nice 'n' fresh empty surface, instantly collects tools, etc.
I have problems with table projects, they get covered with "stuff" if they sit for more than a few hours. I'm such a chump 😜
I have problems with table projects, they get covered with "stuff" if they sit for more than a few hours. I'm such a chump 😜

A well-built Sled Dave, a must in any shop.
Main Street to the Mountains
All,
Thanks for the comments. Considered using a 4 inch tall push fence full length, but big sleds like this get pretty heavy.
Thanks for the comments. Considered using a 4 inch tall push fence full length, but big sleds like this get pretty heavy.
daveg, SW Washington & AZ
Dave,
Nice sled. I cheated and purchased the Incra 1000HD and sled. Prefect for segment turnings as well and 90's
Nice sled. I cheated and purchased the Incra 1000HD and sled. Prefect for segment turnings as well and 90's
Petey
Pete,
Incra makes some fine tools, sure it serves you well. The segmented bowl turners in the shop have made 1 runner sleds dedicated to 7.5, 15 degrees.
Incra makes some fine tools, sure it serves you well. The segmented bowl turners in the shop have made 1 runner sleds dedicated to 7.5, 15 degrees.
daveg, SW Washington & AZ
Nice build Dave. I also made one following William Ng’s video. Like Petey I also bought an Incra. Sometimes when it rains and the humidity is very high my wood expands and the sled jams in the miter slots.
I like how you used the aluminum miter bars, great idea. I bought my miter bars from HD. They are shipped to the store and much cheaper than most and I picked them up without paying freight. They also have a no freight policy for orders over $45.00. Which I’m sure your aware of.
I like how you used the aluminum miter bars, great idea. I bought my miter bars from HD. They are shipped to the store and much cheaper than most and I picked them up without paying freight. They also have a no freight policy for orders over $45.00. Which I’m sure your aware of.
James McIntyre
Getting the runners sliding well and tight side to side is the hardest part of building sleds. I have used wood and cutting board material (HDPE??) prior to this sled. Wood gets loose, swells due to humidity, HDPE swells at the attachment screws and makes for a lot of trimming the width to make the sled push smoothly. If these aluminum runners don't have issues will use them on future sleds.
The sled I made last year has walnut runners and now is loose. Got some HDPE strips already cut for it. It may wait till next fall.
The sled I made last year has walnut runners and now is loose. Got some HDPE strips already cut for it. It may wait till next fall.
daveg, SW Washington & AZ
I bought a bunch of 3/4" x 3/8" steel (MSC) for runners. Thinking about it the Al would help lighten things up a tad 😀
Great thing about the dual runners is you can fix one runner in place and square, then the other can be attached with some sideways adjustment to fit up against the inside edge of the other miter slot. Gives the ability to tune the action and still have the full face to face contact with the miter slot.
To really slicker up the action, the drawer glide tape (HDPE?) applied to the side of the runners really helps, but you need to be careful when laying the sled onto the table to avoid peeling it off. The tape also really does wonders when you apply a bunch of strips to the base of the sled to let it "float" above the table. Slicker that Pomade on a greased pig.
Really nice sled! You did a great job. Mr NG's 5 cut is very well thought out by him and accurate.
I have used many HDPE runners for jigs....I f they are a little loose tighten them the HDPE expands a little and fills the gap. If its too much use a file on edge to adjust. I get the HDPE at Sams, in the form a 24" chefs cutting board and then run it through a drum sander as lightly as I can while still moving to take off the bumpy surface it came with. I got that from somebody on the old LJ's site and it has served me well. I did get the Rockler runners for my last crosscut jig I made though, for durabilty.
I have used many HDPE runners for jigs....I f they are a little loose tighten them the HDPE expands a little and fills the gap. If its too much use a file on edge to adjust. I get the HDPE at Sams, in the form a 24" chefs cutting board and then run it through a drum sander as lightly as I can while still moving to take off the bumpy surface it came with. I got that from somebody on the old LJ's site and it has served me well. I did get the Rockler runners for my last crosscut jig I made though, for durabilty.
Mike
More from gdaveg