Share your craft projects
Make new craft buddies
Ask craft questions
Blog your craft journey

RyanGi
8979 posts
and
60 followers
in over 3 years
in over 3 years
More from RyanGi
2025 BeerBQ Swap Project
For the 2025 barbecue swap, I drew Keebler. I mulled around some ideas and figured BBQ picnic was going to be the theme. I built three small projects, and of course included beers… as is the custom..
As I said, three small projects… and I wanted them to be built with similar materials, including some stainless steel pieces. I had some ideas, but wanted to stretch a little bit and do all the work in-shop, including any of the metal work. I built all three of these items all at once, moving back-and-forth between working on them as the mood struck. I’ll present them separately, but you’ll probably notice parts from each one showing up in the pics throughout the project… As I said, all at once, all together, but separate… or so says the ADHD side of me…
First up was a pigtail flipper for the grill. I had a couple lengths of 1/4" stainless steel steel round stock that was about perfect for all these projects, so I started by doing an initial sharpening of one end of each of the rods, chucking them into a power drill and then running them against the 2 x 42 grinder to get them tapered down sharp. Following that, I polished the entire length using the Combat Abrasives three wheel kit mounted on the lathe. This made pretty quick work of both rods and they were pretty much at finish polish at this point.


From there, I rough cut the rods to length and then worked them over on the metal bender. I haven't used this tool in a couple years, so I ran a couple test bends first, since I knew the stock would slip a bit as the right radius' were put in. But it was easier to manage the slip than it would be to polish the bent rods later on. The bending worked out alright! I made two, in slightly different styles, because I had an idea for the second one, and who knew if both were going to work out, right?!?! Both ended up great, and I'm not really sure I prefer one over the other, functionally (I tested them afterwards before sending out...and cleaned them of course).


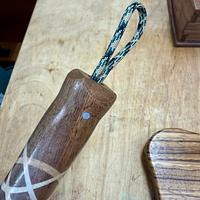
Next up was making some handles. I've turned some Celtic knot style handles before and thought they would look nice on this. I laid out and cut the sections, using walnut for the primary wood, and thin maple slats to make up the knots. Cut, rotate, glue, cut, rotate, glue, repeat...if you've made these before, you know. I used a simple shop jig to help make the glue ups a bit faster, cutting off the protruding 'wings' on the band saw after each glue up. Once these were all glued I turned them down to handles, then drilled a bore to receive the stainless rods.

I lasered a little commemorative deco work on the ends, but really wasn't happy with how it came out, so I sanded it off and went another route. I drilled a bore on the opposite end of the handle from the steel shaft and stitched together a loop of paracord, then inserted it into the bore and cross pinned it above the stitching. This resulted in a pretty clean hanger loop for the tool.


All of these projects were finished with wipe on poly. I'm not always a fan of that finish, but for something that will most likely need to get wiped down with a damp rag from time to time, I wanted them fairly well protected. I did about 8 coats of poly. on these handles. Here's one of them, done, but before I decided to change the back end.

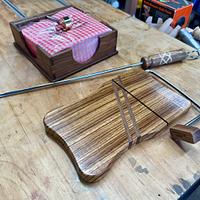
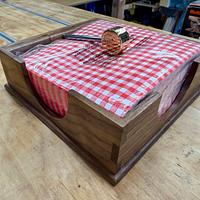
Next up was a napkin caddy. I made this with resawn walnut for the sides, 1/4", but the rear wall I kept a bit over 1/2" since i wanted to use a hidden hinge for the weighted arm installed to keep napkins from flying away in a breeze. I resawed all the walls and base from a single slab...and ended up juuuust a bit shy with the base, so I panel-ized two pieces together. I got so focused on turning down the hidden hinge that I forgot to take pictures of the process...doh! But, it's a 5/8" walnut dowel that I made using the veritas dowel maker, then cut into thirds, drilled and pinned back together. I drilled a side-bore in the middle (moving) section to receive the stainless weighted arm, which I decided to weigh down with a brass slug.

I cut wide finger joints on the ends of the side walls of the caddy, then cut out large radius openings on each side to allow access to the napkins. A little more laser work on the base for fun. I prefinished the insides of all of it with poly, knowing it would be a bear to get to the corners later. I was pretty proud of my forward thinking for prefinishing throughout this swap!


I turned down the brass slug and lasered some decos on the side for fun, these pics are after initial polish and laser work, but before final polish.


Once the hidden hinge was glued in and the back wall sized, I glued up the whole carcass, added the base, then finished the outside with the poly. From there it was just assembling the weighted arm.


Last, but not least, was a cheese cutting board. In fairness, I had a Woodcraft kit that I modeled it from, but wanted to make the bar out of the stainless rod to carry the theme, and the handle out of walnut to replace the stock plastic handle in the kit. I made all the parts for this project in-shop, with the exception of the cutting wire. I tried to fashion my own from some stainless wire, but the genius of the Woodcraft design is the way the ends of the wire are wrapped around itself allowing for the wire to be tightened during assembly with the cam-style handle, resulting in a nice tight cutting wire every time. I tried but couldn't reproduce the wire turns properly to get the desired result...so I used the wire that came with the kit. I'm so ashamed!!
It was a bit of a trick to get the 90s sized just right into the stainless arm using the bender, and it's a good thing the supplied cutter wire has some adjustment in it! I got it pretty close though, and it worked out. There's an indent drilled into the stock (black) arm that comes with the kit. It became quite apparent as I was laying everything out that the location of this indent (which captures a small set screw in the handle and holds everything in tension) was critical, not just in distance from the end, but in location around the circumference of the rod as related to the axis the bends are on. I was able to widget together a jig to get the angle right, using a small bit to assist with alignment. Since the stainless I was using is much harder than the supplied black steel rod, I needed to move to the mini-mill to actually drill the indent out properly and keep the alignment right.


With the arm pretty much done, I set sights on the handle. This turned out to be the most challenging piece because the dimensions are small, and fairly exacting, including two intersecting bores, a cross pinning bore, and a kerf for the wire. The handle design is kind of brilliant. It hinges around the stainless arm, and a cross bore behind that captures the cutting wire, but it cams over-center forcing the wire into a kerf and into tension. A set screw through the bottom of the handle aligns with the small indent on the arm to lock in place. The stock handle is injection molded plastic, but modeling it out of wood turned out to be a lot of hand work. And trying my best to keep the grain aligned to keep it strong since it's under tension from the wire was important too. Hopefully it worked!!
I rough shaped the walnut blank to match the dimensions of the plastic handle, then mortised out the center, cross drilled it, and added the kerf. Then it was just a bunch of hand shaping to get it feeling right. A bit of laser work (seen in the final assembly pic), because everything is better with a laser...

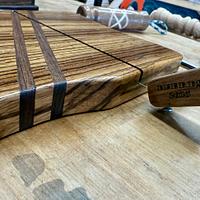
Last part was the actual board. I had a nice piece of zebra wood, so I glued up a couple walnut slats to carry the theme. After glue up, I cut it down, drilled the side bore to receive the arm and cut a kerf across the face for the cutting wire, then shaped it and finished the edges. A bit of decoration on the back side to memorialize it. Finished with 8 layers of wipe on poly so it can be cleaned.


It was a fun swap...so much so that I forgot to take pics of the beers I sent along! But, I got a few from our local breweries here, and a couple more that I picked up on a weekend jaunt to the coast, near Mendocino. Hopefully Keebs gets some porch time to enjoy the beers, and some grill time to enjoy the picnic tools!


Ryan/// ~sigh~ I blew up another bowl. Moke told me "I made the inside bigger than the outside".
2 Comments
Very well done....A good selection to be sure! Good job. Besides you talent at Woodworking you certainly have a talent for metal working too!
Mike
Cool set! Big like on all photos.
...woodicted


