Share your craft projects
Make new craft buddies
Ask craft questions
Blog your craft journey

RyanGi
8949 posts
and
60 followers
in about 3 years
in about 3 years
More from RyanGi
Project - Shop Tour
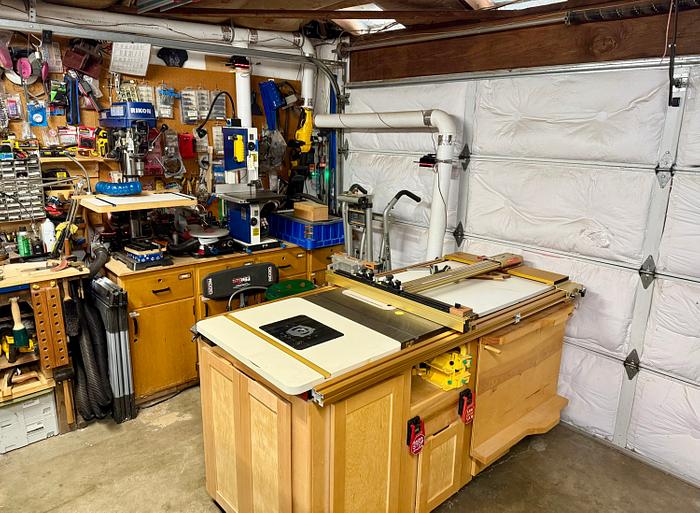
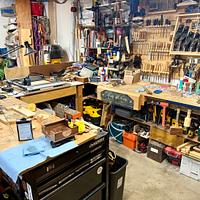
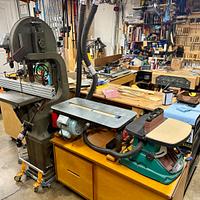
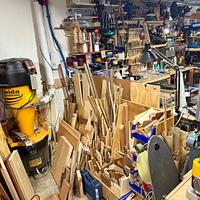
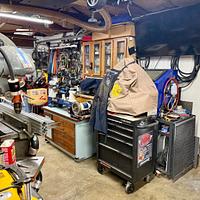
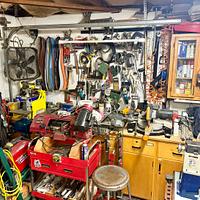
Since we’ve been talking about putting together some project posts to highlight workshops, I thought I’d start it. My workshop is nothing more than a converted garage in a suburban house. It’s about 425 ft.² total, but I give up some of that to the washer and dryer. The shop is divided roughly 70/30 between woodworking and metal working. I started building up the shop well over 10 years ago, and it’s been a work in progress ever since. The images are basically me standing in the center of the shop, facing the rollup door and turning counter clockwise (anti-clockwise for you ducky).
I started off with my father-in-law‘s old 113 craftsman tablesaw and his father‘s workbench. Workbench is a colloquial term, in this case it’s some two by sixes nailed to some 4 x 4 legs…but it’s probably close to 100 years old at this point. Not a true woodworkers workbench, but it’s what I started with. I still have it, although I’ve modified it somewhat. Living in a university town I caught wind that the school was dismantling one of their chemistry labs…and was trying to get rid of the furniture. A couple of pick up truck loads later I had a whole bunch of solid wood cabinets, just like you remember from your high school chemistry class underneath the workstations! I lined both side sides of the garage with them to add storage.
I built a nice surround around the tablesaw including some wings and added a router lift. I topped it off with an Incra LS-TS fence system, which is the bees knees! I started adding bench top tools to include a Rikon drill press and 10 inch bandsaw over the years. Additionally, a scroll saw and a Kreg pocket hole machine. Say what you will about the pocket hole machine, but it makes quick work of cabinet carcasses! I’ve always been big on building my own shop furniture (with the exception of the cabinets I stole from the chemistry lab). It’s a great way to learn new techniques and try finishing technique without any real commitment. Almost all of my shop furniture is home built, and absolutely none of it matches! But that’s OK because I learned a lot from building it. I built several simple rolling tables and had them all the exact same height as the finish height of the workbench… Which is great but ends up being about 6 inches too tall for hand tool work, but what did I know? Having all the tables together means that I have a fair amount of utility space when I’m working on a project.
I built a rolling sanding station that’s a wide, low cabinet carcass on casters and on top of it put the Flat Master panel sander as well as a grizzly oscillating belt sander. Next to that is a venable 16 inch Walker Turner band saw that I inherited from my father-in-law when he passed. What an awesome saw! I found a full height Delta DP that I couldn’t pass up, and I’ll refinish at some point. I’ve also got a DeWalt 735X planer and a Wahuda 8 inch joiner on a flip top cart that lives next to that. Behind the tool area is wood storage and the space for my Oneida super cell dust collector. The entire shop is connected to the dust collector with 4 inch S&D pipe and uses the GRIT automation tool control system for open opening and closing blast gates. That was a major addition and has proved itself worth every penny! Additionally, I have a tool wall that I built to cover the garage window. It’s all built with French cleats and almost all of my hand tools are displayed because I like the way they look. Most of my hand planes are Stanley type 11 or type 13 and are prominently displayed in the middle of the tool wall. Along with a selection of screwdrivers, chisels, gouges, scrapers, etc. I like having the hand tools displayed!
I built a rolling sanding station that’s a wide, low cabinet carcass on casters and on top of it put the Flat Master panel sander as well as a grizzly oscillating belt sander. Next to that is a venable 16 inch Walker Turner band saw that I inherited from my father-in-law when he passed. What an awesome saw! I found a full height Delta DP that I couldn’t pass up, and I’ll refinish at some point. I’ve also got a DeWalt 735X planer and a Wahuda 8 inch joiner on a flip top cart that lives next to that. Behind the tool area is wood storage and the space for my Oneida super cell dust collector. The entire shop is connected to the dust collector with 4 inch S&D pipe and uses the GRIT automation tool control system for open opening and closing blast gates. That was a major addition and has proved itself worth every penny! Additionally, I have a tool wall that I built to cover the garage window. It’s all built with French cleats and almost all of my hand tools are displayed because I like the way they look. Most of my hand planes are Stanley type 11 or type 13 and are prominently displayed in the middle of the tool wall. Along with a selection of screwdrivers, chisels, gouges, scrapers, etc. I like having the hand tools displayed!
I’m absolutely a hybrid woodworker and have lots of power tools, and lots of hand tools. And I have included a lot of technology over the years. I have a Shaper Origin, as well as a laser engraver, and a 3-D printer all in the shop. For small power hand tools it’s all 20 V Dewalt, of which I have most of the collection. They work great for what they’re intended for.
On the other side of the shop, is the metal side and woodshop-overflow. I have the rolling lathe cart that I built for my Rikon midi lathe, including sharpening station. I have mark outs on the floor where I move it to and it allows the overhead dust collection to attach, which is really convenient for sanding! Also on that side is a shop-made steel tube table for my 3-D printer. Eventually, when I get the washer and dryer out of there, I’ll add another tube steel table for the laser engraver. I’ve got a great design for it! Overhead in the shop, besides all the dust collection, is a compressor airline system that I set up years ago. It uses a blue plastic flexible tubing with a metal core. It wasn’t cheap, but it was an awesome way to bring compressed air all over the shop. Additionally I have two air cleaners that are linked together and respond to dust levels increasing in the shop.
On the metal side of the shop is where I fiddle with fabrication from time to time. I have a small bench top metal lathe, as well as a benchtop metal mill that lives on a rolling tool cart. For any of you that aren’t involved with metal working, if you think wood tools are expensive, you should try metal tools! The general rule of thumb is that the tooling you add to the tool is just as expensive as the tool itself. Sometimes even more so. I also have a small MIG welder and a TIG welder, and a small plasma torch. I built a nested welding table that has a pullout cutting rack for the plasma torch underneath it as well. I have a slow speed metal cutting chopsaw as well as a 2 x 42” grinder which is absolutely awesome! I wish I was a better welder, but the reality is I spend much more time on the wood side of the shop than the metal side!
Rounding out that side of the shop is a powder coating station that I built. I posted the project on here somewhere, but basically I welded up a rolling cart frame with an extension wing. On the bottom of the cart is an old kitchen oven that I found on craigslist . On top of the cart is on Eastwood blasting cabinet. When I fold out the extension wing, I can set a small paint tent on it with a fan and filter on the back. I have a small Eastwood powder coating gun that works great! Powder coating is just such an excellent way to keep metal preserved. Way better than paint. The joke of it is the powder coating station is painted not powder coated because I didn’t have a big enough oven and I didn’t want to transported to the city to have it done! I wired the whole thing up into a junction box on the trolly that lets me plug one 240v plug into an aux receptacle on the wall and power everything on the cart.
Anyway, that’s about the extent of my shop. It’s always in flux with things moving around here there, but the last couple years has kind of found it stride. Hopefully I’ll get the washer and dryer out of there this year and then I’ll be able to spread out just a tad more!
Ryan/// ~sigh~ I blew up another bowl. Moke told me "I made the inside bigger than the outside".
30 Comments
Nice! Do you have wheels on everything? The high school cabinet find is great - I wish for more behind a door storage.

Great start in breaking the ice R'Gi...
On first sight it looks cluttered, yet well organised... mine seems bigger yet totally disorganised in comparisson.
In one way I envy your metal working nook, but on the other hand I just hate metal swarf in the workshop.
Where'd you get you Shaper project inspirations... have mine since Jan, yet to make my first actual cut. When I started wating one, I had a 1,000 uses planned, but in the 6 years waiting, followed by an impulse buy when available, that well has dried up.
I have my laser and 3D printer up in the house... would hate to try and fit into the workshop... though they would make extra bench-top space for more junk.
If your first cut is too short... Take the second cut from the longer end... LBD
Ryan,
Way to lead.
I have to look into the S/O.
Long write up that I will go back to read.
Thanks for posting.
Following
Way to lead.
I have to look into the S/O.
Long write up that I will go back to read.
Thanks for posting.
Following
Petey
Following
Petey
Interesting, nice writeup.
Ron
Wow, a well equipped shop no doubt.
Badass Ryan! It’s very similar to my setup so I appreciate the peek inside to give me some ideas on how to keep all that crap arranged😁.
Is that a box fan in the man door?
Is that a box fan in the man door?
Thanks fellas. I need to go back and edit down the size of the pics a little and imbed them in the text…for a more pleasant read. They’re too big right now.
Ducky, anything you’d do with your laser, on thicker material, the Shaper shines. I also have done a fair amount of artsy stuff with it…epoxy backfill of pocketed shapes and the like. You should also read up on the ramping feature, since you can do some pretty artsy stuff with that too.
Kenny, yes, the box fan covers an old dog door. I’ve got it attached to a thermostat of sorts and it helps keep air moving in the shop. I added a thermostatically controlled roof-top fan a few years later. All my cooling is passive, which I keep considering changing, but haven’t gotten their yet…
Ryan/// ~sigh~ I blew up another bowl. Moke told me "I made the inside bigger than the outside".
Ohh, nice to have a look in anothers on shop.
Great, now I have to clean my shop.
Nice packing job Ryan!
I'd feel comfortable in that space, everything is near by and good chance you know where everything is.
The "islanding" of your major tools is excellent, full 360 access.
I'd feel comfortable in that space, everything is near by and good chance you know where everything is.
The "islanding" of your major tools is excellent, full 360 access.
That’s a lot of work packed into your shop.
Nice job.
Nice job.
alright a nice start for shops. youve got a lot going on in that shop ryan.
working with my hands is a joy,it gives me a sense of fulfillment,somthing so many seek and so few find.-SAM MALOOF.
Ryan,
You certainly prove that a big shop isn't necessary to produce all kinds of great projects! I, too, have a shop outfitted with lots of lab cabinets.
Ten years ago, many of us showed our shops in the blog section. Here's mine. If you search Workshop Tours under blogs, you'll find a few.
L/W
You certainly prove that a big shop isn't necessary to produce all kinds of great projects! I, too, have a shop outfitted with lots of lab cabinets.
Ten years ago, many of us showed our shops in the blog section. Here's mine. If you search Workshop Tours under blogs, you'll find a few.
L/W
“Those who would give up essential Liberty, to purchase a little temporary Safety, deserve neither Liberty nor Safety.” Benjamin Franklin
Great Job Ryan....good job with being first and showing us the way...now we all have to clean our shops and get busy....
Mike
Nice shop. Its too clean time to mmake something
Good job kicking this effort off Ryan. Your shop looks great!
Awesome job on layout. All of the "usual suspects" when it comes to the tools, and placed around to access each in a usable fashion, with ohhhhhh soo much hanging, and hiding behind a door. For space, I believe you are at max usefulness.
I too have cabinets back into the dark days of cabinet builds, almost like a history of cabinetry. You can see a progression of the how to make a cabinet several times as we did progress, and I'm proud none of them match. All of them are used, and not having to remake to make em all purty works well for me.
I too have cabinets back into the dark days of cabinet builds, almost like a history of cabinetry. You can see a progression of the how to make a cabinet several times as we did progress, and I'm proud none of them match. All of them are used, and not having to remake to make em all purty works well for me.
Looks great! I like the way you were able to make wood and metal work coexist, I'm always worried about setting something on fire when welding where there's residual sawdust.
Station looking good!
...woodicted


