In the interest of continuing the educational process for myself and maybe for others, I’d like you guys to post your favorite method and/or process for changing the color of wood. That could be dies, colored waxes, stains, fuming, whatever. If you’ve got a go-to wood species/coloration combo that would be awesome too (like aminos fumed white oak, etc). This post isn’t about finishes necessarily, but about coloration.
Please, do a quick couple sentences (or a book, if you want) that includes product type and name (if you’ve got a go to), and process steps. Try to write this for someone who is new and is looking for a bit of a guide t change the color of a piece they’re working on. The more steps you outline, the more likely that are to be able to follow it.
I’ll start with something I stumbled upon. Don’t shoot me for blasphemy!
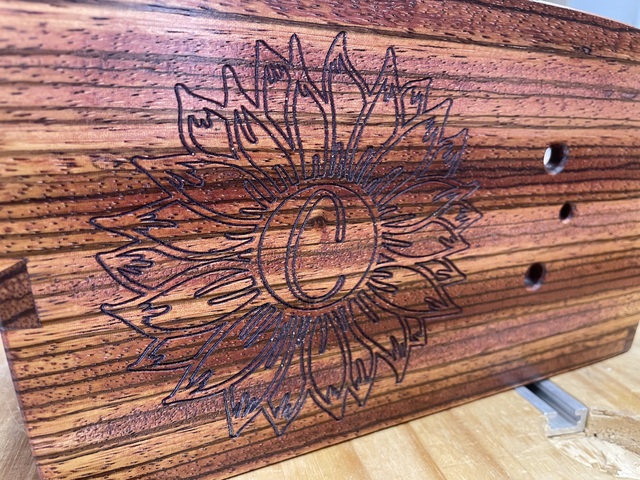
Zebra wood with Cabernet Minwax gel stain 1) sanded to 220 2) applied a liberal coating of the gel stain with a rag 3) immediately wipe off then scrub hard with a rag, regularly moving to a clean section of rag 4) scrub until you’re barely getting any stain on the rag 5) let dry to spec then topcoat
Before throwing what would be reasonable hatred towards desecrating perfectly beautiful zebra wood with a stain, hear me out: Our house has a heavy Craftsman influence, which means more reds than yellows in the wood inside. The zebra wood has a fair amount of yellow in it, so the red gel takes that edge off and by scrubbing it hard you really only get a slight hue change, but it’s noticeable.
What I found with this method is that gel stain obviously doesn’t penetrate as far into the wood, so you can scrub more of it off. Unlike a liquid stain that’s going to quickly penetrate and be very difficult to get back out of the pores. This provides a lighter color shift.
It’s not a method I use all the time, but I’m glad I found it! Waddya got…?
Ryan/// ~sigh~ I blew up another bowl. Moke told me "I made the inside bigger than the outside".
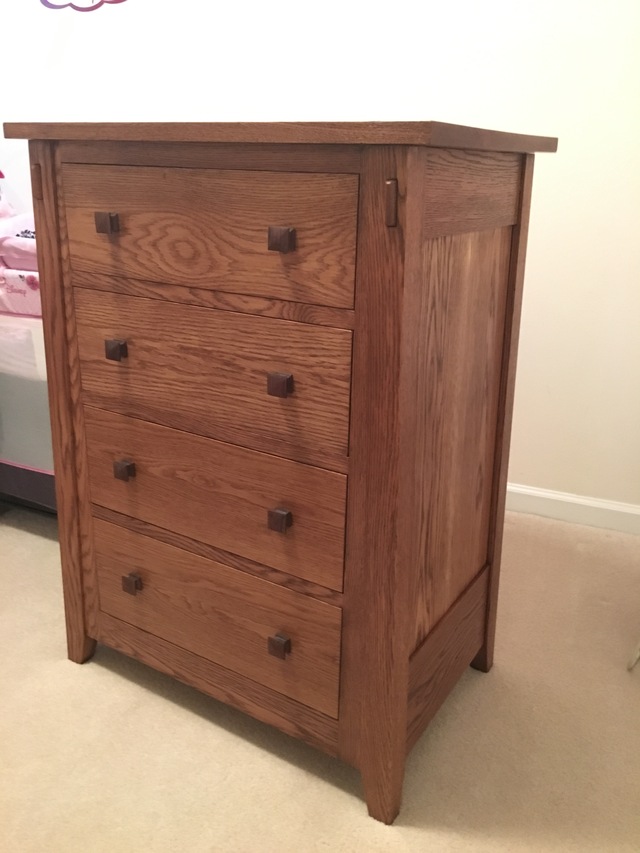
I've had success with evening out the color of Oak using a gel stain glaze. Here is a photo of a dresser I did. You can see I had to switch batches of lumber for the bottom drawers:
A smarter man would have gotten some lumber that was a better match and re-made those drawers but I ain't smarter.
So I gave the entire thing a seal coat of shellac and then layed some dark gel stain on top of that on the lighter colored parts. Let it sit for a bit and wipe off. Repeated until I got a decent match on all the pieces then poly over top of it all.
Those bottom drawers still bug me but the customer was happy so I let it go.
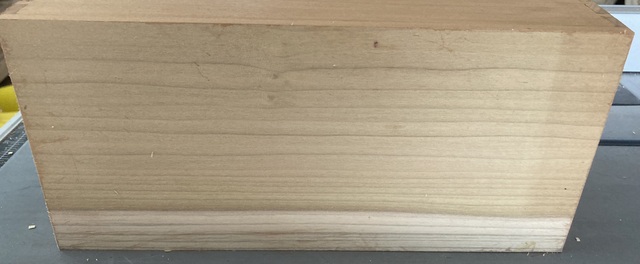
I tend to use shellac mostly, since I’ve played with it a lot and have experience. But this morning I tried kakishibu (bitter pomegranate juice) on some poplar that had a strong green cast.
The interesting thing about this is that the color deepens with exposure to sunlight, and of course I tried it on one of our three cloudy days this summer.
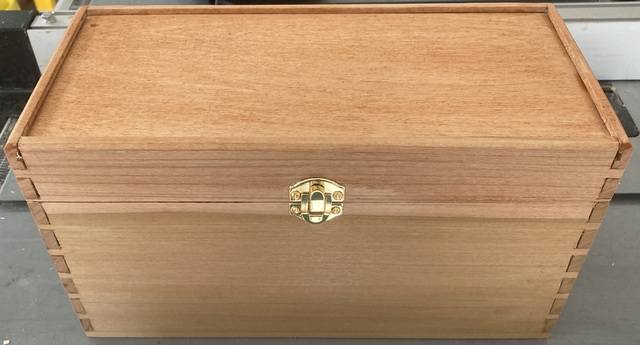
Anyway, untreated (the bottom of a box) and treated.
I’m not sure if I like the pink or not, but it’s supposed to get more brown with sunlight. I’ll be posting more about it next week some time.
The top of the box is Baltic birch, which should be an interesting comparison.
im not one to use stain very rarely but i like the look of that zebra wood ryan. nice job on that chest kenny, cant even tell it's two different tones of oak.
working with my hands is a joy,it gives me a sense of fulfillment,somthing so many seek and so few find.-SAM MALOOF.
There could be volumes written on this but just a few tidbits for now.
(Yes, be aware of the hazards of ammonia and the fumes!)
Yes, it can be tricky. Wood from the same board may or may not all react the same. Use test pieces from your cutoffs!
Besides the color, to me the best thing is you can fume the wood before assembly, no affect on gluing what-so-ever and the finish goes deep so touchup sanding an edge won't burn through as with a stained part.
I use "janitorial strength" ammonia from Ace Hardware. 10% strength and a tad over $5/gallon. Many say you need to special order "blueprinting" ammonia for $$$. WRONG! Don't waste you time or $. The 10% will turn a part into a nice brown in a few hours, overnight and you will have a chocolate brown (provided the wood has enough tannins).
I fume small parts in a RubberMaid tub. I use PVC couplers to act as stilts so my parts are above a small pool of ammonia in the bottom. The PVC keeps the ammonia from wicking up.
Alternatively I also use a frame made from PVC pipe and either a large trash bag or plastic drop cloth to envelope it.
Make a tent with the frame and plastic, sealing off where the plastic meets the ground (I spread a ring of sand). Place your parts (I hang them) in the tent, add a small dog food bowl of ammonia. I also set in a computer fan to circulate the fumes. With clear plastic you can keep track of the process, don't be afraid to sneak a piece out to see how it is doing.
The frame is great for doing complete projects, the tub is ideal for smaller parts.
I built a small cabinet awhile back with sort of a whitewash finish. It took considerable experimentation to come up with something (toned poly) my wife liked. I documented the saga in this blog post: https://craftisian.com/entries/1430-adventures-in-finishing.
I’ll tell you one stain I hate using is gel stain.
Interesting. Why do you hate it? I don't use stain much, but the general consensus is that gel is more user-friendly.
One I didn't care for was the GF water based stain. I used it to match the color of an unfinished door to the cabinets that were in the room. It dries so fast that I had lap marks that were really visible. I wound up using a grout sponge wrung almost dry to even it out. It worked, but what a pain.
Half of what we read or hear about finishing is right. We just don’t know which half! — Bob Flexner
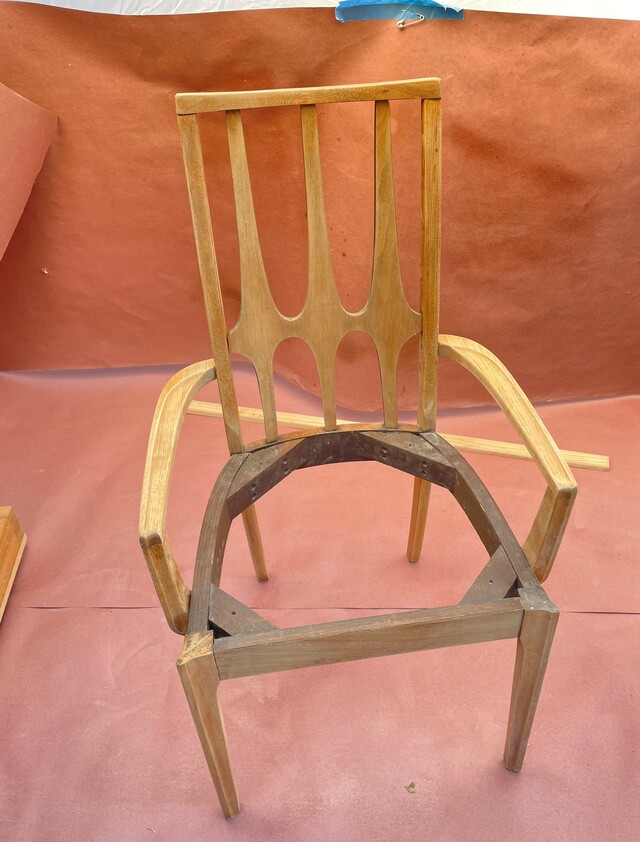
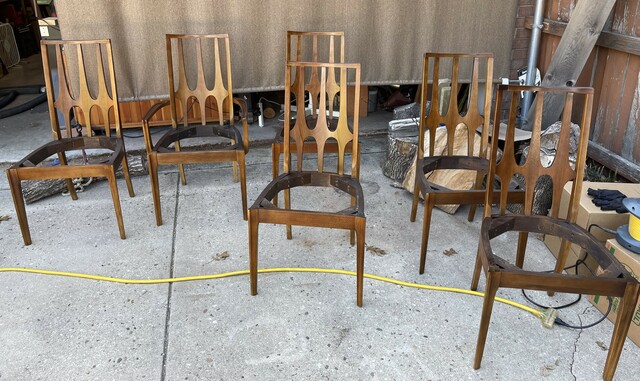
Much, if not most , of the non-artisan produced furniture these days is finished with tinted lacquer and has been for 60 years at least. It allows them to get a uniform color over the entire piece and every piece they produce regardless of the type of wood or source of wood. I discovered this after stripping several mid century modern pieces and finding that most of the color comes off with the top coat. This set of chairs was produced in the early 60s. Once stripped, I found out just how non-uniform the wood of different pieces really are underneath the finish . In the past, I usually stained these MCM pieces to get the color back but last year I used a tinted lacquer top coat for a set of chairs I refinished for my wife. It took some practice to get the color right because I was trying to match a table that was not being refinished but I got pretty close.
The first picture is after stripping and prep for finishing. It is actually not as obvious just how much lighter the arms were than the rest of the chair in this picture. The back and seat frame were walnut veneer and they tended to be much darker after stripping than parts that were solid wood like the legs and frame around the back. After first stripping, the solid pieces were so light, I wondered if they were actually walnut at all. As light as they are, I thought the arms might be oak.
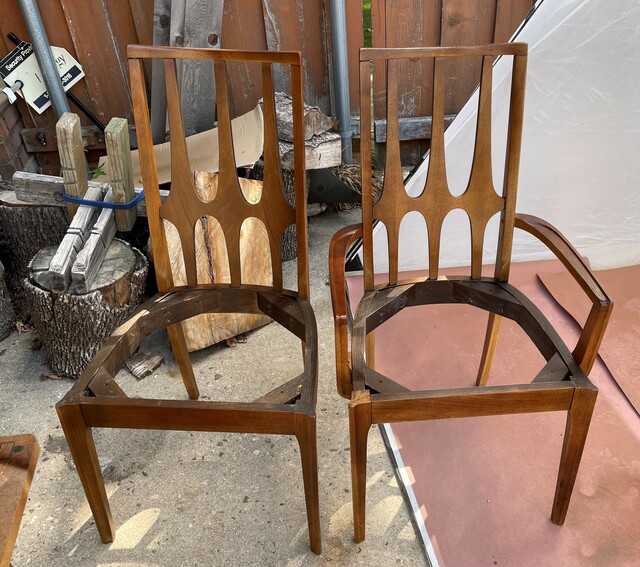
After refinishing with tinted lacquer and sprayed with several layers of clear lacquer.
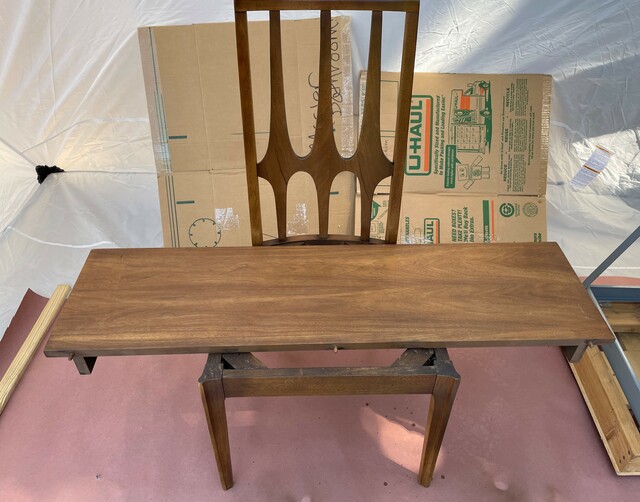
To get this color, I had to use two different versions of brown tinted lacquer. one was greener and the other redder. One thing that I learned from what I read about color theory in regards to refinishing is that if something is too red, you add green and if too green, you add red so I basically had to go back and forth between the two colors until I snuck up on a color that was close to the table. I used a leaf to help gauge when to stop adding the tinted lacquer. This was the first chair. BTW, one thing that I have noticed on MCM pieces at least is that the chairs and base are often finished to be darker than the table tops. Still an amateur at this but overall, but I got a pretty uniform look across all the chairs, though the lighting and sheen in this picture makes it a little hard to tell.
--Nathan, TX. Hire the lazy man. He may not do as much work but that's because he will find a better way.
I tend to even out stuff like that with regular stains first to bring down the lighter parts, then bring on the tinted lacquer.
The only reason I do this is the only tints I have for lacquer are freaking expensive and would double the finishing cost if I was to use them to really push things.
Do you have a special tinting dye or process that doesn't cost too much?
I also got some 30% acetic acid today from the Soap Refill Station here in Santa Fe. Should be just the thing for ebonizing oak. Just have to find the bag of coarse steel wool I almost never use…
I haven't done any big pieces with it. Doing any kind of finishing when it's hot is trouble. I remember trying to wipe on some Waterlox with a cloth when it was really hot in the shop. It was drying so fast the cloth stuck to it. I had to take it off and try again in the morning when it was cooler.
Half of what we read or hear about finishing is right. We just don’t know which half! — Bob Flexner
I’m not a fan of gel stain either just because it’s so thick. Like Corelz said, it’s hard to tell if it’s even or not until it’s too late. With a glaze coat under it though, it goes on easily and evenly.
Do you have a special tinting dye or process that doesn't cost too much?
For these chairs, I used Mohawk brand lacquer and tinted lacquer. For large pieces, they sell concentrated dyes for mixing with the lacquer to whatever tint you want but for these chairs I just used their rattle cans of tinted lacquer. They sell pre-blended colors like dark walnut or the base colors which you can mix to get literally any color you want. With the rattle cans, I could experiment with different tints and layer them without a huge investment in a bunch of concentrated dyes. IIRC, each can was about $8 and I use between 2-3 cans of 2 different types of brown. For all 8 chairs and I used about 3/4 of a gallon of lacquer which was under $60. Spraying lacquer wastes a lot of lacquer. Probably half of it is over spray that blows past the chair.
Here is the process I followed:
Spray 2 clear coats on the bare wood. This seals the wood and prepares for the tinted lacquer. I used a semi-gloss on these chairs. This basically prevents the tinted lacquer from staining the wood.
Lightly sand the seal coat smooth. If you have better spray equipment and more experience spraying lacquer than I do, this should be minimal. I was able to get mine smooth enough with a quick pass using gray 3M abrasive pads.
Spray the tinted lacquer over the seal coats, blending the 2 tints until I got the shade I wanted. I started with very light coats to sort of dust the surface with the tint and added more until I got close to the density I wanted. This is how you control the darkness of the color. The 2 shades I used were Vandike brown and Dark walnut. I found the Vandike was too green and walnut was too red but blending them got me a color in the middle that matched the table well. In this case, I usually started with the Vandike and used the walnut to move it away from green. It was actually kind of cool seeing how the color morphed with just a light spray of the second tint.
Once the color you want is achieved, spray several coats of the clear to seal the tinted coat and get the finish you want.
One nice thing about using tinted lacquer is that if you do not like the result, you can simply use lacquer thinner to strip it off and try again.
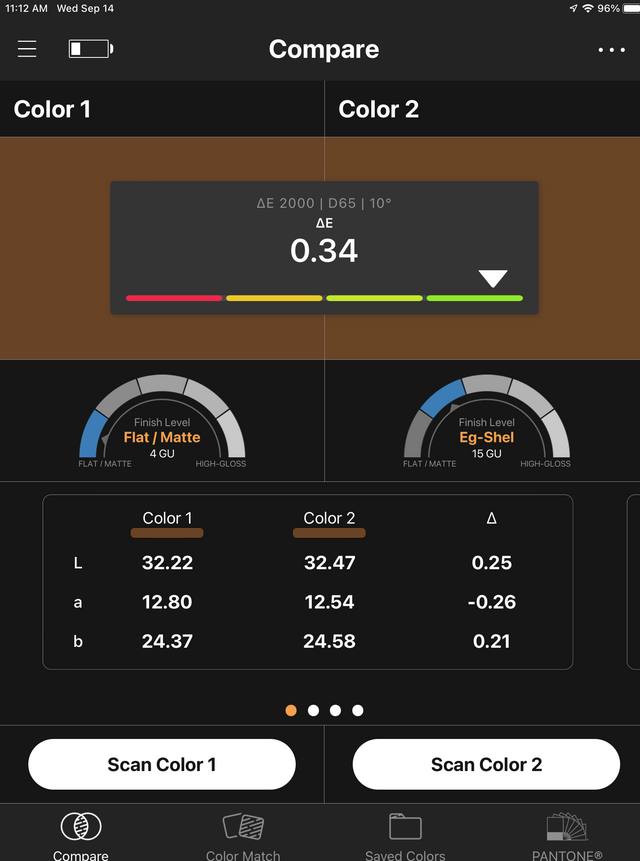
Note that I used a Color Muse (thanks for that tip, Rich) to check that my eyes were giving me a color that was close to the target color of the table. Wood grain is naturally variable so I used the darker grain in the table as a comparison. After finishing the first chair, these are the results of the comparison. I think that the table was on the left and the chair on the right.
I actually bought the Sherman-Williams branded version of the Color Muse. It is exactly the same device and works with the Color Muse app as well as the Sherman Williams app but was a little cheaper than the Color Muse branded one. I've used to this to help find paint colors as well.
--Nathan, TX. Hire the lazy man. He may not do as much work but that's because he will find a better way.


.jpeg)
.jpeg)