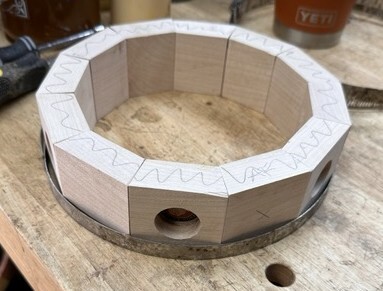
I have a segment ring with 1" holes that I would like to fill with some sort of clear stuff that would harden. I don't have a pressure pot or a vacuum pot so 2 part epoxy is out. Or is that the only way to do this? This ring is not glued up yet as it will have walnut strips between the segments.....just sayin Thank You for any suggestions.
There are some 2-part epoxies that are low viscosity (check out West Systems 207 hardener). I used some for top coatings as it is designed, but have used excess for general fill uses and was pleased to see that the bubbles cleared out before it set. Mixing without aerating much and a careful pour help.
It's egg-pensive but even with the small quart kits of the 207+resin you get a lot.
Yes, holes are not all the way through. The heat gun is a good idea. I found some stuff in a more manageable amount that is supposed to be very good about curing (72 hours) bubble free and very clear. Not sure where it’s coming from but even with Prime not going to be here till Saturday. I’ll let you know how it works out. Thanks again for your help.
I may be wrong, but I have some of the West systems that is suggested for such a job, and it becomes a multi pour. What I have had to do is turn your ring on it's side, and put a smooth flat surface like a piece of plastic/glass under the outside hole, and fill it in from the inside hole. I can fill the pour all the way, but at best only get 2 holes filled per pour, lest it just flow out the open side. Once hardened, roll to the side and repeat.
I don' know what the clear holes are for, and not having used much epoxy myself - usually as a glue - so I look for alternative solutions. Could you route the inside of the segments containing holes, making a place to insert glass windows? Just a thought. Good luck.
Hi Oldtool, yes glass inserted into the holes would work too, assuming of course that it was done after the bowl was turned. I also thought of another alternative myself and that is to not even use anything to fill the holes, just turn the bowl and put the medallions into the holes and leave them like that. Filling the holes with clear epoxy was plan A and I got tunnel vision I guess. It would be easy enough to make 6 more segments for an a different approach. Thanks for your comment.
You can do it with clear epoxy. Just glue a bloc over the hole and fill it from the other side. Cut the block off before you mount the the ring to turn! No problem , mon!!
Cheers, Jim ........................ Variety is the spice of life...............Learn something new every day
BTW, I seem to remember seeing some issue with using a vacuum chamber with epoxy and other resins. The escaping bubbles tend to cause a foam and make a huge mess so pressure pots are the preferred method. They basically make the bubbles in 2 part resins get microscopic and don't make a mess. With a vacuum chamber, you probably need a very long open time and low viscosity to give it time for the froth to settle down at a minimum.
It is a good idea to seal the wood in the holes before you pour in the epoxy. This prevents air trapped in the wood from bubbling up before it is cured. You can actually just mix up a small batch of the epoxy and paint the bottom and sides with it, let it cure and then do the full pour.
You question got me think...I wonder if you could use one of the those space saver bags that you evacuate using a vacuum cleaner would work in place of a vacuum chamber? Some of them come with hand pumps. Put the segment with the wet resin in a paint can or other rigid container and put the can inside of the space bag. Drill a hole in the side of the can so that the vacuum doesn't seal around the top before fully evacuated? Just thinking out loud.
--Nathan, TX. Hire the lazy man. He may not do as much work but that's because he will find a better way.
There is no arguing that any trapped air will froth up in a liquid when vacuumed, but with my usage recently for poly, the froth disappears when the vacuum is removed and everything becomes effectively under pressure. Now add a pressure pot and that'll really crush any bubbles.
Of course I'd imagine that 95% of that effect could be obtained without any vacuum stage (and bonus, no froth).
Jim, the holes don’t go all the way through, so can only be filled from the outside.
Eric, there will be “things” in the holes, using clear so they will be visible.
Lazyman, a couple of good points you raise. I like the idea of sealing the sides of the holes. Also, you really got me thinking about using vacuum food saver bags and space bags too. I’ve been looking for an old pressure cooker I could use for pressure or vacuum, no luck so far though.
Great thoughts from all of you gentlemen, I appreciate it.
Haven't read all the comments so I don't know whether covered or I'm way off the mark.
With all the laser dialogue bouncing like red beams, have you considered laser cut perspex. Cuts perfectly clear and precise. Do you know anyone prepared to cut for you. Scrap material should be available and the job should only take minutes.
Cheap and woodwortking in the same sentenc is an oxymoron!
With System 3 epoxies (other formulations may not behave the same), TransTint dyes lower the surface tension of the epoxy enough that I get almost bubble-free pours with no vacuum or pressure pot. I do, however, get lots of leaks if I don’t do something to seal it all up before doing the big pour, so I tend to paint a thin layer of clear epoxy on the pieces parts to make a sealed unit, then do a second tinted pour to fill the volume.
The few remaining bubbles I pop with a propane torch. But then I’ve got an open time of almost an hour with the hardener I use after adding the dyes, so there’s plenty of time to deal with the few bubbles.
Just to throw in my 2 cents, I use AlumaLite and am happy with the results. I’d probably do this one in a couple of pours, but I think it’d work out. It’s not a deep pour epoxy, although they do make one. But a couple pours isn’t a big deal to me.
Ryan/// ~sigh~ I blew up another bowl. Moke told me "I made the inside bigger than the outside".
The duckster has a good point with the acrylic. It'll turn fine and can be polished up to glass like clarity. Resins and epoxies are a mixed bag depending on their intended uses.
Splinter, yes, I saw the merit in that right off. Unfortunately I am still in the confused stage of getting a laser engraver, I'm interested though and have started looking at them. There are so many in my price range I was overwhelmed and had some sort of attack, Yikes. I don't know anyone around here that has one either. I am still deciding how to proceed. For one thing, my holes were too deep so I cut new segments. And on and on....
Cutting your own would be expensive, like buying a new cabinet saw to cut your 2x4 down a few inches.
You can probably buy them if your hole dimensions are in agreement with the pieces.
For cutting clear plexy, you'd need a CO2 laser. You can also buy glass circles that could be pressed in after turning if that fit your design. My wife buys those by the 100's for her crafts (metric increments), under 10 cents each for the convex shapes with flat bottoms.