


Share your craft projects
Make new craft buddies
Ask craft questions
Blog your craft journey
Kelly
1012 posts
and
19 followers
in over 12 years
in over 12 years
Dust Deputy Cyclone and Shop Vac Marriage
I bought a Dust Deputy [DD] when looking for a way to deal with the VERY significant amount of dust that was blown out of my Paint Shaver Pro (it'll remove all the paint off a one square foot section of siding in about thirty seconds). I'd tried other solutions. Some, like a water pre-filter, worked, but were messy to clean up, which had to be done about three or four times and hour.
I was so impressed with the performance of the DD (metal version, for durability on job sites), I went on to buy a Dust Gorilla dust collector, a Super DD dust collector, and another DD, in the plastic version to build a dedicated collector for my sandblaster.
I started playing with the configuration of my Dust Deputy [DD] and vacuum for the usual reasons - shop space, easier movement the DD and vacuum, and to minimize the chaos of dealing with the DD, vacuum, hose, and collection wands.
I scoured the Net for ideas and found many solutions others used. For example:
(1) Perhaps the most common method was, put the DD and its collection can on a cart, beside the vacuum.
This still requires a hose from the vacuum intake to the top of the DD. Also, it takes up the same amount of room just sitting the DD and vacuum on the floor does.
It does make moving the vacuum-cyclone system easier, and provides opportunities for storing hose and collection wands.
(2) Another frequently used solution is, putting the DD and its collection can above the vacuum and, again, running a hose between the vacuum intake and the top of the DD.
This approach is really no more complicated than building a cart to sit the DD and can side by side with the vacuum, and it takes up about half the space the side-by-side method uses, protruding hose aside.
A disadvantage of this approach is, you are limited on how big a collection can you can use for the DD sitting above the vacuum.
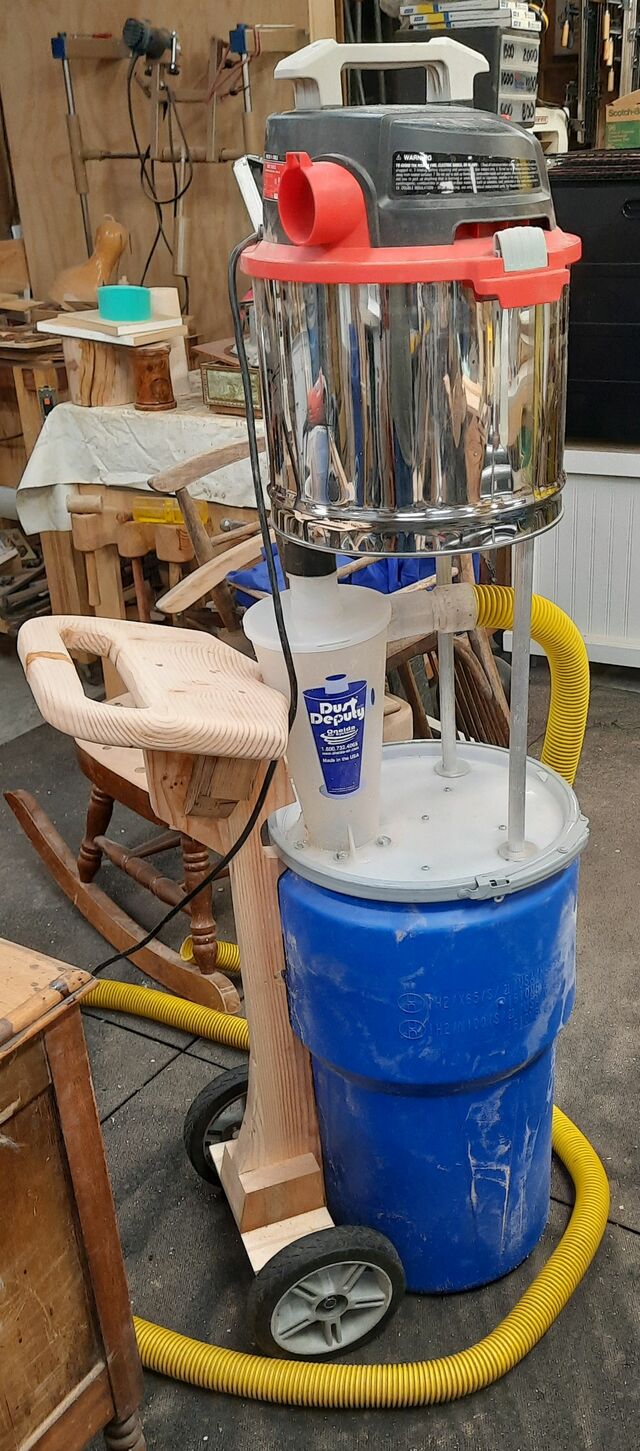
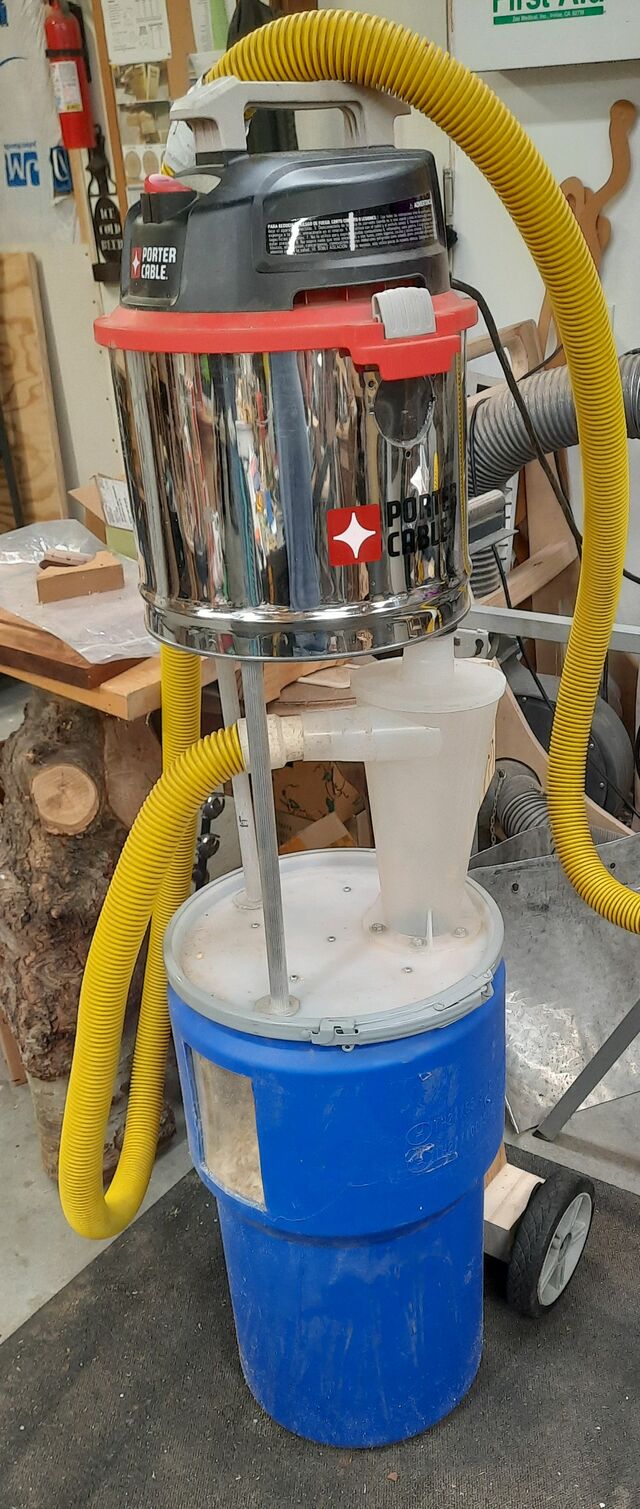
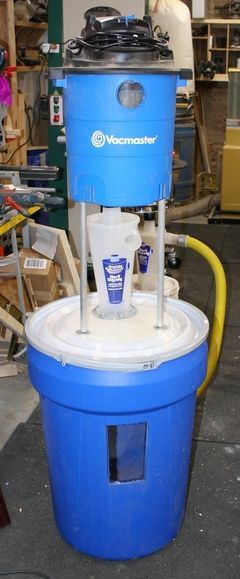
(3) I didn’t find any examples of the approach I took until after I finished building three, so reinvented the wheel by placing the vacuum above the DD. That method is the focus of this writing.
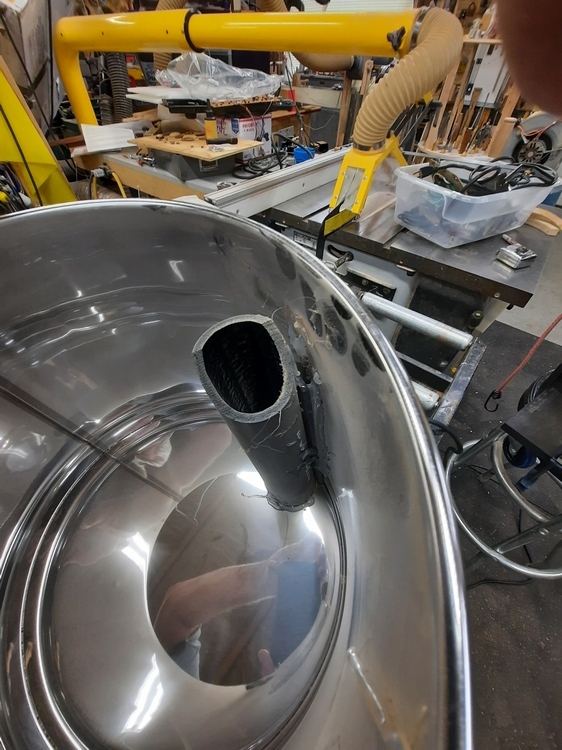
This requires you to modify the vacuum by blocking its intake port, then drilling a new intake hole in the bottom of the vacuum collection can large enough to just fit a 2" black plastic pipe. The pipe sticks a few inches out of the bottom and stops just an inch from the top of the can.
NOTE: When drilling the hole for the pipe, keep in mind where, when the vacuum sits atop the DD, it will position the vacuum atop the DD and collection can. I opted to drill the hole near the side of the vacuum can so it could be hot glued to the can wall.
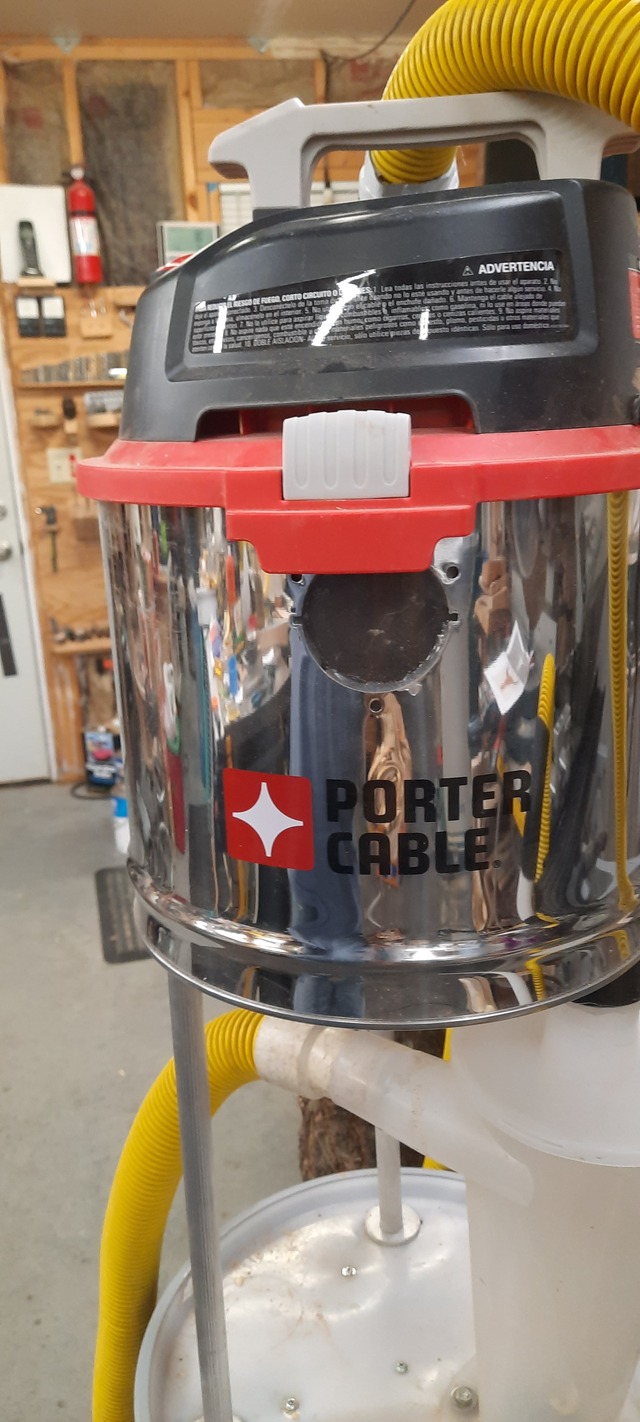
After the modification of the vacuum, its new intake port slips over the top of the DD. The weight of the vacuum holds the vacuum intake tight to the DD intake.
NOTE: You will have to grind the inside of the pipe using a rasp bit to enlarge its opening, to allow it to fit over the DD intake. Alternatively, you can heat the pipe end and open it more.
Regardless which method chosen to tie the DD and vacuum together, emptying the DD collection can is easy:
(1) If the unit is side by side, you just focus on the DD collection can.
(2) If the DD is above the vac, it should just lift out for emptying.
(3) If the DD is under the vac and a cart was used, you merely need lift the vac [held in place by its weight over the DD and by the cart upper rack], then pull the DD and collection can out. The upper part of the cart will support the vacuum while the can is being emptied.
(4) If the DD is under the vac and mounted on the lid of a large collection can, as described herein, you merely need to lift the vac and DD collection lid off the can as a unit.
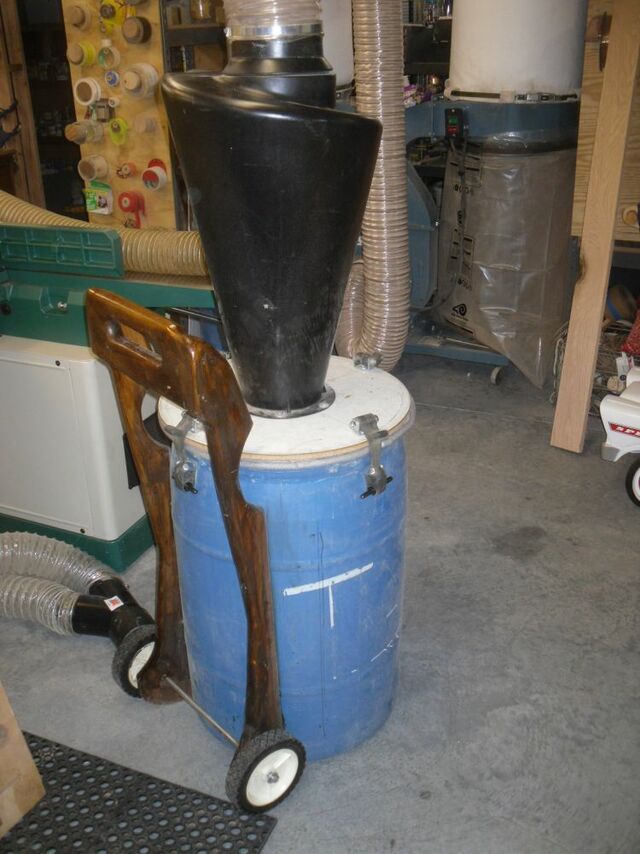
With the DD under the vacuum, you can opt for a much larger collection can. I chose a 20 gallon [blue] plastic drum with a snap ring lid, which makes removing the lid, well, a snap. A similar system I built for a friend used a larger drum.
I installed a 6" wide by 12" tall clear Plexiglass view port for easy monitoring of the debris level in the can. The view port is mounted near the top of the drum.
I shaped the Plexiglass by moving a heat gun all over it, until it bent to match the inside curve of the drum. After it cooled, it is held in place, on the inside of the drum, using silicone, which is also used to insure there are no air leaks around it.
I installed the DD on the snap ring lid, at the outer edge. Then I mounted the vacuum to DD collection can lid using two 3/4" tubes and Allthread.
NOTE: The tubes can be plastic pipe, copper pipe, conduit or aluminum tubes. I used 3/4", but 1" could be used instead. Regardless, I sought to use home made washers to limit stress to the lid and vac can.
The two tubes are cut so, resting on the DD collection can lid, their length holds the vacuum can level, as it’s sitting on top the DD.
The two tubes are positioned opposite the DD intake (pointed across the DD collection lid, rather than straight out from it), and as near the edge of the vacuum can bottom and the DD collection can as I could get them and still keep them vertical (plumb) to the vac and lid.
To hold the vacuum can bottom and the DD collection can lid tight against the two tubes, I used Allthread rod through the tubes and into both the vacuum can bottom and the DD collection can top. The Allthread is secured via LARGE washers [to reduce the stress to the DD collection can lid and the bottom of the vacuum can], under lock washers and nuts.
This method alleviates the need for a hose from the vacuum up to the top of the DD, which MAY increase efficiency, though some say vacuums do not suffer the same problem dust collectors and dryer vents do.
I added an integral hand truck to both the DD system and my Super DD using 2x’s. The DD uses a single vertical 2x4 between the wheels (1/2" axle and 8" lawnmower wheels) and the handle. The Super DD uses two vertical 2x’s, because of the size of the drum.
My prototype projects was done using scrap plywood and lumber to build a cart. That one worked well, but only used a 5 gallon bucket, which fills up quickly. When using a large Forstner bit to drill holes in logs and things, the 5 gallon bucket fills much too fast.
When I upgraded the 5 gallon bucket to a 20, or 25 gallon drum, a cart was no longer necessary, since an integral hand-truck could be added to the collection drum, and there was no longer a need to support the vacuum by external means.
Because DD’s reduce how much debris gets to the filter, so the filter stays clean far longer, I’ve found I was able to go to a smaller, but still powerful vacuum than I was using when not using a pre-filter.
I was so impressed with the performance of the DD (metal version, for durability on job sites), I went on to buy a Dust Gorilla dust collector, a Super DD dust collector, and another DD, in the plastic version to build a dedicated collector for my sandblaster.
I started playing with the configuration of my Dust Deputy [DD] and vacuum for the usual reasons - shop space, easier movement the DD and vacuum, and to minimize the chaos of dealing with the DD, vacuum, hose, and collection wands.
I scoured the Net for ideas and found many solutions others used. For example:
(1) Perhaps the most common method was, put the DD and its collection can on a cart, beside the vacuum.
This still requires a hose from the vacuum intake to the top of the DD. Also, it takes up the same amount of room just sitting the DD and vacuum on the floor does.
It does make moving the vacuum-cyclone system easier, and provides opportunities for storing hose and collection wands.
(2) Another frequently used solution is, putting the DD and its collection can above the vacuum and, again, running a hose between the vacuum intake and the top of the DD.
This approach is really no more complicated than building a cart to sit the DD and can side by side with the vacuum, and it takes up about half the space the side-by-side method uses, protruding hose aside.
A disadvantage of this approach is, you are limited on how big a collection can you can use for the DD sitting above the vacuum.
(3) I didn’t find any examples of the approach I took until after I finished building three, so reinvented the wheel by placing the vacuum above the DD. That method is the focus of this writing.
This requires you to modify the vacuum by blocking its intake port, then drilling a new intake hole in the bottom of the vacuum collection can large enough to just fit a 2" black plastic pipe. The pipe sticks a few inches out of the bottom and stops just an inch from the top of the can.
NOTE: When drilling the hole for the pipe, keep in mind where, when the vacuum sits atop the DD, it will position the vacuum atop the DD and collection can. I opted to drill the hole near the side of the vacuum can so it could be hot glued to the can wall.
After the modification of the vacuum, its new intake port slips over the top of the DD. The weight of the vacuum holds the vacuum intake tight to the DD intake.
NOTE: You will have to grind the inside of the pipe using a rasp bit to enlarge its opening, to allow it to fit over the DD intake. Alternatively, you can heat the pipe end and open it more.
Regardless which method chosen to tie the DD and vacuum together, emptying the DD collection can is easy:
(1) If the unit is side by side, you just focus on the DD collection can.
(2) If the DD is above the vac, it should just lift out for emptying.
(3) If the DD is under the vac and a cart was used, you merely need lift the vac [held in place by its weight over the DD and by the cart upper rack], then pull the DD and collection can out. The upper part of the cart will support the vacuum while the can is being emptied.
(4) If the DD is under the vac and mounted on the lid of a large collection can, as described herein, you merely need to lift the vac and DD collection lid off the can as a unit.
With the DD under the vacuum, you can opt for a much larger collection can. I chose a 20 gallon [blue] plastic drum with a snap ring lid, which makes removing the lid, well, a snap. A similar system I built for a friend used a larger drum.
I installed a 6" wide by 12" tall clear Plexiglass view port for easy monitoring of the debris level in the can. The view port is mounted near the top of the drum.
I shaped the Plexiglass by moving a heat gun all over it, until it bent to match the inside curve of the drum. After it cooled, it is held in place, on the inside of the drum, using silicone, which is also used to insure there are no air leaks around it.
I installed the DD on the snap ring lid, at the outer edge. Then I mounted the vacuum to DD collection can lid using two 3/4" tubes and Allthread.
NOTE: The tubes can be plastic pipe, copper pipe, conduit or aluminum tubes. I used 3/4", but 1" could be used instead. Regardless, I sought to use home made washers to limit stress to the lid and vac can.
The two tubes are cut so, resting on the DD collection can lid, their length holds the vacuum can level, as it’s sitting on top the DD.
The two tubes are positioned opposite the DD intake (pointed across the DD collection lid, rather than straight out from it), and as near the edge of the vacuum can bottom and the DD collection can as I could get them and still keep them vertical (plumb) to the vac and lid.
To hold the vacuum can bottom and the DD collection can lid tight against the two tubes, I used Allthread rod through the tubes and into both the vacuum can bottom and the DD collection can top. The Allthread is secured via LARGE washers [to reduce the stress to the DD collection can lid and the bottom of the vacuum can], under lock washers and nuts.
This method alleviates the need for a hose from the vacuum up to the top of the DD, which MAY increase efficiency, though some say vacuums do not suffer the same problem dust collectors and dryer vents do.
I added an integral hand truck to both the DD system and my Super DD using 2x’s. The DD uses a single vertical 2x4 between the wheels (1/2" axle and 8" lawnmower wheels) and the handle. The Super DD uses two vertical 2x’s, because of the size of the drum.
My prototype projects was done using scrap plywood and lumber to build a cart. That one worked well, but only used a 5 gallon bucket, which fills up quickly. When using a large Forstner bit to drill holes in logs and things, the 5 gallon bucket fills much too fast.
When I upgraded the 5 gallon bucket to a 20, or 25 gallon drum, a cart was no longer necessary, since an integral hand-truck could be added to the collection drum, and there was no longer a need to support the vacuum by external means.
Because DD’s reduce how much debris gets to the filter, so the filter stays clean far longer, I’ve found I was able to go to a smaller, but still powerful vacuum than I was using when not using a pre-filter.
1 Reply
NOTE: I had to stiffen the lid with plywood because the vacuum pressure pulled it down enough to make me apprehensive about what would, eventually happen. I used more of the silicone used to seal the view port and some screws to hold the plywood, until the silicone hardened.