In this installment, I'll be talking about the actual implementation of the vacuum clamp, successes and failures, and what I plan to do next...
As mentioned previously, the V4 vacuum pump, PODZ and the latching pedal are in place. So now it was time to see how the whole thing works! My working plan was to use the auxiliary bench as the vacuum clamp location for the Shaper Origin, and my tool bench for work holding for hand tools and such. As it worked out, the length of the vacuum hose means I can use any of the three bench tops that are available to me in the shop.
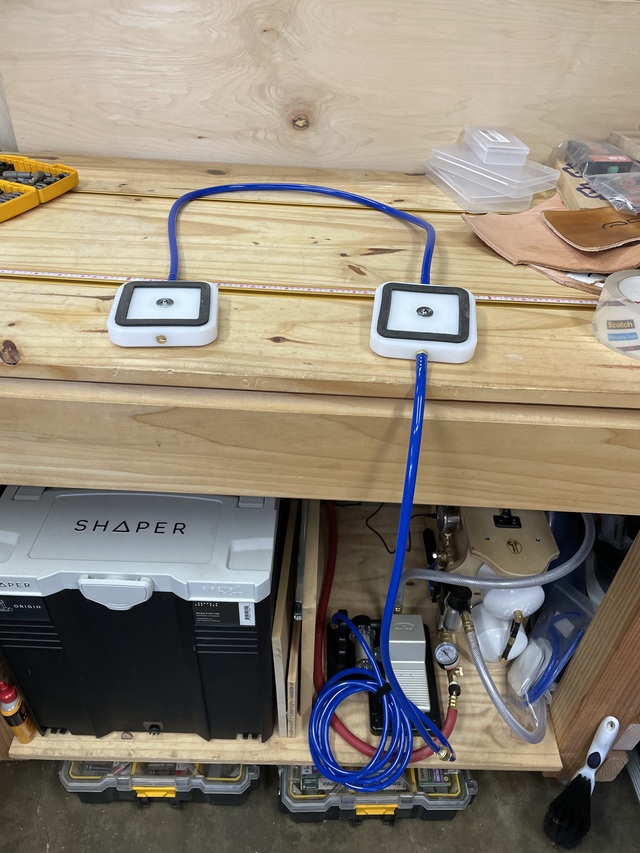
Roughly speaking, I have a tool bench that's set up (kinda poorly) for hand tool work. Behind it I have an area that I use as an Assembly bench. It's got T-track in it and is coplanar with the flat master sander behind that, so it makes for a pretty formidable assembly area in a small shop. Between those two benches is a third bench top that kind of joins the two into a horseshoe. The top of that horseshoe is the area I'm calling the Auxiliary bench (that's the bench in the pic above, as well as the one in many of the other pics in this blog). As I said, it's used primarily for the Shaper Origin, and for accumulating junk during a project. The vacuum pump assembly lives below that bench.
Let the tests begin! Since I've got no idea what I'm doing, I slapped the PODZ on the auxiliary bench, and placed a random piece of stock on top of that, and let 'er rip! And it ripped, and ripped, and ripped some more...and kept ripping...and wouldn't stop ripping. The pump just kept running. Hmmm. A leak? Must be. At this point I was kinda freaking out. I had no idea what was wrong, so I started trouble shoot from the pump forward. Capping off the braided vacuum line with a piece of black electrical tape and smashing my thumb over it (as Joe directed in the assembly instructions for testing the plumbing) yielded a solid vacuum in only a few seconds of the venturi running. I watched the vacuum gauge while plugging the hose and it didn't move a bit. Whew! I let off the thumb pressure a bit and it leaked (as expected). The vacuum valve did its job and reestablished the vacuum very quickly (like 2 seconds). Ok, so the pump and main vacuum line aren't the issue. I connected the latching pedal and did the same tape/thumb trick over the quick connect in the blue tubing downstream from the pedal, and got the same positive results. Ok, maybe the PODZ are messed up? I remember reading somewhere that soft woods can bleed enough air through them which can compromise the vacuum. This can be an issue with vacuum chucks on a lathe as well, which is why its recommended to use the vac chuck after the inside of the bowl is finished...presumably with something that will make it less porous. The benchtop for the Aux bench is solid pine, but only 3/4 and it's pretty old and dry. Maybe that's the issue? I Grabbed a couple scrap pieces of 3/4 MDF with melamine tops and sandwiched the PODZ between them. Stepped on the pedal and waited...
Success!!! A vacuum was quickly established and held nicely. The two pieces of melamine were locked in place and very solid against the PODZ. Watching the vacuum gauge, there was a very small amount of leakage showing, but it was reeeeaaaallly small, and when it did trip the automatic valve maybe 3 minutes later, the venturi ran for less than 3 seconds and we were back at full vacuum. To be honest, I always knew there was going to be some leakage in the way I set this up. I've got a lot of joints going on in this system and each one is prone to giving up just a little pressure...damn leaks...they vex me...
So the issue at hand was how to make this work with the bench. In the same area I read about wood bleeding air, I also read that you can try cellophane tape as a way to seal the leaks. I tried that by putting some packing tape overlapping on the bench, then placed the PODZ, then the melamine scrap as a 'workpiece' on top of the PODZ. It worked, but the tape started shifting a little bit as I was pushing and pulling on the melamine scrap to see how well it would hold. This wouldn't be ideal, especially as I was trying to get away from tape in the first place.
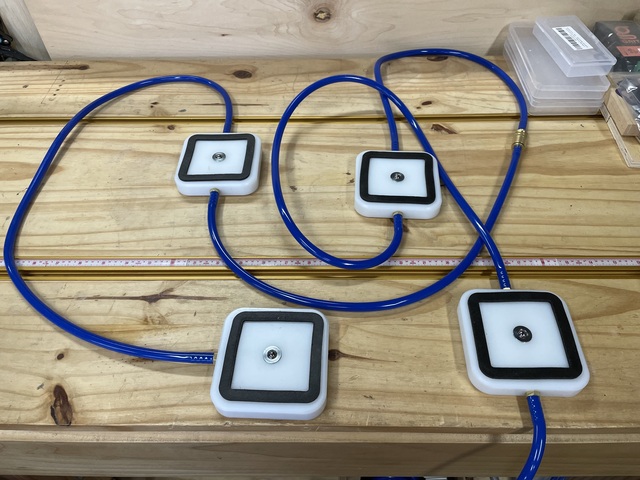
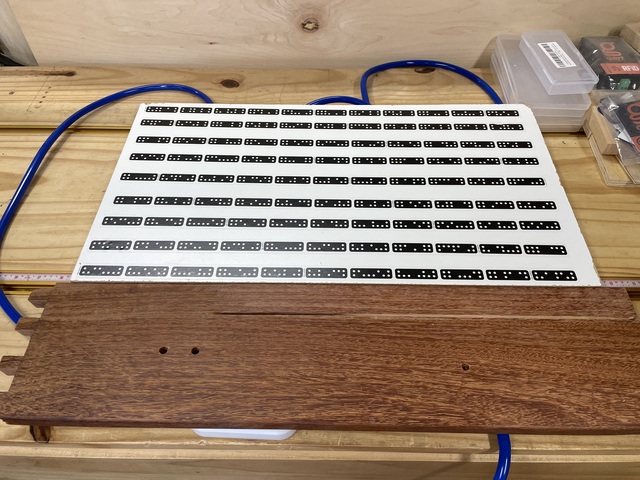
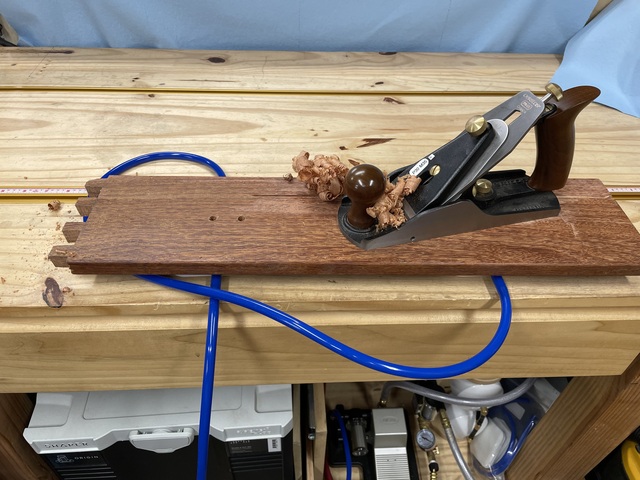
Another thing I'd read spoke about sealing the wood with either a film forming finish, or at least something to help fill the pores and swell the fibers. I sprayed down the Aux bench with poly (should have used a wiping poly). I let it dry, and after a few coats gently sanded it down to try to even it out. I applied another coat and waited for it to dry. Once it was all dried, I threw the PODZ up on it, again with melamine on top. Success! And it worked well enough that I was able to do some actual work holding with a scrap of Ipe. The second pic shows the 4 PODZ configuration holding both the work piece and the Origin domino matrix (which is applied on a melamine covered board). So this shows 4 PODZ working on two different substrates, atop the poly coated bench. Not bad.
Well, it was much better than before. But still not perfect. The venturi kicked on about every minute or so. That would probably be ok, but I feel like I can do better. For now, it's working well enough to run the Shaper Origin on, but I think I'm going to get a 2'x4' piece of ply with a melamine top and replace the benchtop. That should provide a rock solid base for the PODZ to work off. And since the Aux bench is primarily used for the Origin, and I intend to use the vacuum clamping primarily for the Origin, it all works out! Hopefully I'll get the benchtop replaced in the next week...we'll see what the weather does here.
*******
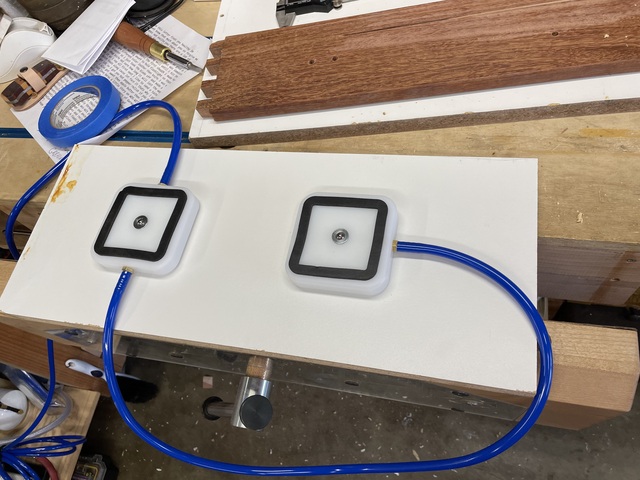
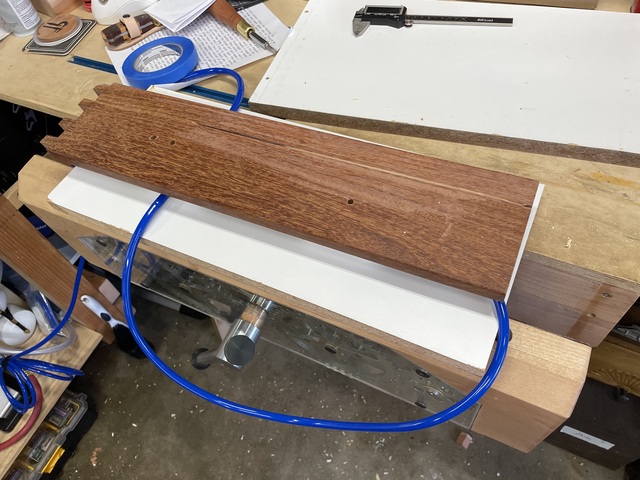
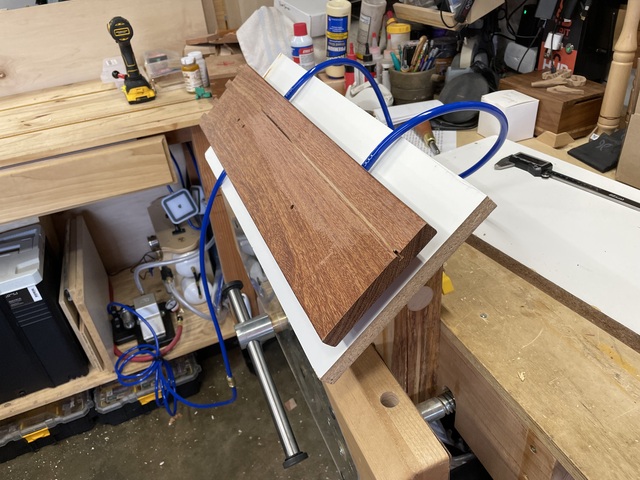
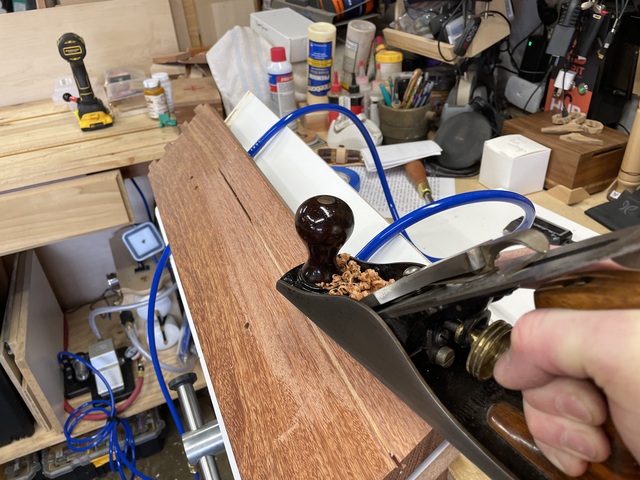
Alright, on to operation #2: Work holding for the hand tool bench. My vision here was two fold. Initially I was just considering tossing the PODZ on the bench and using them as something like vacuum planing stops. This work ok, but there's enough bleed through on the hand tool bench (as with the Aux bench) that it would be pretty annoying to have the venturi firing every minute or two. Not that it's overly loud, but it kinda ruins the zen of hand tool work. I know the melamine trick works, but I'm not interested in a melamine topped hand tool bench. But I also had a vision of using the vacuum clamps to hold work at angles for when I'm doing certain operations...like chamfering, rounding over, whatever. So, in my mind, I wanted a small tilting table anyway.
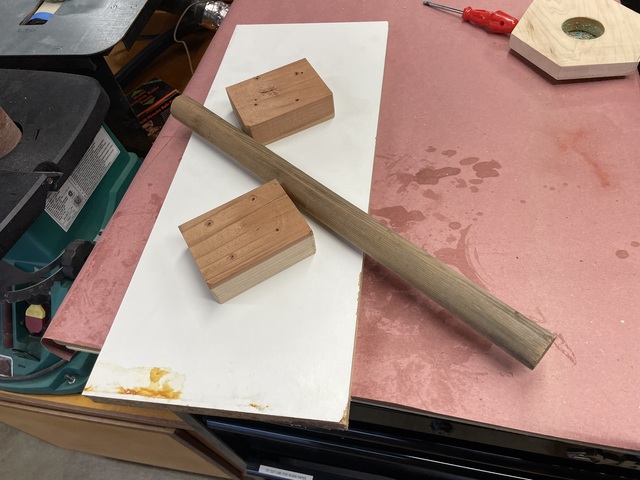
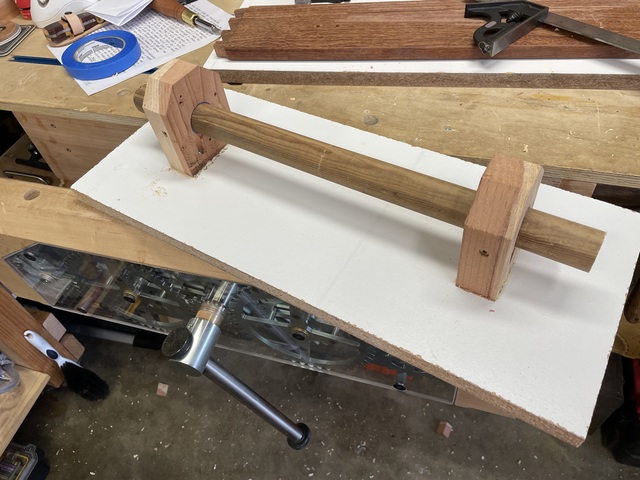
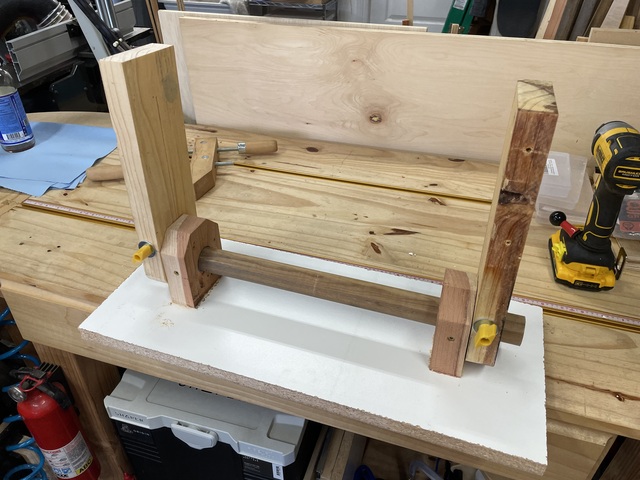
The solution was to build this small small Melamine work table. Under it, I installed two bolsters with a large dowel running between them. Next I built two 'legs' that would hang on the end of the dowels. They could pivot around the dowel, allowing the table to tilt along the long axis. I cut long relief slits down the legs and bored a through hole for a long bolt. Twisted on a knob and tightening the knobs tightens down the legs onto the dowel, locking it at whatever angle I want. I made the legs long enough to raise them up in the face vice, thus bringing the work up to a more comfortable height for fiddly operations like hand chamfering.
If I slide the legs off, the bolsters and dowel (the dowel is secured in place with wood screws through each bolster) slips into the face vise on the bench and provide a vacuum happy surface for for flat work.
So I still reserve the capability of just tossing the PODZ on the tool bench top for larger projects (especially larger planing operations) and just listening to the venturi cycle. But I've got other work holding operations for something like that too...
Overall, the work holding portion of this adventure is running at about 80% success right now. Once I change out the Aux benchtop to a melamine covered substrate I'll be at about 90%. The last 10% is probably never going to get fixed...specifically because the work pieces themselves are probably going to bleed air, some more than other obviously. In further testing, oily woods like Ipe hold a great vacuum...very close to the melamine. But, I had some 4/4 pine (albeit pretty dry) and it bled pretty bad. The venturi was cycling regularly. However, it will hold the wood in place, so that gives me another option for work holding. Since I work mostly in hardwoods, I'm pretty confident that I'll find success with the way I have this set up, especially for the using the Shaper Origin. It's still very early in the testing period for all this, and besides planing a few boards to test the system out in various configurations I haven't used it for a real project yet, so it'll be interesting to see how that goes.
One interesting thing about vacuum clamping is that vacuum doesn't care about the shape of the PODZ-type puck. It just cares about the square inches confined by the gasket and in contact with the work piece. This means that, if you wanted to, you could get a larger slab of HDPE and stick gasket material on it in the shape of your random, weirdly shaped work piece and generate vacuum against the entire surface of the oddly shaped work piece, and by doing so greatly increase the holding force since you're taking advantage of the entire project surface area. I could see this being used for some specialty projects, since you're effectively building a vacuum clamp jig specifically for it, or for some sort of production style repeatedly produced pieces. Imagine sanding a whole bunch of cut out Christmas tree shapes. If you built a custom PODZ for it (or really just applied a custom gasket), you could slap those tress down one after another and have solid work holding for your sanding. With sticky backed gasket being easy to come by, and flexible, this wouldn't be a big deal to do, proving you had a larger slab of HDPE set up as a canvas to stick the gasket to. Maybe that needs to be on my purchasing list...?
Another consideration is the shape and size of the workpiece. Vacuum clamping is never really going to work well for very small pieces since a vacuum clamp works best by the additive strength of a vacuum applied over a wide surface area. A pretty solid vacuum is somewhere about 1700 pounds per square foot at about 21" of water. Really what you're looking at is the pressure of the atmosphere pushing against the other side of the wood trying to offset the vacuum created. So, if you can get a one square foot PODZ and apply it to a 1 sq ft. piece of stock, you'd have something around 1700 pounds of holding force. However, since 1 sq ft is 144 sq inches, that same 1700 pounds made available to only one square inch (on a little baby PODZ) only gives you about 12 pounds of holding force. The commercial PODZ that I bought have a vacuum holding area that's 2.75"x2.75" (the area inside the gasket), so that yields about 7.5 sq inches or about 90 pounds of holding force per engaged PODZ. So two PODZ gives you 180 pounds of holding, which is pretty damn good. But that's at full vacuum...as the vacuum falls, so does the holding force. Which is why the vacuum valve on the V4 is designed to rapidly regenerate the vacuum...so you never lose that holding force. So, if you wanted to hold a very small piece in place with a custom built PODZ-type puck and a basic gasket (which would be pretty easy to make if you're willing to get some HDPE and work with it), you're only going to get a small amount of holding force. Depending on your application, that may be fine...or not.
One interesting thing about vacuum clamping though is that vacuum doesn't care about the shape of the PODZ-type puck. It just cares about the square inches confined by the gasket and in contact with the work piece. This means that, if you wanted to, you could get a larger slab of HDPE and stick gasket material on it in the shape of your random, weirdly shaped work piece and generate vacuum against the entire surface of the oddly shaped work piece, and by doing so greatly increase the holding force since you're taking advantage of the surface area. I could see this being used for some specialty projects, since you're effectively building a vacuum clamp jig specifically for it, or for some sort of production style repeatedly produced piece. Imagine sanding a whole bunch of cut out Christmas tree shapes. If you built a custom PODZ for it (or really just applied a custom gasket), you could slap those tress down one after another and have solid work holding for your sanding. With sticky backed gasket being easy to come by, and flexible, this wouldn't be a big deal to do, proving you had a larger slab of HDPE set up as a canvas to stick the gasket to. Maybe that needs to be on my purchasing list...?
This may be the last installment of this blog, or I may add another chapter when I get the Aux bench top changed out and get some time on it with the Origin. If I end up with a veneering bag, I may add something else to this to talk about that process with this pump, but I wouldn't anticipate that any time soon...too many other irons in the fire for that.
So, dear reader, if this be the last tome, I thank you for soldiering on. I hope you found something worthwhile in all this. I learned a lot about vacuum pumps, vacuum clamping, work holding, and various other aspects. And I got a new tool out of it. I'll take that as a win...
Ryan/// ~sigh~ I blew up another bowl. Moke told me "I made the inside bigger than the outside".