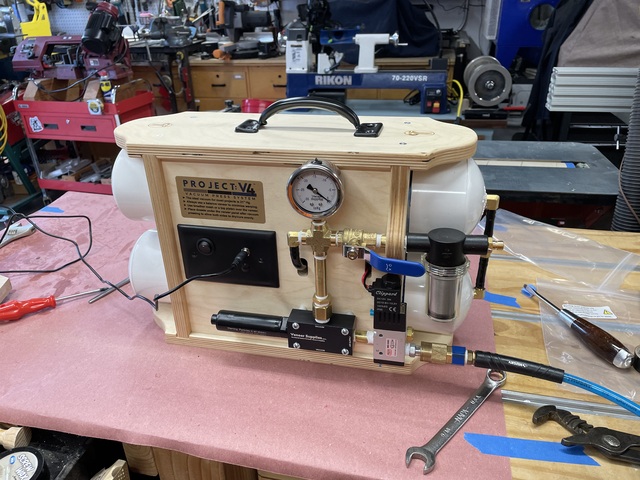
This entry will focus on the assembly of the V4 veneer vacuum kit from VeneerSupplies.com. I spoke about the choice of this pump in the first entry in this series, but the V4 has a pretty good history. I'm told it was the brainchild of Joe (the Man at VeneerSupplies.com). The V2 model was wildly successful, but it had some minor shortfalls so he supe'd it up to the V4. One would think that it would be the V3, and evidently there was a V3, but it was short lived and quickly modded up to the V4...or so I've read. There are a couple versions of the V4, based on airflow that can be provided to it. Since I had the airflow to spare, Joe recommended one of the 'Premium' models (so fancy!)...basically the larger CFM allows for the vacuum to form faster, but not any stronger. The idea being that, since no vacuum clamp is ever going to be perfect, the loss over time can more quickly be replaced with a larger CFM. See the Specs below...the model I got is the Premium 5...
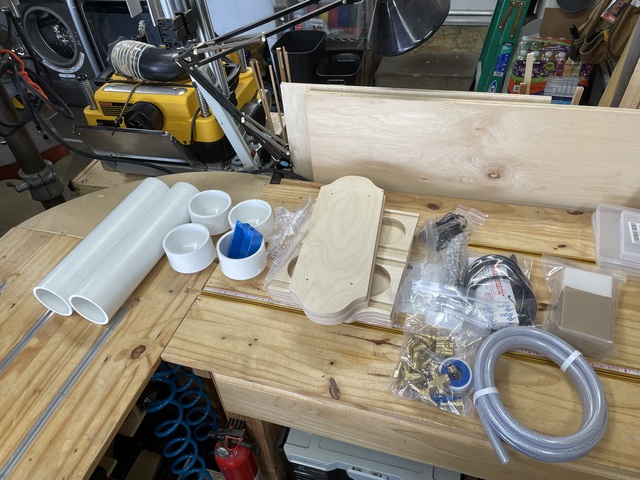
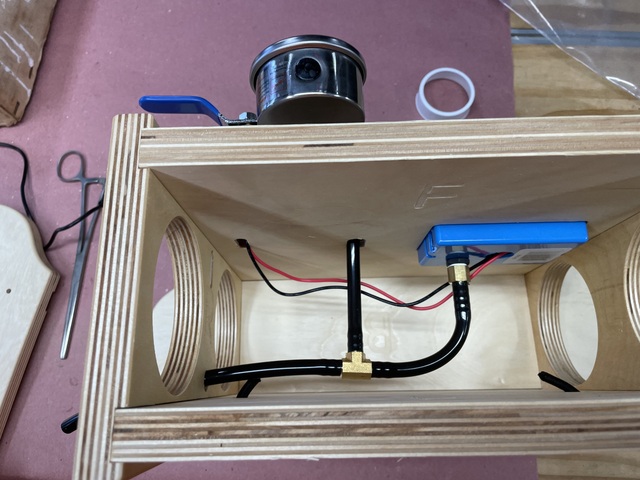
The V4 is a Venturi style vacuum pump kit. Yup, some assembly required. But it's actually pretty simple. Mostly just brass plumbing parts that screw together, a couple higher end switches and, of course, the venturi. The frame is CNC cut 13 layer ply, nicely labeled and pre-dadoed for your assembly pleasure. It houses two 3" diameter PVC pipes that are used as reservoirs to give you a little extra vacuum in reserve. Pretty much everything is included, with the exception of PVC glue.
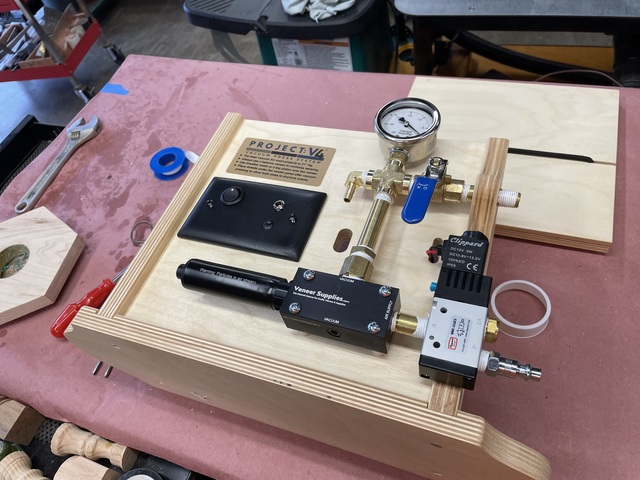
The instructions are straight forward and easy to follow. Tape all the joints with the included pipe tape and twist them together. Joe did a nice job of outlining the exact steps, including a layman's version of 'torque'. Some joints are 'hand tight', some are 'aggressively tightened'...each comes with a definition...after all, we're trying to hold vacuum here. I managed to shear loose one of the small brass pipe sections...which I think might have been a fault in the metal itself. I leaned on it pretty hard, but to shear 1/4" NPT seems a neat trick. As an aside, I reached out to Joe because I damaged the vacuum gauge in the process of shearing the pipe. Joe was outstanding and took care of me fairly, and quickly! Once I got the replacement parts, it was a quick job to finish it up. I did have to disassemble it once to tighten down a couple joints...I guess I was a little gun-shy after my first go around!
Once the system is up and running, there's a little bit of testing and tuning to do. The vacuum valve has a valve screw that's adjusted to get you dialed into the 21" of water pressure the system wants. Everything is explained in the instructions. From there it's just a matter of plugging it into the included braided line and...well...vacuuming something!
Up Next: This thing is supposed to be pulling a vacuum inside a bag filled with wood and glue and more wood...so how is it going to act as a clamp? Stay tuned!
Ryan/// ~sigh~ I blew up another bowl. Moke told me "I made the inside bigger than the outside".
I’ve never used a vacuum bag…I’m fact I’ve never done any veneer work to speak of. I’ve done some edge banding and laminating, but not proper veneering that’s needed a bag. I’m sure I’ll end up getting a bag at some point, because I’ve got the pump for it now! I’ve got a few more installments about the current build that you might like. Might be a few days until I get them up…
Ryan/// ~sigh~ I blew up another bowl. Moke told me "I made the inside bigger than the outside".
Years ago I built one of those from the same site. I made my own vac bags from vinyl and used them successfully until I got into marquetry and built my screw press. I looking forward to the clamp application.
The early bird gets the worm but its the second mouse that gets the cheese.
Thanks! Yeah, the bag thing is something else to look into…as I said, I’m not doing veneer work, but I suppose I will at some point, especially if I I have the equipment for it now. How did you make your own bags?
Ryan/// ~sigh~ I blew up another bowl. Moke told me "I made the inside bigger than the outside".


.png)
