


Share your craft projects
Make new craft buddies
Ask craft questions
Blog your craft journey

John
16 posts
and
2 followers
in almost 12 years
in almost 12 years
My little Shop #1: Small Shop - Big Ideas with good Intentions
This is
part 1
in a
1 part
series:
My little Shop
-
Small Shop - Big Ideas with good Intentions
- Small Shop - Big Ideas with good Intentions
So like most part-time woodworkers, my shop is small. 15′ × 15′ was the size that I was given by the boss. It’s home to all my equipment, other hobby stuff and two motorcycles. Living in a coastal community in South Carolina means your house is built on piles and 12 feet off the ground. Just in case the 100 year flood comes rolling in or a named hurricane.
There’s a big concrete pad under the house that I take advantage of when the temps are nice. So I often roll my shop out there for that feeling of building in the wide open spaces. Did I say that! That concrete pad is home to the wife’s car, my Jeep, a 19’ boat and a motorcycle trailer. Not to mention bicycles, lawn mowers and the huge recycling bins.
With that being said… I got to “Roll Man !” That’s the plan for now anyway. So the first rolling item was the work bench. Below is the non rolling version. 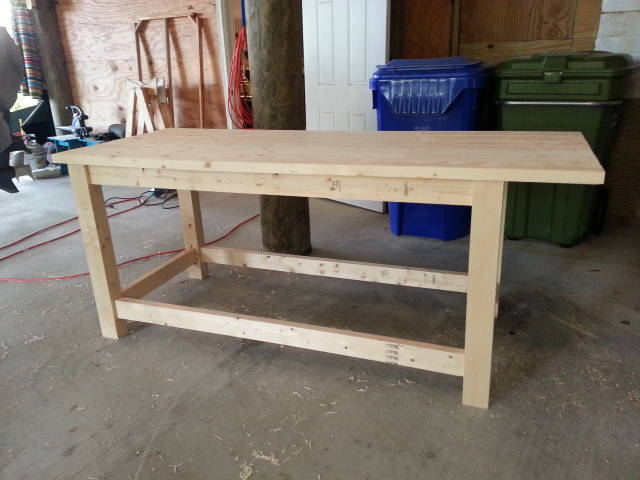
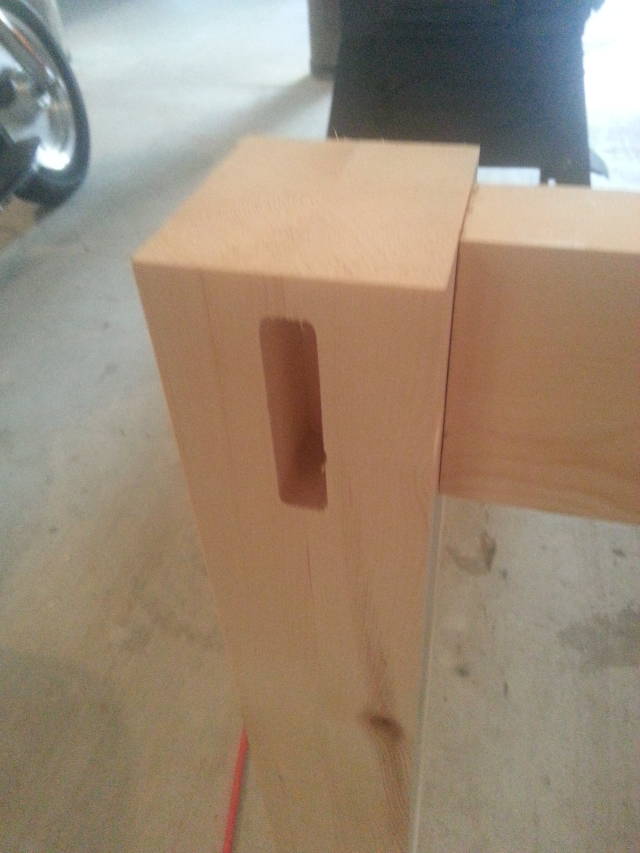
Tried to use some joinery techniques for strength and aesthetic good looks.
The top is made from Doug-Fir- 2×6′s that I planned both sides and the edges to. In fact the whole thing is Doug-Fir. I put the top together with dowels and glued them and used every clamp I had. The end result was pretty good. But the choice of wood was not the best. I told myself this is just a dry run and if I feel good about the outcome, " I’ll build the whole thing with nothing but the best." Right! That was two years ago and I’m still using it!
I put the wheels on it and I rolled it into the small area and filled it up with stuff and started using it right away.
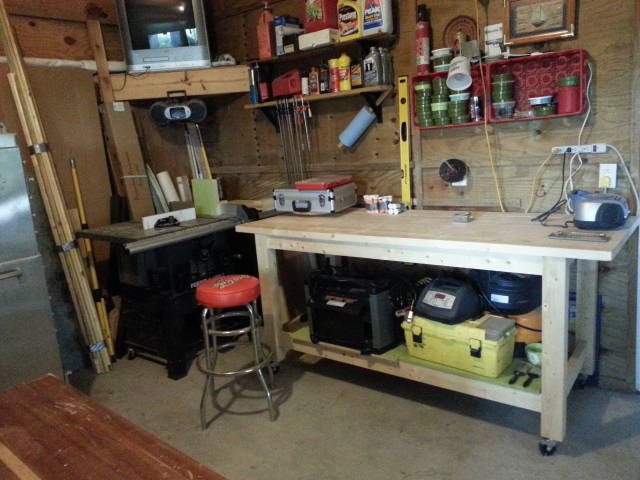
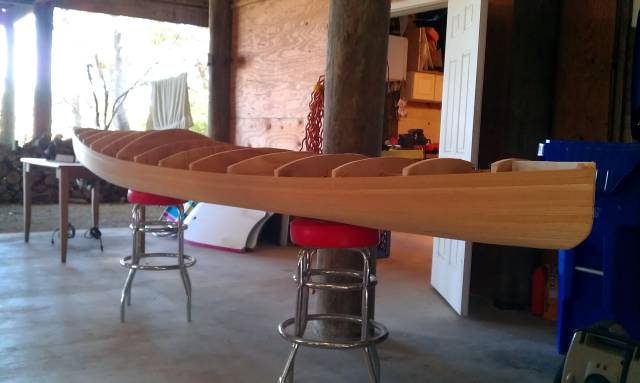
You know… everyone needs a table saw. It’s the heart of the shop. Well so was mine, only mine was a table. In fact it came from my daughter’s collage days in her dorm-room. Not the best for strength or construction, (Particle Board) but I had a good power saw and it went right in the bottom of that table and got bolted right in place. The fence was C-Clamped and adjusted by measurement with a tape measure. I’ve looked for a good photo but haven’t had any luck yet. I built a lot of things with that table saw. Below is a strip built Kayak that if you know anything about that construction technique, it requires a lot of saw time. If you look real hard in the photo below, on the left side of the photo you’ll see the table saw that made that all come to life. Now that I look at it… I had a Router in there too.
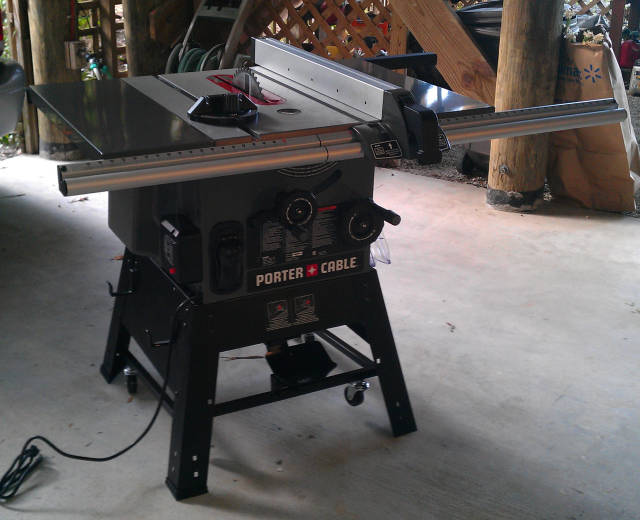
So I finally broke down and got the best table saw that I could afford. Actually I used the safety points my company gives me and turned them into Lowe’s cards. I saved them up to buy the Porter Cable you see below. Once again, not the best, but you got to do what ya got to do! It was such a huge step up from my previous saw. It’s a Roller as you can see, but if there is one thing that I didn’t like about the saw, it was the dumb rollers and the locking system it had. When you roll it someplace it always dropped and locked itself. Aggravating!
Any who, I think it was YouTube that a saw a video about tuning your saw. Even a new one needs to get a tune up! So I tuned it up and gave it the test and got pretty good results. I’m happy with it. For Now!!! Hay… my wife’s got this shoe thing… I got this saw thing! What can I say.
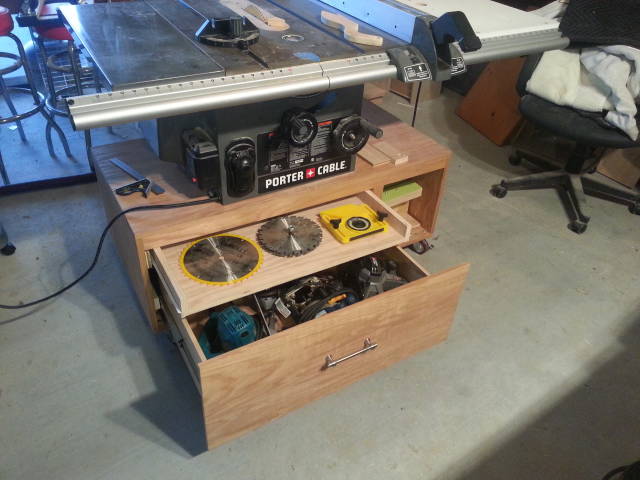
So I got a lot of time offshore to come up with all kinds of ideas, and one of them was my table saw base. Rolling of course. You see it below. 3/4" ply construction. Two draws with full extension draw glides. The bottom one is the place for my router, power saw, and other large power tools. The top draw is for blades, push sticks and other fence and saw tools that are required by the upwardly mobile hobbyist woodworker who quickly needs to grab something. The roller lock on all four corners and once again, if there is something I don’t like about this set-up, it’s the locking of the rollers. One has to be very careful to not forget to lock it down. Anyone got any good ideas… please send them my way. Oh, and thank you to Sketch Up for a great design tool. Without this program, this and many other projects I’ve done would never come to be. And it’s free! How?
Cruiser
5 Comments

Welcome to the tiny shop club. At least you have a luxurious space to spread out in once in a while. I’m stuck in my tiny shop but at least I have it all to myself. :-)
Losing fingers since 1969

I have a small shop, too. It’s just 9 × 14 but I don’t share it with anything else. It has a window that looks across the valley and there is a 10 × 20 carport beside it that I often use.
Welcome to the club. We need a more impressive name for it. Something “newspeak”. I suggest “Minimal impact work environments”
-- Alec (Friends call me Wolf, no idea why)

Most of us complain about having too small shops no matter what size they are. I have seen amazing, large projects made in spaces the size of walk-in closets and some pretty unamazing stuff from luxury shops with every tool imaginable. I guess the most important part of a shop is the person working in it no matter the size or even the equipment. It’s nice that you can work outdoors. I wish that were possible here. Congrats on your new table saw. It looks very good, especially with that nice cabinet you built for it.
Mike, an American living in Norway
I just found this simple retractable caster base. You may find it interesting and it will definitely some your caster lock issue by setting the base on the floor instead of using locking casters.
Losing fingers since 1969
Thanks Brian. I think I could pretty that up a bit and hide it under the cabinet. Most likely have put smaller casters on there so when lifted with the base it comes up to match the work bench level. I’m hitting the sketch up now.
Cruiser