


Share your craft projects
Make new craft buddies
Ask craft questions
Blog your craft journey

Ron Stewart
953 posts
and
24 followers
in over 3 years
in over 3 years
More from Ron Stewart

 - Project by Ron Stewart")
 - Project by Ron Stewart")

Yoga Board/Platform 2.0 (for doing yoga on carpet)
")
")
")
")
")
")
I originally posted this project on LumberJocks on July 30, 2018. While this project may not be of great interest to the typical Craftisian, it has been very popular on LJ (over 24K views) and Pinterest. I'd like to see some of that traffic move here. Also, a young woman contacted me once to tell me she had built her own board using my original post as a guide. I felt like a proud parent.
It's difficult to do yoga on carpet. It's much easier to do it with your mat on a firm surface like a wood or tile floor. Our Yoga room is carpeted, so I made this board/platform to act as a substitute floor. It's made of 5/8" thick bamboo flooring planks glued to a 1/4" sheet of birch plywood with 1/8" bamboo trim around the perimeter. It's 80 1/2" long, 33 3/4" wide, and 7/8" thick. Three sets of parallel flutes on the bottom help prevent it from sliding on the carpet during certain transitions between poses.
About a year ago, I built two yoga boards/platforms for my wife and her best yoga friend. (See this Craftisian project for details.) I pinned this project on Pinterest, and it has drawn some interest. I designed this new "Version 2.0" board to be easier to construct and to cost less than my original boards. That is, I tried to make it easier for DIYers who aren't quite as skilled as the typical LumberJock to construct. To support those DIYers, I'll provide more background and construction details below.
A SketchUp model of my board is available on the 3D Warehouse. (Click the Scenes icon, which looks like a director’s clapper board, to view different logical drawings within the model.)
Also, please see my 7/31/2019 update at the end of this project description.
Background
I built the first set of yoga boards from wide (7" to 9") edge-glued solid poplar boards. They look nice and have worked well, but the poplar cups a bit at times, and the boards aren't always fully flat on the floor.
When I built those boards, I had never tried yoga. After we set them up, my wife convinced me to give it a try, and it has been an everyday practice for me since then. My wife and her friend have invited me to join them in their YouTube-based classes from time to time, but I always declined because I knew I couldn't keep up. (Despite what you might have heard or thought, yoga can be very physically demanding.) Now that I've been practicing for ten months, I've improved enough to do some of the classes they do, so I needed to build my own board.
Project Goals
As with most projects, I've thought about improvements to the end product and build process. I had these goals in mind for this new project:
- Better dimensional stability. The cupping of the solid-wood boards is not too bad, but I'd still like to see less of it.
- Simpler (and faster) construction. Gluing up multiple boards to create large panels is second nature to many Craftisians, but not necessarily to all DIYers.
- Easier finishing. Finishing large surfaces is a bit of a pain, and I wanted to minimize it.
- Lower cost. Lumber is expensive at the local big box stores (Lowe's and Home Depot). I can get it much cheaper at my favorite lumberyard, but the cost per yoga board is still in the $80-100 range.
Basic Design
For my new yoga board, I envisioned using engineered wood flooring planks glued to a plywood base, with thin trim to hide the edges. Wood flooring is nice because it's flat, stable, pre-finished, and has either tongue-and-groove construction or other interlocking mechanisms to help hold everything together. Gluing the planks to the plywood is fast and easy. The trim around the edges isn't strictly necessary, but I think it looks better. Inexperienced builders could use iron-on edge banding instead of thin strips of wood. Or they could just skip the edge treatment and sand the edges to avoid splinters.
Costs
Wood flooring (even engineered or laminate flooring) can be very costly. In my case, I was happy to discover that Lowe's had a special clearance/odds-and-ends shelf in their flooring section. I found a 23.8 sq. ft. carton of 5/8" solid, tongue-and-groove, bamboo flooring (Natural Floors by USFloors) for $29 (almost half price). My wife and I liked it better than the engineered flooring. One carton was all I needed.
A sheet of 1/4" birch plywood cost another $32. With 5/8" or thicker flooring, hardboard or lower-quality plywood like Sandeply would have also worked and cost less. If I had selected thinner (3/8") flooring, I would have gone with 1/2" plywood for stability. I had Lowe's cut the plywood to slightly larger than the final board size.
The bamboo carton contained 24 planks. I was pretty sure that would be enough (for the main board and the edge trim). I also already had a gallon of wood glue, so my total cost was $62, which is not too bad.
Plank Layout
I wanted my yoga board to be slightly longer than 80". I'm 6' 2" and have an extra long (80"), extra wide (28") mat, so it needed to be at least that long.
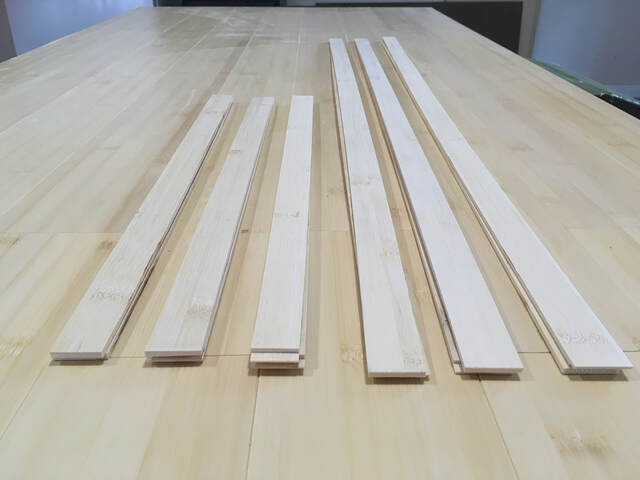
Much to my chagrin, the bamboo planks were only 37 3/4" long, meaning that I needed more than two planks for each row along the board. I didn't want each row to consist of two full planks with a little 5" connector in between, so I had to figure out how to cut the partial planks to create a pleasing pattern. I also wanted to cut the planks such that all joints were tongue-and-groove (no butt joints).
After some puzzling, I decided to create each row from one full plank, one half plank, and one medium-sized plank, with the positions of the shorter planks alternating on each adjacent row. Some SketchUp work (see the image above) confirmed that approach, and that I'd need 23 planks for the main board. The half planks created no waste. The medium-size planks did create waste, but it was unavoidable. I also had to be careful with how I cut the planks to leave flat ends at the edges. I didn't want any tongue or groove outside edges.
Cutting the Planks
I started by crosscutting the five planks in half to yield the nine half planks I needed. Each half plank has one flat end, with the other end having either a groove (female) or tongue (male).
I then cut nine planks to yield the four female medium and five medium male planks. The cutoffs are scrap.
That left ten full planks. Nine are needed for the main yoga board.
With all of the crosscuts finished, all I had to do before starting to glue the planks to the plywood base was select the six planks that would form the long left and right sides of the board and use my table saw to create flat edges for their outside edges. That is, I had to trim the tongues (and an additional 1/4") off the sides of three planks and trim 1/4" off the groove side of the other three.
Having my SketchUp drawings handy was a big help, as was being very careful in how I laid out the cut planks. It's very easy to get confused about which planks go where.
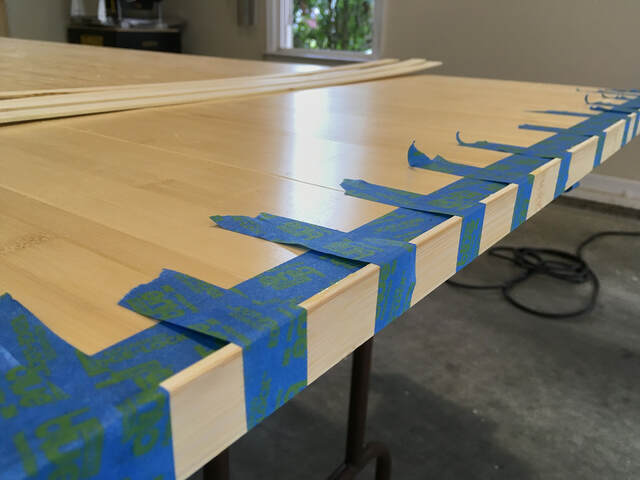
Gluing the Planks to the Base
Gluing the cut planks to the plywood base was easy (and much less stressful than most glue-ups), but I did take special care to make sure that the first row was perfectly straight. (If it wasn't, I'd end up with unsightly gaps between parts of the rows.) To do that, I glued the first row to the plywood. While the glue was still wet, I placed the next row's planks (unglued) next to those planks as a guide to make sure everything was straight. I then carefully clamped the first-row planks, making sure they didn't slide out of alignment as the clamps tightened. Then I let the glue dry for a few hours.
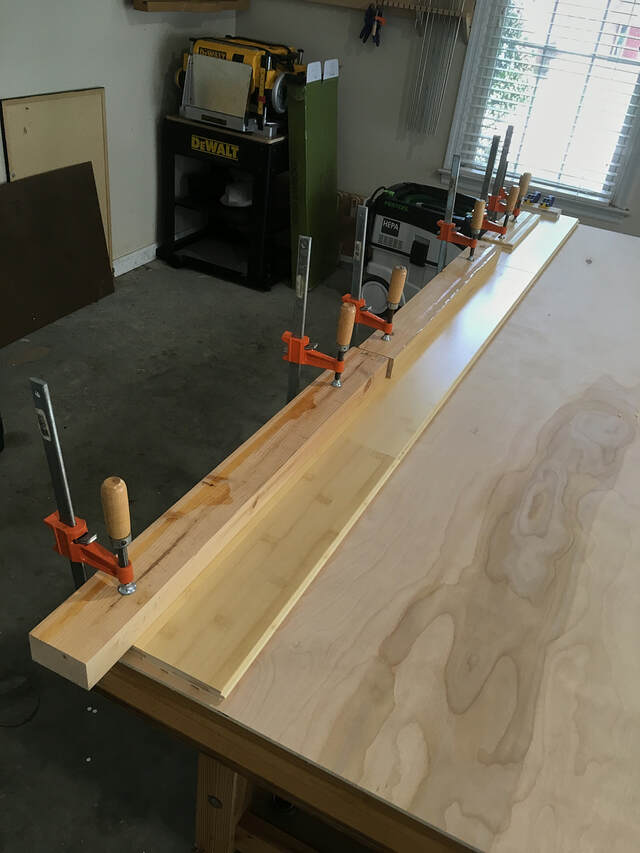
With the first row in place, the rest of the glue-up was easy. I worked one row at a time. I rolled glue onto both the plywood and back of the planks, and ran a bead inside the plank grooves (which I now think was a mistake). The tongues and grooves kept the new planks aligned and in place. My yoga board is longer than my workbench, so I did clamp the ends of the planks to the plywood to eliminate any sag and to keep everything snug.
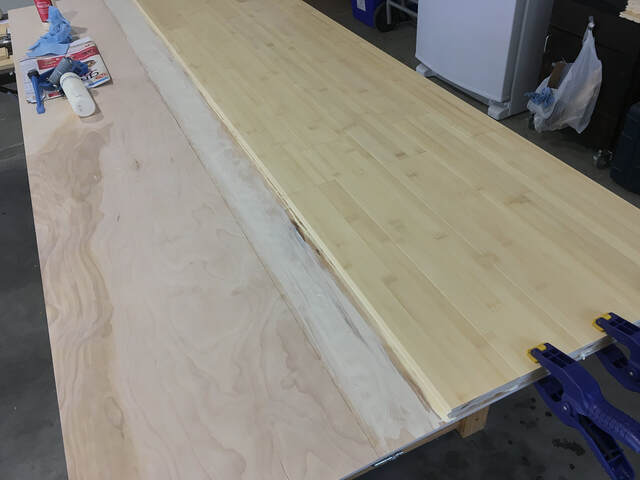
Before long, all of the planks were glued. It probably wasn't completely necessary, but I did use cauls (that I use for panel glue-ups for other projects) to clamp the plywood-and-plank sandwich to my bench to maximize flatness. My bench is only 24" wide, so I couldn't clamp both sides. Instead, I just used a cafeteria table to weigh down the other side. Then I let the glue dry overnight.
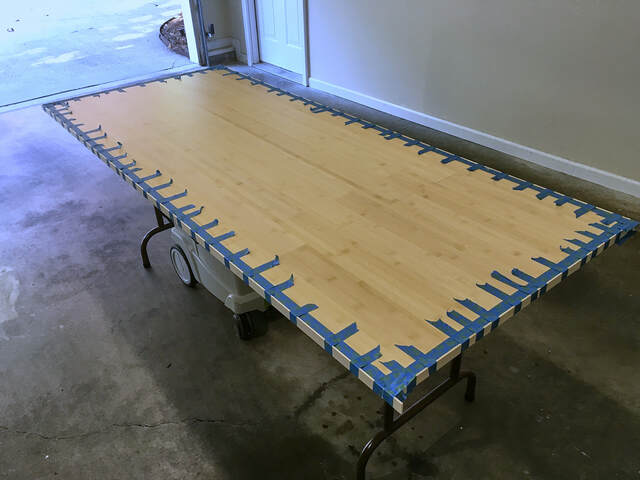
Trimming the Excess Plywood
As I mentioned earlier, I started with a slightly oversized plywood base. One some sides, the excess was small enough that I just used my router and flush-trimming bit to remove the excess. On other sides with more overhang, I used a jigsaw to trim off most of the excess, then followed up with the router.
Squaring the Ends
During the glue-up, I was careful to line up the ends of the planks, so the two ends of the overall board were pretty straight. But they weren't perfect, so I clamped a straight board across each end and flush-trimmed off about 1/32" to 1/16". That left each end perfectly straight, with all of the plank ends flush.
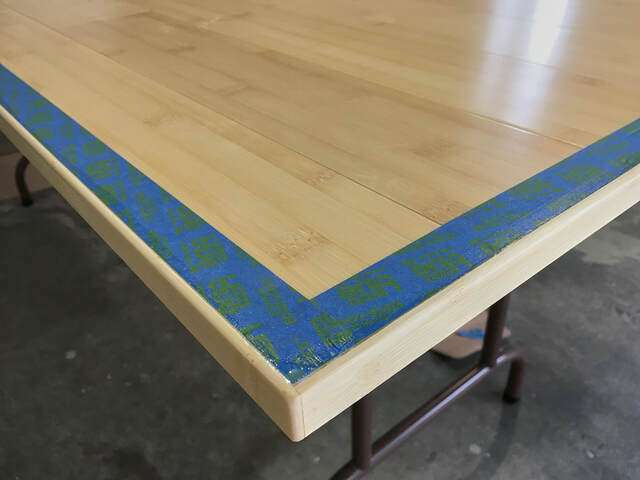
Adding Trim
At this point, the yoga board was functional, and I could have stopped there. If I had left the edges unfinished, I would have sanded them to smooth the edges and round the corners so I wouldn't cut my hands or get splinters when I moved the board.
I wanted to add trim to the edges to hide the seams between the planks and plywood. Iron-on edge banding would have been an easy way to do that, but the banding wouldn't have matched the flooring.
In my case, because my flooring was solid bamboo, I was able to make all of the trim I needed from the extra full bamboo plank and the extra half plank. Making the trim was probably the hardest part of the whole project.
To start, I had to run the two planks through my planer to flatten the bottoms and remove the finish layer.
Then I very carefully resawed the planks in half (across their thickness) with my table saw. (A band saw would have been really handy for this step). Next, I planed the two halves (which were now less than 1/4" thick) to make sure they were of the same thickness. Finally, I ripped each piece into 1" strips and squared off the edges.
The full plank yielded six strips. I used one for each of the two ends of the yoga board, leaving two for each long side. Then I just needed a 15" or so piece of trim to fill in the rest of each long side.
Gluing the trim strips to the board was easy. I just used many pieces of tape as clamps.
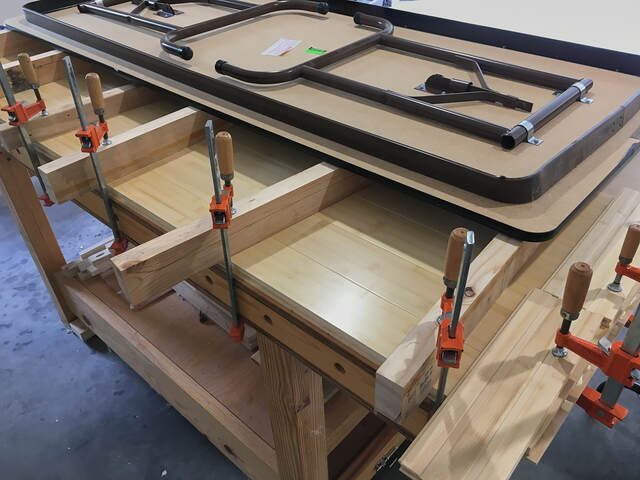
I made my trim strips slightly wider than the edges of the board, so I had to flush trim them after the glue dried. Trimming the long sides was easy. I just clamped the yoga board side-edge-up to the front of my bench and balanced my router on the edge. (That took some care, and I know there are L-shaped router plates/jigs to make it easier, but I don't have one.) Trimming the ends was harder, because I'm not 10 feet tall. I improvised by clamping the board end-edge-up up to my bench and standing on the bench to rout, repeating "do NOT take a step" to myself the entire time. (I'm glad my wife didn't happen to enter the garage during this step, or I would have gotten a long and well-deserved "what in the world are you doing" look from her.)
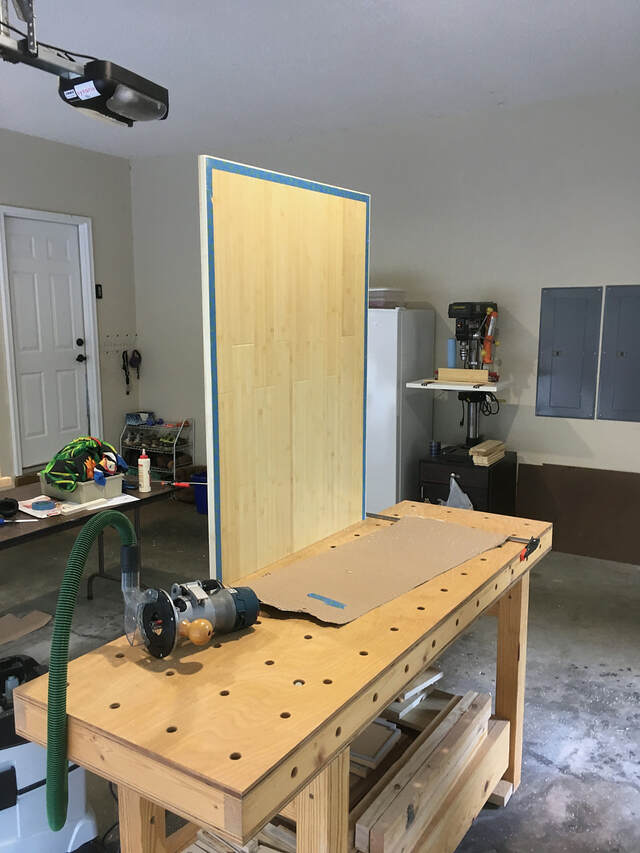
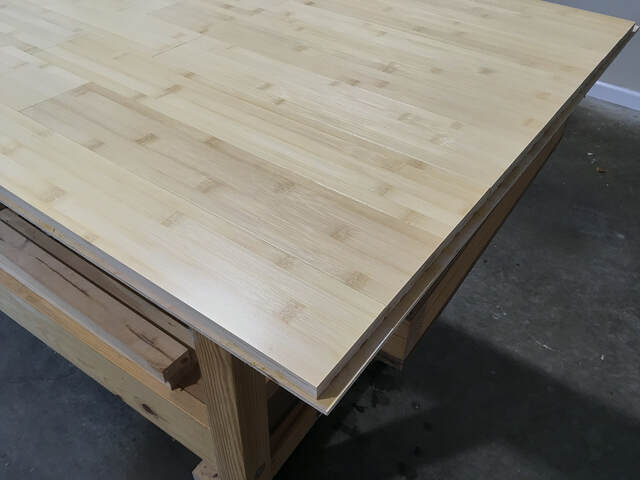
With that part done, all I had to do was run a 1/8" roundover bit over each corner and sand lightly to create a nice smooth board with no rough edges. I used a piece plywood between the router and the top of the board to protect the flooring surface.
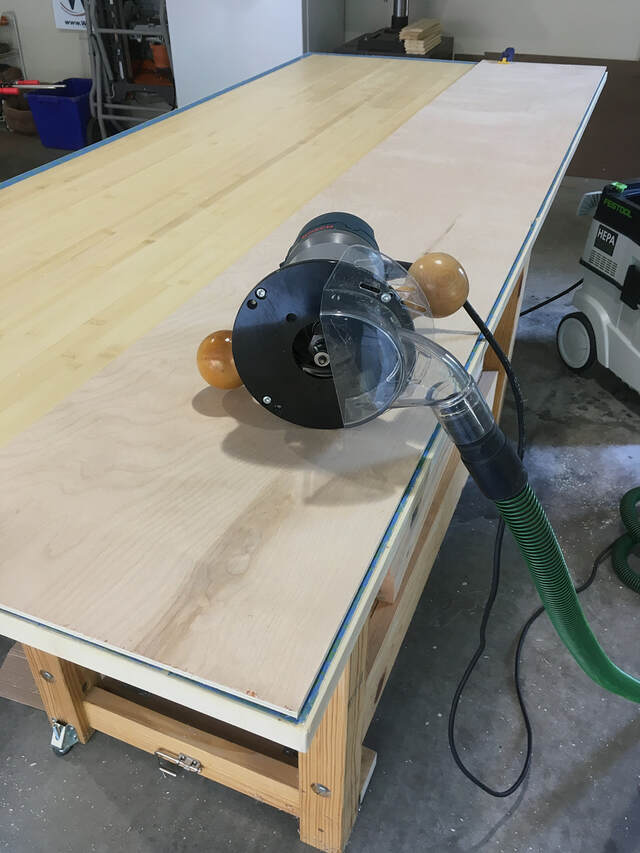
I also finished the trim strips with a few coats of Polycrylic. That finish closely matches that of the flooring.
Routing the Non-slip Flutes
I'm not sure how helpful they really are, but I also routed three sets of three flutes/grooves into the bottom of the yoga board. It was simple enough to do with my router, a 1/4" round-nose bit, and a straight board. I spaced the flutes 3" apart and put one set in the center and one set 15" from each end.
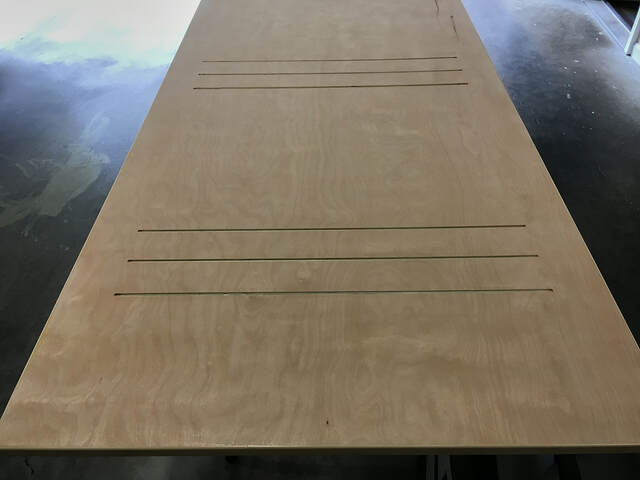
When I was done, I also slapped on one coat of Polycrylic to the bottom (mainly as a sealer) and sanded it smooth. It's smooth, but not slick.
So far, it's working well. The board is mostly flat, and it hasn't shifted under me yet.
7/31/2019 Update:
To my chagrin, my new board did bow pretty badly (worse than the original solid poplar boards). I flipped it upside down (exposing the less attractive plywood side) a few weeks ago, and it has finally flattened out enough for me to flip it right-side up again. I think the problem was my use of 5/8" solid bamboo for the top. That bamboo is subject to the same wood movement as wood. As with solid wood, the top surface dries and shrinks in low humidity, causing the sides to bow up.
If I were to build another board, I would still use this design, but I would probably use 1/2" plywood for the base and the thinnest engineered wood flooring I could find for the top. (I'd probably also avoid gluing the edges of the planks to decouple them.) I think that would lessen the bowing. If anyone reading this actually builds one of these boards, I'd love to hear about it (here or on Pinterest).
Maybe one day I'll post a Version 2.5 project that stays flatter...
4 Comments

Another great writeup. I wonder if luxury vinyl plank flooring would work (?too "grippy"??)

Nice upgrade and excellent writeup.
I think your theory about the bowing is correct.
I think your theory about the bowing is correct.
Barb, I bet LVP would work great, but I don’t know how easy it would to glue an edge treatment to it. I’m sure there’s a way. I just have no experience working with it. Grippy would be better. With my board, I sometimes see that my mat has shifted without my noticing. A grippier surface would eliminate that,
Steve, it’s good to hear a second opinion. During the glue up, I was still in a panel-assembly mindset (glue the edges to eliminate surface gaps).
Thanks, Bentlyj. I greatly appreciate your comments, particularly given the superior quality of your work.
Steve, it’s good to hear a second opinion. During the glue up, I was still in a panel-assembly mindset (glue the edges to eliminate surface gaps).
Thanks, Bentlyj. I greatly appreciate your comments, particularly given the superior quality of your work.
I think with the right adhesive you could get edging on the LVP. It's relatively thin so perhaps a lip could be designed to cover the cut edge? We installed it in two bathrooms (covid time remodel) and it has a nice feel when standing/walking on it.
More from Ron Stewart