


Share your craft projects
Make new craft buddies
Ask craft questions
Blog your craft journey

Ron Stewart
953 posts
and
24 followers
in over 3 years
in over 3 years
More from Ron Stewart
 - Project by Ron Stewart")

 - Project by Ron Stewart")
 - Project by Ron Stewart")
Turntable Plinth (Base)
")
")
")
")
")
")
Originally posted on April 21, 2014 (personal website) and then on January 18, 2016 (LumberJocks).
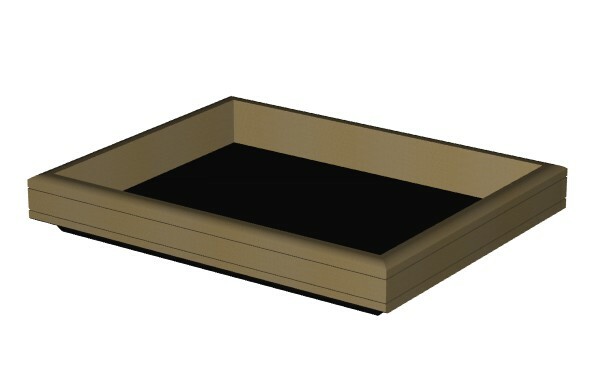
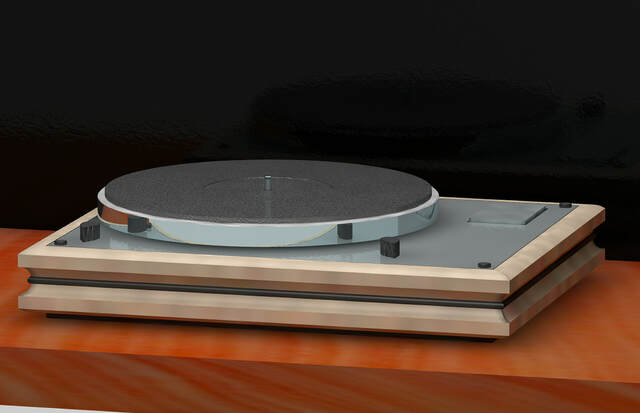
Here are some photos of the custom plinth (base) I designed and built for my Thorens TD 166 MkII turntable way back in 2014. The sides are maple with cherry accents (dowels). The base plate is 1/2" oak plywood with birch edge banding, inset by 1/4".
I used a three-step finish. First, I used Watco danish oil to warm the maple and accentuate the little grain it has, and to darken the cherry dowels. Then I used spray shellac to build the finish and add gloss. Finally, I applied paste wax with #0000 steel wool to smooth the shellac and soften the gloss to create a smooth satin finish. I stained the edges of the base plate a very dark brown (almost black).
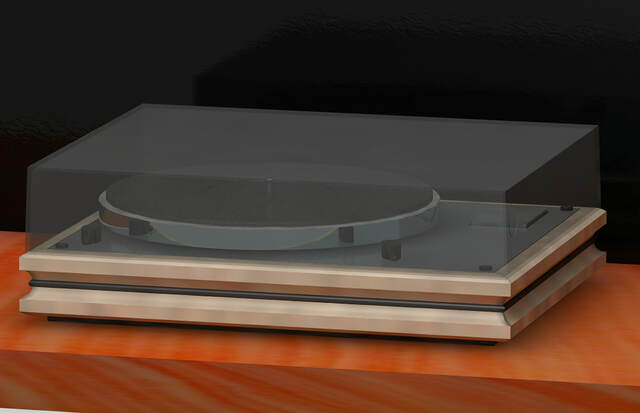
Around back, I added phono jacks (Dayton RCA-CHRB from Parts Express), power supply jack, and a binding post for the ground wire. I also routed slots for the dust cover hinges.
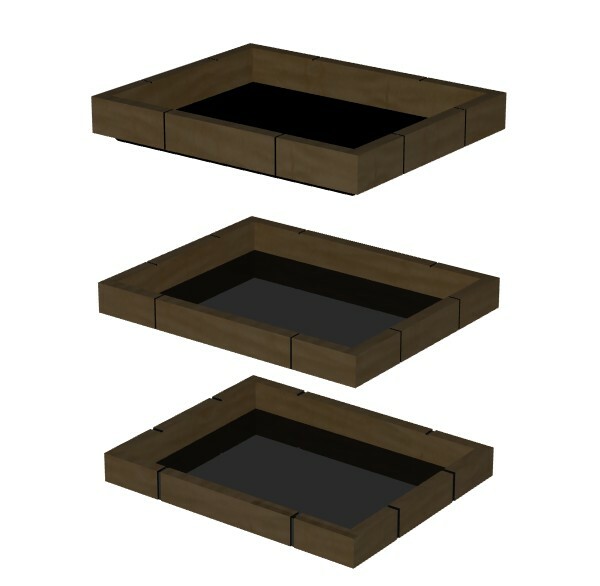
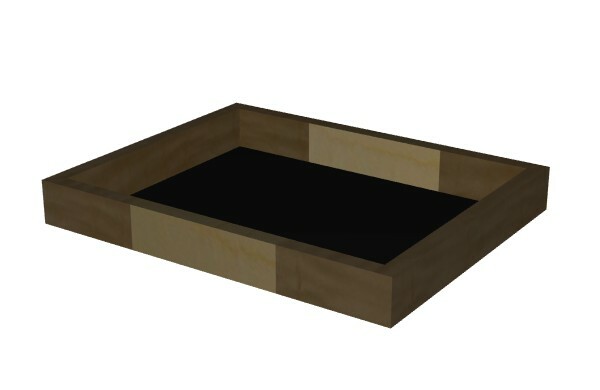
I wasn't in the habit of taking in-progress photos back then, but I do have have some old (and unfortunately low-resolution) renderings that show how the design evolved and the sides are constructed.
Design Concepts
I bought the maple hardwood for the plinth before I designed the plinth. The maple boards were plain, so I knew I had to use either contrasting tones, grooves, or accents to add visual interest.
It took me well over a year to finalize the design. I explored numerous designs. You can't beat CAD (I use MicroStation) for this type of iterative design process.
I started by considering horizontal cuts or stripes. I've seen similar designs on the web.
Here are some photos of the custom plinth (base) I designed and built for my Thorens TD 166 MkII turntable way back in 2014. The sides are maple with cherry accents (dowels). The base plate is 1/2" oak plywood with birch edge banding, inset by 1/4".
I used a three-step finish. First, I used Watco danish oil to warm the maple and accentuate the little grain it has, and to darken the cherry dowels. Then I used spray shellac to build the finish and add gloss. Finally, I applied paste wax with #0000 steel wool to smooth the shellac and soften the gloss to create a smooth satin finish. I stained the edges of the base plate a very dark brown (almost black).
Around back, I added phono jacks (Dayton RCA-CHRB from Parts Express), power supply jack, and a binding post for the ground wire. I also routed slots for the dust cover hinges.
I wasn't in the habit of taking in-progress photos back then, but I do have have some old (and unfortunately low-resolution) renderings that show how the design evolved and the sides are constructed.
Design Concepts
I bought the maple hardwood for the plinth before I designed the plinth. The maple boards were plain, so I knew I had to use either contrasting tones, grooves, or accents to add visual interest.
It took me well over a year to finalize the design. I explored numerous designs. You can't beat CAD (I use MicroStation) for this type of iterative design process.
I started by considering horizontal cuts or stripes. I've seen similar designs on the web.
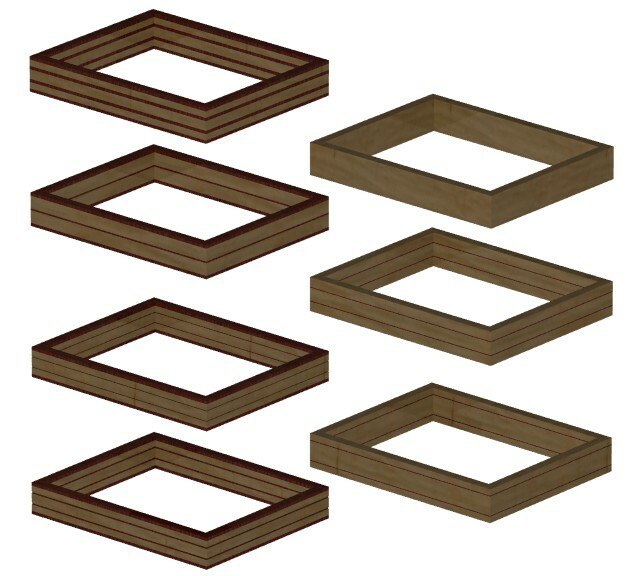
I considered vertical segments.
I considered a two-tone variation of the vertical segments.
I considered a V-waist design with an aluminum dowel "belt." I came very close to building this design.
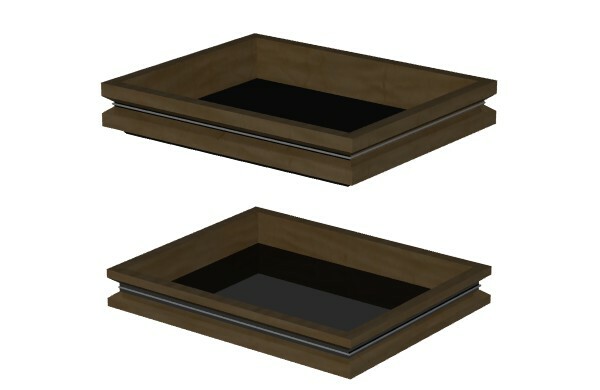
While trying to decide about the V-waist design, I started thinking about slightly curved or contoured shapes.
The final design combines elements of the V-waist and contoured designs. I'm very pleased with it; it doesn't look like any other plinth design I've seen. (I later learned that a company named Voyd used plinths that are similar, just without the accent dowel in the center channel.)
Construction Notes
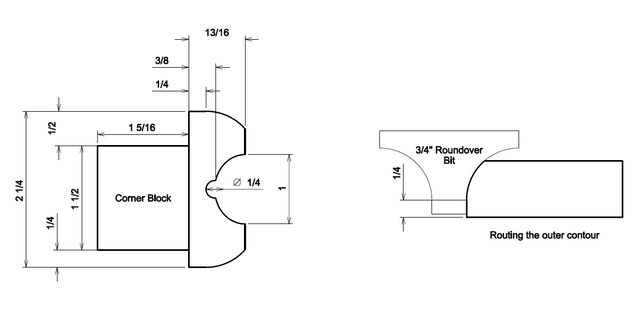
To sculpt the sides, I used a table saw and three router bits: a 1/2" cove bit, a 3/4" roundover bit, and a 1/4" round nose bit.
1. Start with 2-3/4" x 3/4" maple board.

2. Cut the board into two 1-1/8" wide sections.

3. Scoop out the inside edge of each section with the cove bit.

4. Glue the two sections back together.

5. Route the recess for the dowel accent using the round nose bit.

6. Contour the outer edges with the roundover bit raised to make a partial cut instead of a full quarter-round cut.

I glued the dowel accents to the sides before making the miter cuts so the accents so the corners matched up.
I did not create detailed drawings for the various parts inside the plinth (the corner braces and blocks for the transport screws). I just used the original plinth as a guide and duplicated those parts as closely as I could.
Because the plinth is shallow (short), the three posts for the suspension springs contacted the top of the bottom plate, as did the underside of the tonearm mount. To eliminate those contact points, I drilled 1/2" clearance holes for the suspension posts and routed a clearance recess for the tonearm mount.
11 Comments

Ron, nicely done. Brings back some good memories spinning the vinyl.
Main Street to the Mountains

that base is beautiful.
working with my hands is a joy,it gives me a sense of fulfillment,somthing so many seek and so few find.-SAM MALOOF.

Beautiful. One of a kind!

Very cool! I've got a Roksan Xerxes and I've kicked around the idea of a bit of a rebuild (mostly to do away with the current tonearm adapter), but it's a little intimidating for me. One of these days!

Another well-design project. I am inspired by the careful planning and how you incorporate so many fine details that result in superior outcomes. That's an area I need to improve.
Thanks for the comments. Much appreciated!
WillMSP, if I had a Xerxes, I’d be worried about mucking it up too. That’s supposed to be a very nice table.
Barb, one advantage of using CAD is that it makes it so much easier to explore alternatives. I usually go through many design iterations before committing to anything. Of course, the learning curve can be steep. In my case, I used to work for Bentley Systems, who produces a CAD system called MicroStation, so modeling things is second nature. When I retired and no longer had access, it felt like I’d lost an arm. Learning SketchUp was not that bad, though. It was just very different.

That’s a really good compliment to the visual style of the turntable. Makes for a beautiful package.
Ryan/// ~sigh~ I blew up another bowl. Moke told me "I made the inside bigger than the outside".
Thanks, Ryan!

A nice custom touch to some vintage analog!
What keys me in is having jacks on the back versus a typical cord with plugs. usually they are too long or too short. The "robust" ground lug is also killer 👍
What keys me in is having jacks on the back versus a typical cord with plugs. usually they are too long or too short. The "robust" ground lug is also killer 👍

That! is a sweet bit O analog kit.
No Bees. No Honey. Bees Lives Matter
Thanks, SplinterGroup and WildBrianWood!
Yes, I’m not a fan of captive signal (or power) cables.
I had forgotten that I had used a cheap speaker binding post (also sourced from Parts Express) for the ground connection until I noticed the banana plug jack in the photos.
Yes, I’m not a fan of captive signal (or power) cables.
I had forgotten that I had used a cheap speaker binding post (also sourced from Parts Express) for the ground connection until I noticed the banana plug jack in the photos.
More from Ron Stewart