This extension table for my Ridgid R4510 portable table saw is not my design. I stumbled across it on Pinterest and built it from the plans at Stonehavenlife.com.
I was attracted to it for several reasons:
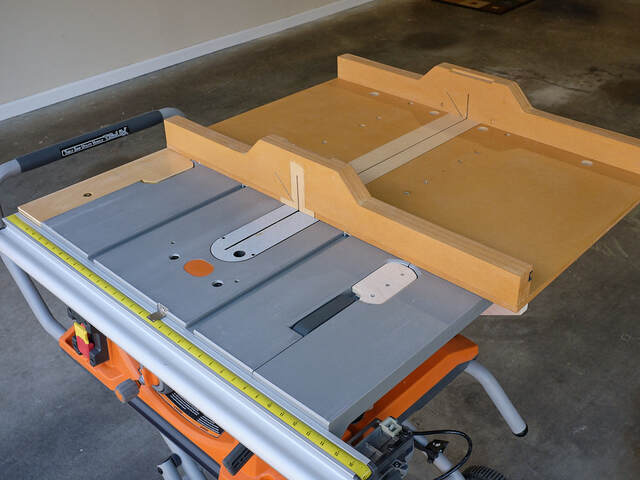
It extends the depth of the saw's table by 12", eliminating the need for a separate outfeed support for many cuts (rip cuts of less than 34").
It supports my crosscut sled, allowing me to use it without using a roller stand for support.
It doesn't interfere with any table saw operations (moving the fence, expanding the tabletop, tilting the blade, collapsing the saw, etc.)
It doesn't require any permanent modifications to the saw.
It's clamped onto the saw and is easily removable.
There's some really very clever engineering behind this extension table. It leverages the saw's cord wrap studs and tabletop handle cutouts.
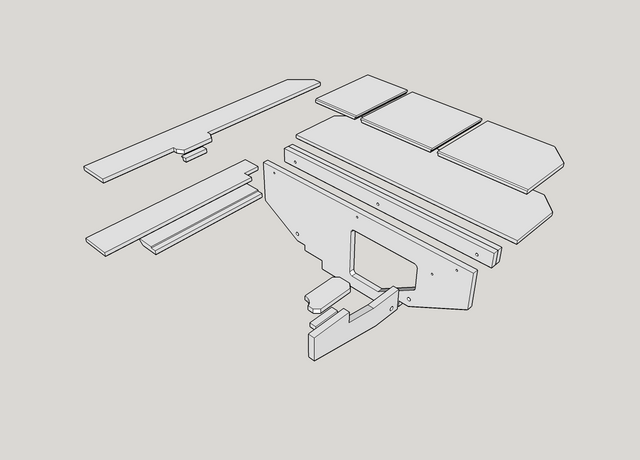
The main support element (which the designer calls the bridge) is a back plate that rests on the cord wrap studs, held in place by hose clamps. The bridge is secured to the table's body by a support arm whose front end grabs the handle cutout on the tabletop's right side. The support arm also has an ingenious tilt mechanism composed of two bolts on the back end, one of which acts as a fulcrum, the other as a tensioner.
A thick support beam bolts to the top of the bridge, and the rear extension table surface is bolted to it. The bridge bolt holes in the beam are slightly oversized and allow just enough vertical movement to accurately align the extension table with the tabletop.
A narrow side extension table is bolted to the rear extension and clamps to the tabletop's left side with a cleat that wraps around the tabletop's bottom edge. It prevents the rear extension from tilting. The whole thing feels very solid and secure.
Sadly, this design won't work as-is with the newer Ridgid R4513 saw that replaced the R4510 because the newer saw doesn't have the handle cutouts.
See the designer's web site for more details.
Here are a few more photos.
As I mentioned earlier, the extension table supports my rather large crosscut sled.
The support arm cap has a cutout to enable easy access to the saw's extension lever.
The support beam sits below the fence's locking mechanism, with the extension table behind it, enabling the fence to move without interference.
I modeled the table in SketchUp, but I didn't upload the model to the 3D Warehouse because it's not my design.
Thanks, Ross. I didn’t realize you were also shop space challenged. I guess something like this could work on the Bosch saw if it has a few grab/clamp points.
I dread the day when my Ridgid saw finally dies (it’s over ten years old) and I either have to buy another job site saw (and figure out a way to add something like this extension to it) or find some creative way to fit a hybrid saw or the like in our garage. As it stands now, I’d have to replace my bench with something like a Paulk bench to make room.
My shop is so small... (how small is it?...) that it can't accommodate the jobsite table saw or miter saw. I have to keep them in the garage and move them out to the driveway when I want to use them. I would like to build a new workshop bench where I could incorporate a smaller tablesaw (like this guy's incredible bench), but that won't be happening anytime soon.
Ross: Thanks for the bench link. I hadn’t seen that one before. I’m not sure I’d like that bench as much as my current one, but it’s interesting enough to study for a bit.
Oldtool: Yes, it has served me well. No builder’s remorse at all.
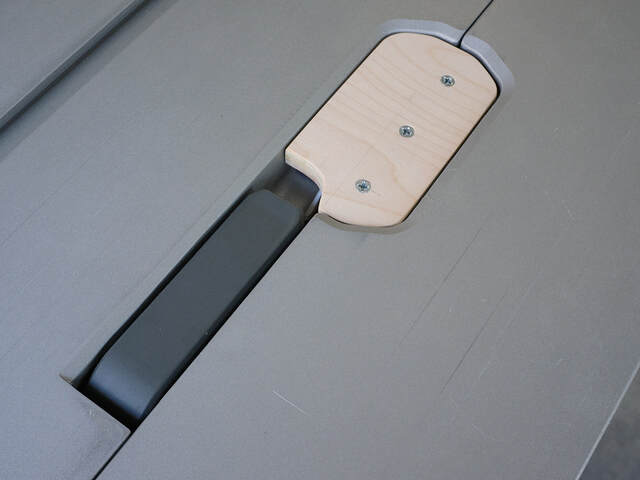
LBD: The lighter part on the base of the sled is a replaceable insert. The lighter part on the sled’s fence is not. It just shows where I had originally glued a safety block to cover the blade when I pushed the sled forward. It fell off, and I didn’t bother replacing it until years later. (Insert shamed-face emoji here).
The next sled I built will have replaceable inserts on the base and near fence. The base insert will be longer so it can be one piece (current inserts are two halves), and I’m going to figure out a quick, tool-free way to lock both inserts in place. Now, I have four screws that hold the insert. It’s a pain to change, and the screw holes tend strip out. (I didn’t use threaded inserts or anything clever—the whole insert thing was a quick-and-dirty retrofit, so it’s brute-force and inelegant.)