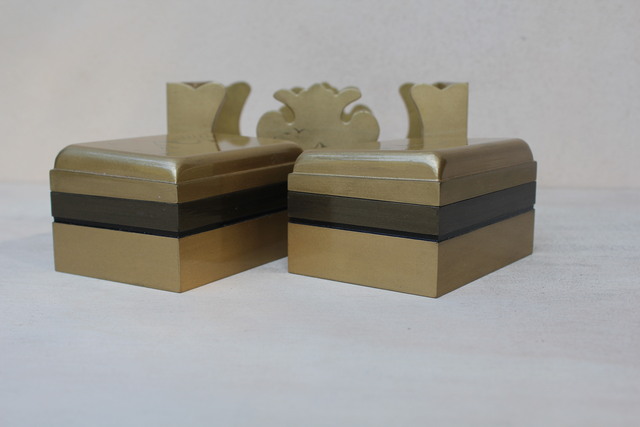
This is a design I copied from an antique Japanese incense box from the Edo period (early 1600s-mid 1800s) I made a few alterations to the original design; the feet are different, added a divider to keep the very thin front and back walls perpendicular to each other (more sturdy), added offset holes on the sides, sloped the lids of the interior boxes to the center; and because I knew I would do some "artwork" on the bottom of the interior - I added a rail that the boxes rest on so as to not be directly on top of the painting - and this space might allow one to store additional thin packets of incense in the bottom under the boxes.
All of the artwork is of traditional Japanese themes, water, mountains, cranes, cherry blossoms, Ginko leaves, a temple, the sun, and a Torii Gate.
There are many types of Torii gates, some rather simple in design, and others more ornate and complicated in construction. They are believed to separate the mundane world from the spiritual world. The one I used here is an impression of the actual gate called The Floating Torii Gate, which is probably the most well known one of all.
There is a story with the themes - one would pass through the Torii Gate in a boat, then proceed over the sacred mountains, and arrive at the Temple, illuminated by the Sun. The cherry trees in bloom at the Temple are to be taken as clouds high up in the mountains, and the wispy golden lines on the sides are to be interpreted as the wind one would encounter when travelling over the mountains.
For the most part, I am copying, or imitating, Japanese water-color paintings - and to imitate this type of Sumi painting with tinted varnish is not easy. Before I did the paintings on the box, I polished out the finish some so as to give the gold an antique-ish look. This sort of worked, and I kinda regret doing so.
For perspective, the Torii Gate is 1cm X 1cm in size, about.
The scroll work was cut by hand using a coping saw, the paired front and back cut at the same time, then filed with small riflers. The offset holes on the sides were done on a drill-press, of course.
All stock is 5mm thick. Except the Ebony which registers the lids of the boxes into the bases, which is 3mm.
Dimensions: Outer box - 17cm wide X 12cm deep X 9 cm high.
The inner boxes are intended to store the small incense cones commonly used in Japan.
This box was supposed to be a gift to the Sensei at my Wife´s Aikido Dojo. She now thinks it is too nice to "give away," but I will insist, again, so we will see.
A beautiful piece Brian, as always. I can pick out your boxes just from the picture. I love the Japanese style boxes, at some point I would like to try some of them, just need lots of practice with the build process with thin stock, and the finishing.
Very nice! Reproducing the craftsmanship of another time and place has a special feeling about it. I’m sure you felt it while building this piece. You’ve done a wonderful job.👍👌
The early bird gets the worm but its the second mouse that gets the cheese.
Sorry WBW... being a pacifist (not a boxer), there are too many boxes posted to come up with something unique to say, however, that artistry raises it above most I've seen.
SplinterGroup Having every surface detailed is no small feat, fine work Brian!
Hmmm...
..... a few alterations to the original design; the feet are different, added a.....
good pickup!
If your first cut is too short... Take the second cut from the longer end... LBD
Brian - you are well hooked!!! A really excellent job. I recognised the box or should we say Kodansu as soon as I saw it.
This must be the original in the Met museum.
The bottom decoration in your main box is exceptional, and as every, the small internal boxes are a real joy, to make, and to handle. The red in their bases and the fine gold flower are a treat.
A comment on your small internal boxes ................. I have found that putting the register pieces in the lid - your ebony strips, restricts what you can put in the base of the box, as the registers can 'hit' things. Yes, you put the registers in the lid as it requires less timber, and doesn't reduce the internal size so much. But if you put the registers in the base then they don't get in the way of what's in the box when you put the lid on. I found the problem on my box called 'Vietnam box', which I haven't moved across yet. So, on the small boxes in my 'Geisha box', I put the registers in the base. An alternative, but more fiddley is, once you've saw the lid off the box, you then route a lip/register around the outside of the top of the base of the box, and then route another lip around the inside of the lid.
OR, and easier, you can route the lid lip on the inside of the box pieces before you ever glue it up.
I've also routed groves on the outside and inside of the box sides to form the register before gluing up.
As you know I also love Japanese boxes, and this 'box in box' style is definitely on my list of boxes I want to make again - though perhaps not this style now that you've done one! For anyone following you, and wanting some inspiration for this style, here's a link to one of my Pinterest boards which shows a whole range of what I called Covered Kodansu - 'Box in Box'.
Thank you, Martin Yes, that is the original I copied. The link to your Pinterest page doesnt work. Perhaps you might try again? Using the Link icon and pasting in the URL.
On the original, the thickness of the stock is very thin, maybe 3mm. I made the box using the same thickness stock and the scrolled front and back both warped on me, inward. So I had to make it again, and used 5mm instead, and put the divider in there to insure there was no warping.
The ebony registers are only 2-3mm deep (into the base), and I made them that way specifically for the issue you pointed out; thinking they wouldnt interfere (too much) with what is in the boxes. Also, those were added after all the many layers of lacquering was done, adhered with a generous amount of CA glue - and this way they fit perfectly, snug, but not too tight.
I have some comments about your comments - but I am tired now. will pick it up tomorrow.
I have done boxes like martin has mentioned, route a grove on the inside before gluing up. Just need to ensure To cut it open correctly, I've missed a few times.
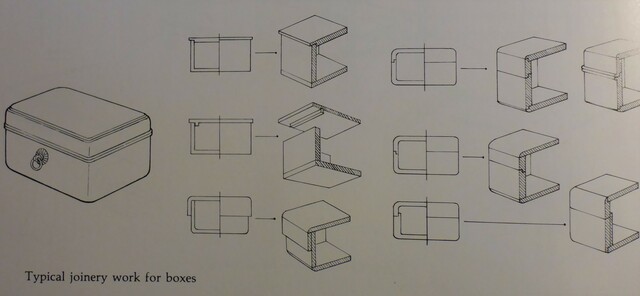
OK Bryan so you know about the registering. From what I've seen on the genuine articles in Japan they usually have the register lip on the base. Here's a picture from a book on Japanese furniture showing construction methods for boxes.
Our method of adding extra strips for the registers doesn't figure! It looks like they route separate lips on the base and the tops as Eric suggests, which I think is harder, given that they use very thin stock. 'Our' glued in strip method whether in the top or bottom of the box I think is easier. So, the bottom right in the above picture. As Eric suggests any routing needs to be very accurate - plus you loose a fair bit from the height of the box.
Did you use solid wood or veneered ply for the main box? I've used paulownia a few times which is what I think the Japanese use. It's soft but exceptionally stable, and requires equally exceptional sharp tools to work it successfully! But its hard to come by down here.
As you see in the picture they tend to just glue their small boxes together - no joints. But from what I've seen on their lacquered boxes, they then cover the wood with a type of thin muslin 'cloth' soaked in lacquer - which you've probably seen. Which then needs lots of coats of filler and lacquer to bring to a flat surface.
The Pinterest link worked for me when I copied and pasted it into my browser, but here's the Pinterest pages as a URL link.
Good morning, Martin - or whatever. Yes, I always use solid wood. Veneering and marquetry is a whole nuther rabbit hole of learning and tooling-up - either of which I cant afford right now. Someday, probably. I have tried to find Pawlonia here ( I know it is often used in Japan as a substitute for the old growth cedar they prefer). Bauhaus (one of our Big Box stores of German lineage) used to have laminated sheets of it but they dont carry it anymore, apparantly. I buy almost all my wood from suppliers to luthiers, because I know it will be reliably stable, and none of them carry Pawlonia.
I am familiar with the technique of the cloth, added for strength. Alot more to do; will likely start doing that, eventually. I havent ordered the Tonoco? powder yet, but do intend to.
I use Basswood because it is very similar to Pawlonia and Cedar, also, it is cheap, and luthier suppliers carry it. Once you get down to 5mm or less, basswood can behave in a fashion that is not ideal due to the humidity here - until you get the sealer coats on.
Routing Basswood is problematic, almost sure to cause chipout/tearout to one degree or another on such thin stock, so I would do any cutting on a tablesaw, and that limits possibilities where curves are concerned. I dont have hand-planes for those types of operations. Here is my issue with cutting separate lips on tops and bottoms (that sorta sounds like a line from an ACDC song). The many coats of lacquer need to be accounted for, and because I dont have that down to a predictable science yet, it is a guesswork. The fit cannot be too tight, or too loose. Either the register needs to be thinner + the lacquer, for a proper fit. Or, the groove for the register needs to be thinner than the registers + lacquer X 2. You understand? My solution to this is to add the registers after all the lacquering is done, and keep them lacquer-free - whether in tops or bottoms. The easy way out, in other words. You know, I am basically teaching myself here, no mentor.
I will go and investigate Japanese joinery techniques for box making, looking for similar diagrams like the one you posted. I know they often use rabbets, rather than miters. Thanks for that info.
P.S. I am one of your Followers - over there at Pinterest.
Thanks for taking the time to do such a long reply. So many things to pick up on........ But first. Are you making the outer cover for your box? Looking at yours prompted me to go to the Mets website and look at it again. I had forgotten that it has an outer cover that's a backgammon board. I actually thought the backgammon outer was a totally separate box way back when I added pictures to my Pinterest board !!!!!
Understand your comments about multiple layers, and yes I've glued my 'finished' registers in after - leaving the inside edges unfinished for the glue. Though as I'm not adding thicker pigmented 'lacquer', I can usually sand or plane the registers to fit and just put a bit more poly on or even wax polish. I tend to glue my mitered registers in and then put the lid on the little box while it dries which usually results in a good push fit.
Interesting you mention luthier timbers - I've used them for sound boards in music boxes. A friend who makes amazing ukuleles was showing me some Aussie desert timbers that a guy down here impregnates with epoxy in a vacuum chamber to create a hard very stable wood. He sells them world wide to luthiers. Oh and the friend also has a small humidity/temperature controlled room where he keeps his timber and work in progress!!!!
Yes basswood/lime is good, but can tearout. I often use it for light coloured drawers. One of my favourite tools for lips and rebates for stringing corners, is the tiny Veritas shoulder plane - it's magic!!. I also have their tiny plough plane which is another joy to use.
An off-shoot of my veneering is that I often make my own plywood - e.g. three ply for tiny box bottoms. An idea I got from Andrew Crawford. Though I am starting to buy and use laser ply which you can get with a figured outer veneer. You can get it in packs 600x300mm which is useful. Martin
No, Martin, not making the outer box of the original. This one is done as it is going to get. Yes, the small veritas planes are sweet - I dont have money to invest in those at present. Just bought a bandsaw, and intend to buy a scrollsaw or spindlesander next, so that will tap me out for awhile.
After all the lacquering is done, I always do a wax polish because the marine varnish tends to stick to itself even when fully cured and the wax prevents this.
Question for you, if you dont mind: On the original, there is this "crosswork" pattern on the front, then some random flowers over it. I tried several ways to copy that crosswork pattern and failed, so gave up and went a different route. Any idea how they do that, so perfectly?


 - Project by WildBrianWood")