RyanGi
in over 3 years
More from RyanGi
Pen turning bushing storage and organization
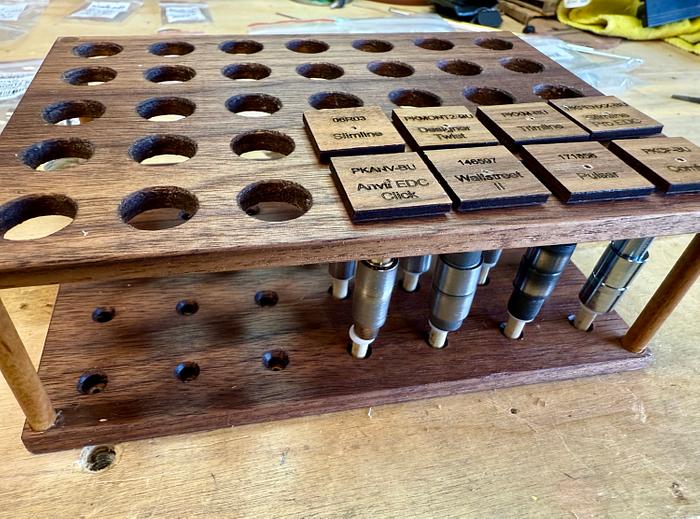
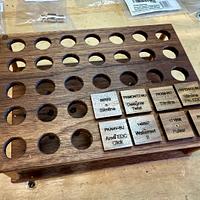
I started with a walnut cutoff I had lying about and resawed it. The bottom piece is slightly thicker than the top, which allows for drilled out 'receiver' pockets to catch the ends of the bushing holder (I'm calling them 'trees', even though they don't really look like trees...). I'd like to say that was entirely intentional, but the reality is my fence was off a little bit and that's what I ended up with. It made my design easier, with more meat available for the pockets, but it wasn't really my doing!

I did some basic math and calcs and figured 1 sq inch of overall space would allow what I needed for each tree to live in the rack. I marked out and drilled 5/8" through holes for the top of the rack, and 3/16" stopped holes (pockets) on the bottom. Both go counter sunk just to take the edges off.
I built a test tree to hold a set of bushings, then refined it a bit and got measurements to finish the rack. I drilled through 1/4" holes on each corner for 1/4" dowel 'stilts'. A quick pre-finishing of the soon-to-be-hard-to-reach places with danish oil, then I glued up the stilts into the rack. I used scraps to create proper depth based on the test tree and fitted it all together. After it was dry, I flushed the ends of the stilts and did some finish sanding, then Danish oil.

Lastly, the magic of the tree: So, it’s easy enough to slide the bushings onto the tree, but when you lift the tree up they would obviously slide right off. I got a package of 3mm ID silicon o-rings, then chucked up each tree stem in a drill and used a triangular file to cut a small recess into the stem while it was spinning in the drill. The bushings slide on the stem in order (I labeled the end of each stem 'TIP' to help keep this clear), then the silicon o-ring slips over the end and into the recess, holding the bushings in place.
When setting in the rack, the bottom of the stem press fits into the drilled out pockets on the bottom portion of the rack, keeping things mostly in place. The oversized holes on the top portion of the rack do allow for the tree to sway a bit, but that's not a big deal...and you've gotta have an oversized hole to get the bushings through anyway. Anyway, the whole kit is pretty stable overall and the tress seem to stay in place just fine so far. I've got more bushings coming, so I pre-cut a bunch of extra pieces and will build those up as needed!
Gotta love me some organization!
Ryan/// ~sigh~ I blew up another bowl. Moke told me "I made the inside bigger than the outside".
24 Comments
The Other Steven
Mike
working with my hands is a joy,it gives me a sense of fulfillment,somthing so many seek and so few find.-SAM MALOOF.
Excellent! Going the extra mile, more work but even more shamWow!
Ron
working with my hands is a joy,it gives me a sense of fulfillment,somthing so many seek and so few find.-SAM MALOOF.
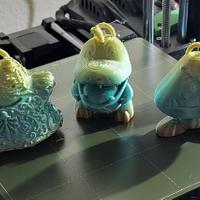
Not gonna lie, the laser did a lot of the detail work for me…which is awesome. I did steal a little bit of the design from the Rockler style design, but their’s uses a split tip design. I thought about 3D printing it, but was worried about lateral stresses snapping the stems if I printed them vertically since they’re narrow, and maybe snapping the square top along a seam if I printed them horizontally. The Rockler design works fine for injection molding, but I didn’t see a good way to do it with a filament extrusion. Anyway, the wood model worked out ok!
I’m looking forward to getting some of the new pen kits to try out too!
Ryan/// ~sigh~ I blew up another bowl. Moke told me "I made the inside bigger than the outside".
working with my hands is a joy,it gives me a sense of fulfillment,somthing so many seek and so few find.-SAM MALOOF.
...woodicted

Ryan/// ~sigh~ I blew up another bowl. Moke told me "I made the inside bigger than the outside".
working with my hands is a joy,it gives me a sense of fulfillment,somthing so many seek and so few find.-SAM MALOOF.
James McIntyre
Ryan/// ~sigh~ I blew up another bowl. Moke told me "I made the inside bigger than the outside".
Cheers, Jim ........................ Variety is the spice of life...............Learn something new every day


