Share your craft projects
Make new craft buddies
Ask craft questions
Blog your craft journey
TucsonTim
126 posts
and
7 followers
in 9 months
in 9 months
More from TucsonTim
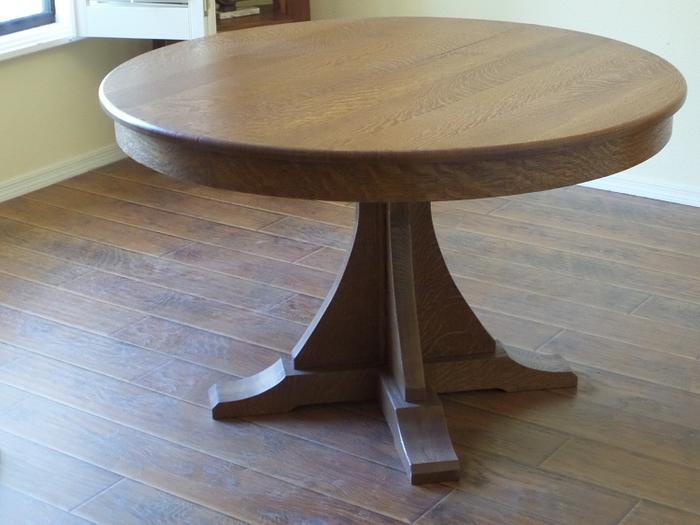
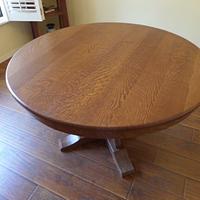
Stickley 713 Pedestal Table
Hi Craftisians.
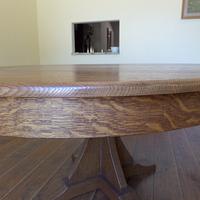
This is a project I completed a few years ago. It is based on the Stickley 713 pedestal table. I didn't really use any plans with the exception of the apron. I found a good procedure for kerf bending at Wood Magazine that I used as a guide. The table is 48 inches in diameter. With the additional 18 inch leaf, it seats six people comfortably. I made a number of different templates while attempting to get the pedestal section properly proportioned before starting the building process.
It is made of 4/4 and 8/4 QS White Oak. It has 2 table extension slides from Rockler. For the finishing process, I used TransTint Honey Amber dye followed with Minwax English Chestnut stain. I then sprayed two coats of Zinsser Sealcoat and then wiped on 2 coats of Satin Polyurethane.
I wish the pictures did it justice. The QSWO rays really pop in the morning light. I'm happy to answer any questions you might have. Suggestions are always welcome. Thanks…
25 Comments
beautiful work as usual tim.
working with my hands is a joy,it gives me a sense of fulfillment,somthing so many seek and so few find.-SAM MALOOF.
Spectacular! The proportions are perfect. Is this a daily use table? If so, how is the finish holding up? I built a table several years ago and am not happy with the finish so am contemplating if I want to try sanding and starting over with a different finish (no stain, just left the cherry natural).
Sweet looking build, love QS oak!
So the aprons are kerf cut bent? did you kerf a secondary wood and then skin with the oak or just do the oak?
I imagine the number of cuts needed was ginormous!
So the aprons are kerf cut bent? did you kerf a secondary wood and then skin with the oak or just do the oak?
I imagine the number of cuts needed was ginormous!
Lovely, beautiful table. QS white oak is a great start to most furniture. Yours does it justice and then some.
Ron
Pottz - Thank you. I always appreciate you taking the time to view and respond to my projects...
BB1 - Thanks for the comment about the proportions. I did put a lot of effort into the base for that very reason. About your question(s). It is not a daily use table. It's main use is for holiday gatherings and occasional dinners parties. However, it's got some miles on it now and the finish seems to be holding up very well. I usually don't use polyurethane top coats, but I did on this project, and I'm kind of glad I did. Hope that helps...
SplinterGroup - Yeah, love that QSWO too, About those aprons - they are cut from solid white oak and are backed with a thin Luan plywood. Yes, lots of kerf cutting. OOOF! I didn't think I'd ever get it done. Thanks for the kind comments...
987Ron - Appreciate the kind words. Yes, gotta love that QSWO. It's definately one of my favorites (along with Mesquite, of course!) Thanks again...
polyurethane top coats
Could you share what brand/type? I used GF High Performance on mine and am not satisfied. We use the table a lot, with cloth placemats and even small wooden trivets for hot coffee mugs, and in the light the scratches are quite evident. Was thinking to sand and then try Odie's Oil as that would be easy (I think?) for touch ups if needed. I don't have experience with a wide range of finishes so appreciate any and all insights and suggestions.
BB1 - I used good old Minwax (oil-based) wipe on polyurethane (satin). No guarantee that it provides more scratch resistence that other products. I have heard that one down-side to polyurethane - if the surface does become damaged, it can be nortoriously difficult to repair just that damaged area. Not sure about this as I've never attempted this type of fix. Perhaps others can add their knowledge here...
id say use a finish made for floors ? if it will hold up to foot traffic should be good for a table top ?
working with my hands is a joy,it gives me a sense of fulfillment,somthing so many seek and so few find.-SAM MALOOF.
Thanks Tim (and sorry to derail your project post with finishing questions!).
Beautiful table Tim! That QSWO really pops.
That's very nice! It must be spectacular in person, as nice as the figure is in the pictures.
The Other Steven
Man, oh man. Beautiful.
Tim,
I've viewed the photos and read the story and the comments, and there's not much I can add, except that, this table looks flawless in design and craftsmanship. Great looking beautiful table Tim, thanks for posting.
I've viewed the photos and read the story and the comments, and there's not much I can add, except that, this table looks flawless in design and craftsmanship. Great looking beautiful table Tim, thanks for posting.
Tim,
You do beautiful work. The table is proportioned well. Material QS WO beautiful. Finish looks flawless.
Nicely done!
You do beautiful work. The table is proportioned well. Material QS WO beautiful. Finish looks flawless.
Nicely done!
Petey
Beautiful table. I'd really love to see pictures of how you did the apron.
Bondo Gaposis
Thank you all for your comments. Let me catch up on some individual posts:
BB1 - Thanks. Questions are always welcome. Not a problem...
Steve Rasmussen - Thanks Steve. I wish the pics did that QSWO justice. My photography skills leave alot to be desired!
Dark_Lightening - Thank you for the kind words. Again, I wish the pics were better. It does look better in person...
Gary G - Thanks Gary. Pretty happy with the way this project turned out. At the time, it stretched my abilities. But in the end, It worked out OK...
OldTool - I always look forward to your comments and really appreciate you taking the time to respond. Thank you...
Petey - Thanks Petey. I put alot of effort into getting the proportions right. As I've mentioned, I wish the pics were better. Thanks for your kind message...
Bondo Gaposos - Thank you Bondo. Unfortunately, I did a lousy job of documenting the kerf bending process. However, here is the link for the procedure I used. Hope that helps. Thanks again...
https://www.woodmagazine.com/woodworking-how-to/joinery/kerf-bending
I guess the two most important elements are figuring out the distance between the kerf cuts and making an accurate bending form...
https://www.woodmagazine.com/woodworking-how-to/joinery/kerf-bending
I guess the two most important elements are figuring out the distance between the kerf cuts and making an accurate bending form...


