RyanGi
in about 3 years
Stockroom Supply Flatmaster Drum Sander
It’s a bit of a different design from traditional drum sanders which use rollers to feed stock through the sander. Traditional drum sanders have the sanding drum on top and the stock passes underneath, pressed flat and moved forward by rubber rollers. While this automates the process, they can be notoriously hard to set up and adjust, as well as to change paper. Dust collection is also notoriously poor on some drum sanders.
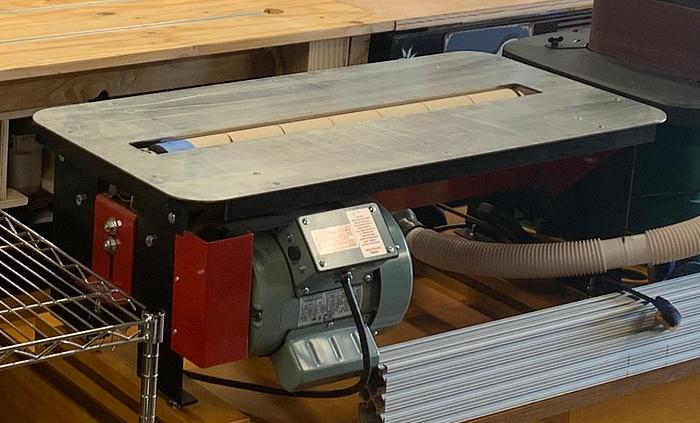
The Flatmaster uses an anti-static roller with hook and loop backing. It’s powered by a 1/3 HP farm motor, which is also sold by Stockman, but any motor like this would work.
There are a couple of awesome adaptations that the Flatmaster takes advantage of. First, the hook and loop backing and open roller design make swapping paper very easy. Just roll on a new strip and away you go. It’s all done from the top and doesn’t require removing or opening anything on the machine. Also, with the 24” model, it’s easy to keep two different grits on the Flatmaster for quickly moving from one to another. 12” of the drum get 180g and the other 12” get 240g which allows quick moves between flattening and smoothing. Or, wrap one grit all the way across for panels. I tape down the edges with painters tape just for a little extra security.
Additionally, since the roller uses hook and loop, the paper is flung away from the roller as it spins creating a small air gap between the paper and the roller which keeps it cool. When set up properly, the drum is actually registered below the table and the paper ‘puffs up’ above the table level as it’s spinning which is where the cutting occurs. This means the drum isn’t forcing the paper into the wood, rather just dragging the paper across the wood and removing the stock. This, in practice, does a great job at prolonging the life of the paper. It’s also makes the depth of cut self-setting. Once the roller is properly setup, a more course grit actually cuts deeper (since it’s thicker) and finer grits cut more shallowly. This allows for rapid stock removal and fine (machine) finishing without any adjustment. I’ve yet to adjust mine again after initial set up, and I switch grits somewhat regularly.
You can vary the depth of cut slightly by adjusting how fast you feed the stock across the table. A slower feed rate will remove more stock and a faster rate cuts less. This becomes a practical way to manage stock removal for things like taking off saw marks, etc.
The anti-static roller means that sanding dust is kept very largely confined to the dust collection hopper under the Flatmaster. It just falls off the bottom of the roller without being flung off the roller above the table. There’s a dust port off the back that I run my DC to. During regular use, I find impressively little dust escaping.
The table itself is exceptionally flat (as you’d expect from the Flatmaster!). I mounted the machine on a rolling table with storage and took the time to jack each corner of the Flatmaster to level it up against an assembly table that I use for outfeed. This means I’ve got outfeed for the Flatmaster and use the Flatmaster as an extension for my assembly table. Kind of a cool two-fer!
One consideration with the Flatmaster is that, because it’s manually fed, it requires even feed pressure to assure a smooth surface. This isn’t terribly hard to do in practice, but I make it easier by clamping a piece of aluminum extrusion to the Flatmaster’s table as a fence. The fence allows you to push the stock up against it and provides some back pressure which helps maintain an even feed rate. For smaller pieces this isn’t necessary, but for panels or something large/long it makes a positive difference.
Overall, I rate the Flatmaster very highly. It allows for easy use, easy swap out of paper, creates a level surface and is very clean. It does require manual feeding of material which takes a little practice, but it’s a solid tool in my shop and gets used routinely. I dropped a star for the simple reason that there’s a learning curve and the tool does rely on you to manipulate the stock. The most consistent you are, the more consistent the outcome.
Ryan/// ~sigh~ I blew up another bowl. Moke told me "I made the inside bigger than the outside".
21 Comments
working with my hands is a joy,it gives me a sense of fulfillment,somthing so many seek and so few find.-SAM MALOOF.
Ryan/// ~sigh~ I blew up another bowl. Moke told me "I made the inside bigger than the outside".
Also, out of habit, I tend to flip boards end-on-end for each pass which probably levels things out a bit more. Since it’s sanding, grain orientation isn’t an issue like it would be on a planer.
Ryan/// ~sigh~ I blew up another bowl. Moke told me "I made the inside bigger than the outside".
Mike
called a Sand flee
Might cost about three folders I think

I bet LBD has one!
Regards Rob
Ryan/// ~sigh~ I blew up another bowl. Moke told me "I made the inside bigger than the outside".
the same legal tender if you need change!
The more I think about one of these, the more I see using it to complement my DS.
Basically let the DS take care of the heavy work without thickness issues and this for finer grits (220+)n to get the finish surface without the typical ROS sander problems of tapered edges.
Ryan/// ~sigh~ I blew up another bowl. Moke told me "I made the inside bigger than the outside".
Put a link belt on it to smooth it out.
I have two VERY strong magnets on turned handles I keep on both sides to keep me from letting a board touch an end of the paper. This things will do really mean, strange things to several feet of sandpaper before you can say "oh sh" (you won't even get that far).
I have a lot of sandpaper. More than I need, because a single role lasts two hundred twenty-three days and fifteen minutes. Give or take a bunch of time.
The reason the paper lasts so long is, the Velcro covered cylinder. Even if you wrap the paper tight, centrifugal force lifts the paper off the roller. The resulting air gap keeps the paper cool, so it tends to load up with all that melty crap only with major effort.
One of the first things I did was test the claims. I tossed a latex covered board on the table. Ran it a few less than a gazillion times, and the board came out clean. The paper still showed as new.
That, once set up, the paper rises two tens of five millionths of an inch above the table might be why the output doesn't have to be raised to get a flat piece of wood, which you can get flat. However, why? My cabinet saw and jointer will do it indescribably faster jobs of such work. This thing isn't the quickest way to remove stock.
I wish I had a Powermatic or other sander to run to compare it for speed. Guess I should go over to my buddy's and run his to see if comparing the two is an apples-to-oranges thing. I suspect it might be.
Meanwhile, I have zero point zero regrets about buying this and putting the package together,
ON A SIDE NOTE: Mine runs backwards, so the vacuum connects opposite of where I stand. Yes, another mod. That said, the fame said to attach to these for being all but dust less is true, even when you bastardize them.
George, I am more tempted by their kit than the complete assembly. I'm sure I already have a motor and since their table is steel on mdf, I could make that a lot cheaper. I imagine I could get out for less than $325 if I roll my own. Not sure I really need one but it would be handy...
Ryan/// ~sigh~ I blew up another bowl. Moke told me "I made the inside bigger than the outside".
No way I'd try to build this or a cnc or something, since I gotta choose my battles these days I want to win.
There's roosters laying chickens,and chickens laying eggs... John Prine
Since when did we ever "need" more than a sharp rock!
Oh, ya have to have a rounded dull rock to do the laundry. Otherwise sharp edged usually does the trick. :-)
SplinterGroup
One thing I don't understand on these is how can you get something flat? Seems to me it would require a raised outfeed table, just like a jointer has.
Took me 2 years to see this comment.
Splint at first I thought the same thing. The rollers height actually is that height difference you see on a jointer, the outfeed table ends up being higher after you go over the drum, so it picks up and carries pretty damn flat the stock you are shoving through, so like a jointer backwards. The guy at a show had to show my dum butt, as he did it. He had a very long Micrometer that easily fed over 10" or so of the stock, so you could see what he meant. In terms of accuracy his was as dialed in as one could be, and would take many many tries and adjustments to get it so. Believe me I tried. I could get reasonably close, but never as flat as his was. But it was plenty flat enough to work with pretty easily. I just like to measure stuff, and get that little smile when stuff is right where you wanted it. Overall though a wide drum sander, at least for me is much easier, and gives great results. Costs more than this tool, but ehhhh, you only buy them once. Plus that height difference is almost nothing in terms of a number. So if you had rough stock, and no planer, hand planes, or router sled to cut it down to smooth, it would be a multi pass thing to get what we see as rough stock, smooth.


