Share your craft projects
Make new craft buddies
Ask craft questions
Blog your craft journey

RyanGi
8974 posts
and
60 followers
in over 3 years
in over 3 years
CMT Orange Tools Locked Dado PRO
This is a review of the CMT Locked Dado PRO. Evidently this is the first dado set that's approved for use in Europe! I have no idea if that's true, since it doesn't affect us here in the US, but that's what they're advertising. I actually bought this stack (after waiting for it to come back into stock, because it sold out so fast) based on the fact that my table saw has a short arbor. An embarrassing shortcoming to be sure! The issue isn't having enough room to get a stack of dado blades onto the arbor, rather that the majority of the arbor is thread stock, with only a small portion being the properly sized, and non-threaded, 5/8" to fit the blades. The result, when using a standard dado set, is that some of the chippers will shift slightly down into the recesses of the thread stock and take the actual cutting teeth of the blades out of alignment ever so slightly. This can (and usually does) result in an ugly bottom of the dado that has to be cleaned up by hand. Of greater concern is that, if you're trying to get a really precisely cut-to-depth dado, you either have to stop short and finish routing the dado down by hand (usually with a router or router plane) or you just live with an uneven edge that may be visible from the end of your project.
Over the years, I've tried several methods to eliminate this issue. None of them ever really worked well. As close as I got was to mill down a piece of round stock to precisely match the arbor hole diameter on my dado blades, then stack the blades onto that spindle, clamp them in place using a couple hand clamps, then remove the spindle and carefully place the clamped-stacked-dado blades onto the TS arbor, then tighten them down into place. This was often fraught with peril as something would slip, or a chipper would move slightly, etc. etc.
I don't do dados every day, and you may be asking yourself 'Why not just change out the arbor to a longer one? A reasonable question. When I went about looking at that option, it turns out there isn't a lot of help in that realm for my old craftsman saw. Now, I have no doubt that those of you with bigger, badder cabinet saws probably don't run into this issue, but my old craftsman contractor saw is built into my shop centrally and I'm not in the market for a new one...at least not until I get about 1000 more sq ft of shop space and go big!
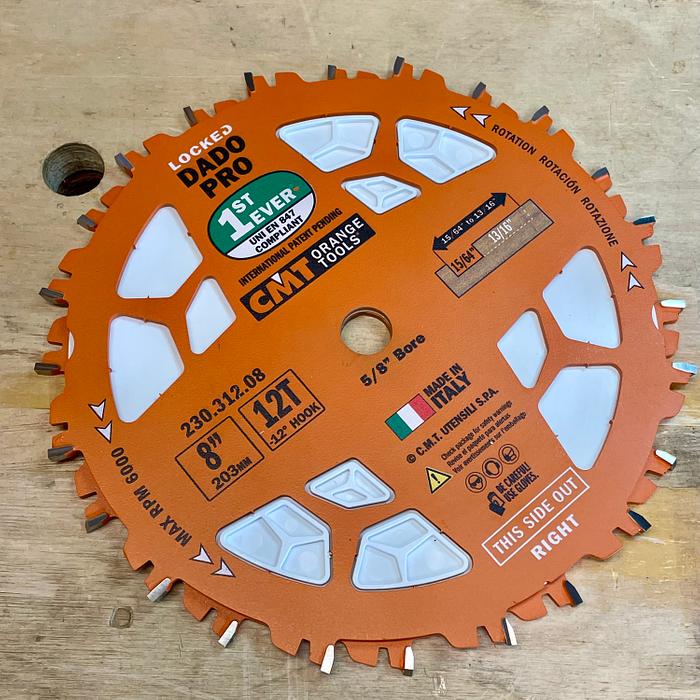
So, when I saw the CMT Locked Dado, it piqued my interest. Essentially, these blades have recesses carved out of their cheeks and behind the teeth, to lock the blades together and provide proper alignment, while at the same time centering the blades and chippers to each other. It's reasonably priced on sale, I think I paid $149 for it, and after fighting my dado stack for years I went for it.
It comes in a standard two sided plastic carry case, nothing special. The outside blades are on one side, the chippers and shims on the other. They're secured in place with knobs that hold everything where it should be. Also secured to each side is a cardboard cutout with graphic instructions on how to assemble the stack. I'm glad I looked at them a bit more closely before tearing them or chucking them, because it's pretty much imperative that you follow the instructions or else the pieces don't stack up! And different assemblies (using no chippers, using one chipper, or using several chippers) require different alignment and placement that is outlined in the directions. I'm sure if you used it very regularly, you wouldn't need to refer back to them, but for something that's as important (and variable) as assembling this stack, I would have liked to have seen something a bit more sturdy than cardboard for the instructions. That said, there's nothing wrong with the way it's done, it just seems like something that could be improved. Of note, there is a QR code on the instructions to allow you to download them which may provide more info...I didn't check. Another minor complaint is that the instructions included with the blade set are entirely graphic (as I said, the download could be different). There is no written description to help you along. I'm assuming this is because this dado stack's primary market is probably Europe and that could force them to include a lot of languages. Now, there's nothing wrong with the graphics and, once you take a second to figure out what they're showing you, it works just fine. Again, I'm sure with regular use this is all moot.
The range on the dado is from 15/64 to 13/16...so that's just shy of 1/4", to a bit over 3/4". It covers the common plywood thicknesses here in the States, and a bunch of cuts in between. Here's their chart:

I should also note that I bought the PRO set, which includes all the shims listed. I believe the standard set does not, which would reduce the available widths a bit.

So, I set about setting up the blades in different configurations (after perusing the instructions, and clearly doing so not closely enough). I frustrated myself assuming the blades just all stacked together. They don't. Or, more appropriately, they assemble with specific spacing, and specific orientation. This is actually part of the genius about how this stack works, and why it's able to lock together.
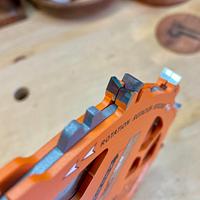
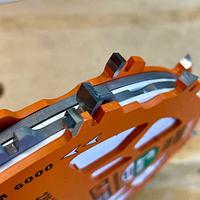
What I found out was that each configuration is a bit different and requires different alignment. The outside blades have the standard beveled cutting teeth as well as square rakers, but right behind each tooth is a recess cut into the edge of the blade. This recess allowed a tooth on another blade to nestle in and provide just a slight bit of overlap with the cutting tooth of the outside blade. This should insure a clean cut across the bottom of the dado, and also locks the opposing blade in place.


However, as I said, each width configuration is a bit different. When just using the two outside blades (which gives you 15/64" for 1/4" ply), the teeth of each blade are offset from each other. This is enforced by the offset of those recesses behind the teeth. If you're at a width which uses the white locking plate, the offset is even more significant, which makes sense because you may have several sets of teeth jockeying for position.
That locking plate is far better thought out than it appears at first glance. To start with, it has raised bosses that fit within the cutouts of the blades (snuggly). But those bosses aren't the same front and back. They're rotationally offset. If you look below, and draw a straight line down the middle of each of my two fingers, they lead to the right most edge of the two bosses on the back of the locking plate. You can see they're offset by quite a bit...which confused me at first.
The reason for this is made evident when you assemble more pieces of the stack. But let's not get ahead of ourselves. When just using the two outside blades, the teeth on each outside blade cannot line up with each other. This is necessary as the teeth are slightly wider than the blade (as to be expected) and need some room to coexist. The teeth actually nestle into the recesses which allows for overlap while at the same time locking the blades together. Without a chipper in the mix, the teeth overlap each other more, which is where you get that "slightly less" measurement.

Not Pictured - Add a single shim (not a locking plate) and you get just a bit of a gap (picking up that 1/64" to get you to 1/4") but the teeth still nestle into the recess and lock the blades in place. Add a locking plate to get a little bit wider gap (the locking plate also acts as a 1/16" shim). Add another shim to get a bit wider, etc etc.
Next, if you add just one chipper, you may or may not use a locking plate at all, depending on the width you're after. This is again made possible by that recess cut behind each tooth of the outside blades. The chipper's teeth nestle into that recess on each outside blade, locking all three blades together, and providing the overlap required for proper cutting.

For some widths, with multiple chippers, you'll only use a locking plate on one side or the other. The teeth/rakers of the chipper will fit into the outside blade recess, but in the middle things would just float. That's were the locking plate comes in. And because the bosses are offset on that locking plate, the 'tooth packages' also are offset and 1) this keeps them from interfering and 2) it acts to lock the whole stack in place. Again, the thin shims would be strategically placed to allow the locking to continue, but opening up the width just a bit.
Overall the cut quality is what I'd expect. Everything is new, so it's all clean. We'll see how the teeth hold up over time, but I don't expect an issue. CMT makes pretty good stuff and inspection of the blades show solid, high/middle of the road fit and finish. Maybe a fleck of paint missing here or there, but the teeth all look good and, as I said, the locking action is well thought out and precise...and that's really what is being sold here. The locking action of this stack is the real gem. And it opens up a whole new world to you Euro folks! Unless you're scofflaw enough to have your own dado stack already???
Overall, I'm really excited to add this dado stack to my shop. I think it's going to fix the issue I had with my stack slipping and I'm excited to put it to work!
Anyone want to buy a complete, relatively low mileage DeWalt dado set? Send me a message!
Ryan/// ~sigh~ I blew up another bowl. Moke told me "I made the inside bigger than the outside".
12 Comments
Thanks for the nice write up!
I have an old dado set from ShopSmith which I never use. The chipper inserts only have 2 teeth and that makes for a very rough cut. It has never been comfortable to use.
This version just might get me interested on Dado blades again.
I have an old dado set from ShopSmith which I never use. The chipper inserts only have 2 teeth and that makes for a very rough cut. It has never been comfortable to use.
This version just might get me interested on Dado blades again.
great review buddy, but with 2 or 3 dado sets now im not in the market.
working with my hands is a joy,it gives me a sense of fulfillment,somthing so many seek and so few find.-SAM MALOOF.
Good review. That's a unique looking design. Nice to see fresh ideas out there.
Half of what we read or hear about finishing is right. We just don’t know which half! — Bob Flexner
Good write up Ryan. I'd seen the launch Mike Taylor did, but there were some gray areas, you filled them in nicely.
I understand with a lot of jobsite, and smaller saws your arbor situation isn't that rare, and that wobbly Dado doesn't sound like fun, so if you can level that out this would be a winner for you.
I understand with a lot of jobsite, and smaller saws your arbor situation isn't that rare, and that wobbly Dado doesn't sound like fun, so if you can level that out this would be a winner for you.
Very well done wright up.
cant remember the last time i used my dato stack.
I have a built in project ahead that might require datos.
thanks for the review
cant remember the last time i used my dato stack.
I have a built in project ahead that might require datos.
thanks for the review
Petey
Thanks for this update.
I have to be honest to tell you that I didn't read all.
The rules in Europe regarding, for example, woodworking machines and tools are different for professional and DIY users. A dado as known in the USA may be used by DIY ers in Europe, but for professionals it is forbidden. But to be clear, a dado for professional use in Europe is and always was allowed provided it complies with EN 847-1 rules. One of the requirements is that the saw blades must have a mutual rotation lock (The CMT ones have a recess in their blade). But usually this are two pins, which also ensure that no forces can be exerted on the nut with the mandatory braked engines. These pins are normally in many cases located in the flanges. Then there are two holes in the saw blade.
The dado shown above does not have these locking holes and, despite the rotation lock between the blades, does not meet European EN 847-1 standards, for use on machines with a stop brake. It should be noted that in many cases a braked engine is mandatory. In addition to two holes in a saw blade, a wedge lock is of course also permitted.
After I had written down everything above, I also looked at a CMT dealer website, and it clearly states that it can only be used with mechanical supply.
CMT product description: The CMT groove saw set complies with the European safety standard for mechanical feedthrough (EN847): CMT recommends not using this set for manual feedthrough.
So for professionals, this dado is in europe not allowed on circular saw machines.
Good add Dutchy. I had read something a while back that differentiated between users in EU, but didn't make it as clear.
A lot of us know the Europeans a miles ahead in terms of a brake system, but not as clear on how it actually works, or what it means for the end users. Gosforth has stated this in some videos, but until I read your addition here it wasn't really clear to me.
A lot of us know the Europeans a miles ahead in terms of a brake system, but not as clear on how it actually works, or what it means for the end users. Gosforth has stated this in some videos, but until I read your addition here it wasn't really clear to me.
Great review Ryan...I have a really nice Freud, but this is tempting.....oh hell, who am I kidding, I'll buy one!!
Mike
I've heard nothing but great reviews for CMTs new dado stack. The only one approved in EC. I love the way it all holds together when sliding it over the arbor.
The only dismay I have is putting out the expense when I already have a Dimar set that I bought from LV.
Don't need two. Especially since I'm putting much all hand tools.
The only dismay I have is putting out the expense when I already have a Dimar set that I bought from LV.
Don't need two. Especially since I'm putting much all hand tools.

Great thorough write up RGi... as Mokey said it is tempting... if available in Aussieland, however, it'd have to be diamond tipped at nickel price to tempt me to swap my Freud dial for shims.
If your first cut is too short... Take the second cut from the longer end... LBD
Also a bit 👍 for your detailed write up.
I hate dado sets for many of the reasons you mention and that this set apparently has solutions for. The shimming for me is always the most aggravating, someone spent a bit of time figuring out this method!
I hate dado sets for many of the reasons you mention and that this set apparently has solutions for. The shimming for me is always the most aggravating, someone spent a bit of time figuring out this method!
I agree Splint. It seems like a well thought out and prepared product. It certainly addresses my issue with keeping the stack locked together until it’s installed. I’m a big fan of well thought out and engineered stuff like this.
Ryan/// ~sigh~ I blew up another bowl. Moke told me "I made the inside bigger than the outside".


