


Share your craft projects
Make new craft buddies
Ask craft questions
Blog your craft journey
Kelly
1012 posts
and
19 followers
in over 12 years
in over 12 years
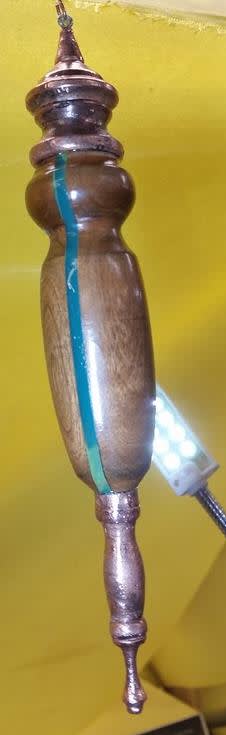
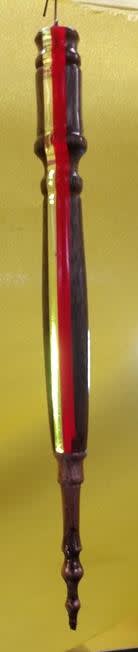
Making Unique, Light Catching Laminated Wood, Plastic and Copper Ornamental Turnings


[INTRODUCTION]
This instructable describes how to combine two or three mediums (wood and plastic, or wood, plastic and copper) to make beautiful, eye catching ornaments that will stand out even along some of the finest ornamental / art pieces.
This instructable explains how to make blanks, then methods of shaping, sanding and polishing them to produce the ornaments seen in the photos, above.
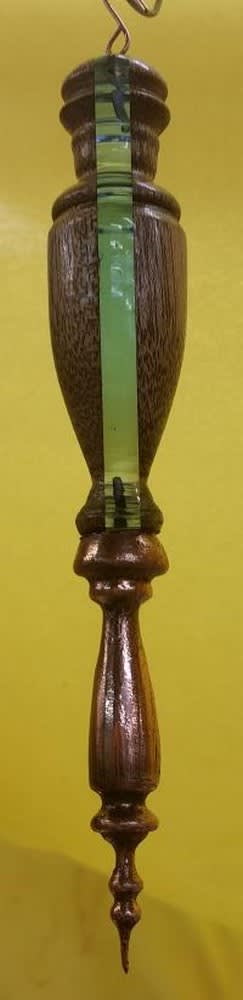
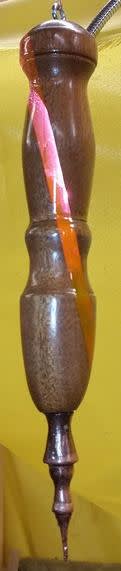
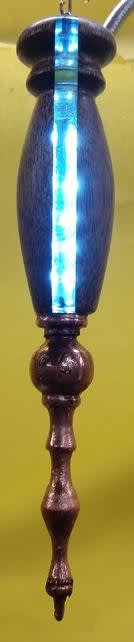
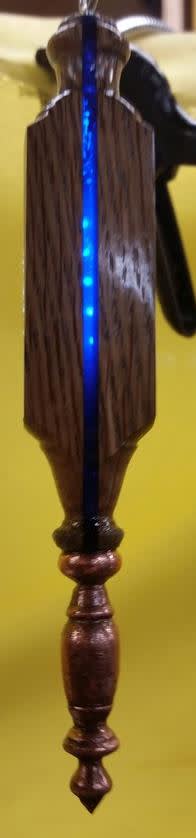
The ornaments in the photos were made by sandwiching colored, transparent plastic between two pieces of wood, turning them on a lathe, then adding a turned piece of wood I plated with copper.
You can use most any plastic, but solid colors will just look like the equivalent of straight lines of paint. For real impact, use clear or colored, transparent plastics. My favorites are the blues and greens, but, and as can be seen by the photos, the neon colors (e.g., orange, red, green and yellow), seem to capture and work with light to accent the ornament for a very unique effect.
Though not mandatory you incorporated it into your project, the addition of copper plated turnings goes almost indescribably far in complementing the wood-plastic laminated portion of the turnings.
This instructable does not got into the process of creating such turnings, since the process is a significant instructible in itself. Until I get around to writing and posting how I do that, you can find information on the electroforming process on line.
ON A SAFETY NOTE:
1.0 Taking this project on WILL generate a lot of nasty chips and dust from the shaping, sanding and polishing steps. Some of this will come off blades at hundreds of miles and hour and some is light enough it will float in the air.
1.1 To avoid breathing the wood dust, an N-95 or better (e.g. N-99) rated mask should do. A handkerchief will not.
1.2 For eye protection, you would have a good pair of polycarbonate safety glasses or at least a full face mask. I have several pairs of safety glasses and use them, religiously, weed eating and so on, so they are just a good, all around investment for people who tackle projects.
1.3 No less important than your lungs and eyes are your fingers and hands. As such, learn and use proper and relative safety measures when operating tools and equipment mentioned here. For example:
(a) NEVER let your fingers get anywhere near a moving saw blade. Instead, use push shoes, which are just “high end” push sticks that have been extended, so they are ten or so inches long, to hold more of the wood down, especially at the back of the blade, where it comes up out of the table and where kickbacks start.
(b) The long push shoe holds the material down several inches beyond what common push sticks do, and the heel allows you to push the material past the blade.
NOTE: The heel should come down just enough to allow you to push the material, but should not touch the table [or it cannot hold the material flat against the table].
© NEVER freehand cut on a table saw.
Of course, there are many other important safety tips and it’s good advice to look into them and to use them. [STEP ONE – Collect Project Materials]
To complete this project, you’ll need some or all of the following materials:
(1) WOOD
Obviously, you can use any wood you desire. You can even use 2 × 4′s and such. It, simply, boils down to your choice of wood.
I was fortunate and acquired a literal truck load of fine hardwood pieces for the price of my labor loading it. The pieces were too small for the door company that tossed them to use, but are perfect for small woodwork projects. So far, I have been able to use oak, walnut, koa, teak, maple, poplar, mahogany, hickory and other woods.
In short, you don’t need a lot of expensive, by the board foot wood to do this process. But the wood should be well dried and should have a low moisture content.
(2) PLASTIC (e.g. acrylic, Plexiglass (trade name), etc.).
As noted in the introduction, clear and colored transparent plastics produce the most desirable effects and the fluorescent colors seem to have light gathering characteristics and the most impact.
Too, using thicker pieces (e.g., 1/4" thick) also add greatly to the impact,
Though the fluorescent and thicker pieces have greater impact and produce very satisfying results, some of my favorite turnings were with the thinner green and blue pieces of plastic.
There are numerous sources for plastics on line. If you live in a large city, you may have suppliers from which you can purchase scraps and other pieces.
(3) COPPER PLATED TURNINGS
As noted, this is just an option and requires either making your own or finding a source from which you can buy them. To date, I’ve never found any on line, so learned how to do simple copper plating and made my own (again, another and complex instructible for another day).
(4) GLUE
As of this writing, I have only used two to one (2:1), two part epoxy glue and cyanoacrylate [CA] glue.
While Super Glue is CA, I’ve been told it’s a more tame version. For this and other wood working projects, I’d buy CA indicated to be used in woodwork, pen making or similar projects, rather than trying the stuff you’d find in the local grocery and drug store.
I should note, I did have a couple of the epoxied projects come apart. I was starting out and did not rough up the plastic. As well, the wood was had small pores and may have had natural oils. All those things could affect the bond.
To solve the random , 1000 RPM disassembly problem (yet another good reason for having a good face shield) I rough sanded (80 grit) the plastic and the wood and glued them together again for a second run. The glue up held.
Another automatic disassembling blank that blew apart held good when I used the CA.
It may be I should consider also wiping the wood down with lacquer thinner or acetone to remove any surface oils that might be present on woods that may be prone to it.
NOTES: For ease of use and to avoid slowing cure times, warm your epoxy to at least a comfortable room temperature before use. The ideal temperature of the glue is somewhere around You can do this by just letting it set in a warm pan of water, until you can see it flow well when you tip the bottle.
(5) SANDPAPER
Many sand down to 1,500 grit, which, though far from the finest, is pretty fine. I only go down to 320 grit, then finish up with buff compounds. The polish process goes very fast on the lathe or with a buffer.
(6) POLISH
I have been using swirl mark remover I purchased from an auto parts store to bring a great finish to the plastic. It does a wonderful job.
On a whim, I decided to make my own buff compounds. I used bees wax from toilet rings I bought at a hardware store, then mixed it with pumice, rotten stone and diatomaceous earth. A bit of turpentine worked to dissolve the bees wax to allow the buff powders to mix with it.
These home made buff compounds do a great job for a small price, but require slightly different handling for a final finish (yet another future instructible).
97) WAX PAPER, MIX CUPS AND STIR STICKS
These are the toss away items for mixing and applying the glue, and for protecting your work area.
You can use most any expendable container to mix the glue, but sizing the container to the task makes it easier to complete. Since these kinds of projects don’t require huge amounts of epoxy, I use the condiment cups sold at restaurant supply stores (e.g., Cash and Carry here in the Northwest). The wood coffee stir sticks they sell can be very handy for things like mixing anmd applying the glue too.
[STEP TWO – Project Tool List]
As with any project, you’ll need tools and /or equipment to complete it. This project can be completed using simple hand tools, power hand tools, stationary equipment or a combination of the foregoing.
Of course, hand tools will be more labor intensive, while power tools will make the job much easier. Especially if you want to make more than one item. Then there is the fact the tools listed and talked about here can be used on many future projects.
The following are tools and equipment that can be used to complete this project:
[PROJECT DIMENSIONING]
TABLESAW -
A tablesaw will handle cutting wood, plastic and even non-ferrous metals, like aluminum.
As noted in the safety section, above, do not cut material free hand on a table saw. Use a fence, a miter slot push tool or a sled to guide the wood and plastic through the blade.
When cutting thin plastics and wood, the material needs to be held tight against the table at the area of the blade to avoid vibration or chatter. Chatter can produce bad cuts (e.g., lots of chipping) AND can cause the plastic to shatter or kick back. As such, you should have some kind of feather board to hold the material down.
If you prefer, you could do as some do and use a sacrificial piece of wood over the laminate, to add thickness during cutting.
You can use a tablesaw sled, just as you would with wood, to size your pieces to the desired width and length.
MITER BOX -
As with a tablesaw, you can use a motorized miter box to shorten your pieces of wood and plastic to the lengths you choose for your project.
While you can use a manual miter to cut pieces, I suspect the plastics would play havoc on the blade sharpness in a short period of time.
BANDSAW -
A bandsaw can do most of what the table saw does and may even feel more comfortable in use.
HAND SCROLLSAW -
A scrollsaw will serve just fine for all your cuts for this project.
If yours is a variable speed scrollsaw, you may want to slow the blade to minimize melting the plastic.
BLADES [for table, miter, band and scroll saws]
You can buy specialty table and miter saw blades for cutting plastics. Generally, the more teeth, the smoother the end cut. HOWEVER, as you increase the thickness of the material, you want fewer teeth, to allow chips to clear and to avoid melting the plastic back together (e.g., welding).
Keep in mind, stacking plastic for cuts is the same thing as cutting a piece the same thickness of the stack.
Many hardware stores sell scrollsaw blades specifically designed for cutting plastics. Again, this may be a good investment, if you are going the scrollsaw route, but you can make do with a wood cutting blade.
I have used my fine tooth (60 and 80 tooth), ten inch blades for this with very good results. However, there are blades available just for cutting plastics and if you are going to cut much of it, I believe it worthwhile to invest in a good one.
NOTE: For this project, the rough edges left by saw cuts will be sanded away or removed in the process of turning or otherwise shaping the ornament, so getting a perfect cut is not critical. Of course, the less chipping, the less material you will have to remove to get a finished surface on the end product.
SCRIBE – You can buy inexpensive non-powered tools to cut plastic in a fashion similar to how you cut glass using a glass cutter. These are carbide tipped tools that scribe a line into the plastic, where you want it broken.
After several passes (unlike with a glass cutter, which should only make one pass), you set the plastic on a table edge or something similar to support it, with the piece to be broken off unsupported, then you snap the unsupported piece off.
[PROJECT SHAPING]
As with dimensioning the materials, there are various ways of shaping the wood and plastic lamination. For example:
(1) WOOD LATHE – In my opinion and regarding shaping, sanding and polishing the ornament, the lathe is king.
Though this was my go to tool for shaping and finishing the laminated wood-plastic blanks, this could be said to be an optional tool, since you could still make decorative wood-plastic items by cutting, sanding and polishing them using the other hand and power tools mentioned here.
(2) ROUTER – Absent jigs and such, a router is limited in the shapes it will produce, but it can give nice results with minimal effort. For example, you can use the router to make slight round-overs on the edges of square or rectangular pieces.
Key to using a router is, make small cuts and use a good, sharp, carbide bit.
(3) DRILLS (Drill press and powered hand drill) – A means of drilling is necessary for establishing centers for mounting on the lathe and drilling eye hook mounting holes.
The drill press can be used as a shaping device, but does require some ingenuity. For example, you require a live center that can be mounted to the drill press table and a drive center for the chuck.
The bearing of the live center allows the piece to turn without creating heat, which would melt the plastic and create undesirable results. You need one which would take a bolt and allow you to bolt it to the table, or you could drill a hole in a block of wood and into which the center would mount. The block would need to be clamped to the drill press table.
The drive center would be anything that would fit in the chuck and lock there to force the piece to spin on the live center, when the drill was running.
(3) RASPS, FILES AND SANDPAPER – You can use rasps, files and sandpaper to shape your laminated piece before moving on to the final finish and polish.
Rasps and files can be either handheld or motor driven, such as those used in a hand drill or drill press. Regardless which version you use, they are good for removing stock fast, to rough a shape in.
A hand held rasp, file or even a dowel with sandpaper mounted to it can be used with the drill press to shape and smooth.
For those who do not own handheld or stationary sanders, just a piece of sandpaper wrapped about a block of wood or a dowel will work reasonably fast for shaping and sanding work.
NOTE: You can cut a slot in the end of the dowel as deep as the sandpaper you will be wrapping around it is wide to hold the paper, as you wrap it around the dowel.
(4) SANDING EQUIPMENT -
This covers a wide array of hand and power equipment. For example:
- A drum-disk sander can be used to bring all the sides of a piece flush with each other prior to final sanding. It may even be flat enough to prep short pieces for gluing.
- A belt sander clamped to a bench and on end or upside down can be used like a drum-disc sander, sans the disk, of course.
- A spindle sander can be used in the shaping process and even for nearing the project to final sanding.
- A thickness sander or something like the FlatMaster sander can be used to create the flat edges for joining and, again, for bringing all the surfaces flush to each other.
- Quarter sheet and detail pad sanders can be used in all stages of shaping and sanding a piece.
- Even a lathe can be considered a type of sander, since it makes the shortest work of sanding a turned piece.
- A drill press, mentioned below, can be used for sanding and shaping. However, it should be remembered the bearings were designed for downward, rather than side pressure.
(5) BUFFING EQUIPMENT – Again, the lathe can handle this operation. If you don’t have one, a buffer dedicated to that task would be ideal. If you don’t have that, you can buy hook-and-loop pads that will mount in a drill or VARIABLE SPEED grinder (you’d need to slow an angle grinder down to, safely, use it for buffing, and to avoid melting the plastic).
You can also use some sanders as polishers. Again, the hook and loop is a must.
In a pinch, microfiber cloths think they are hook-and-loop pads, if pressed against the pad. The polish compounds mentioned in the material section will work fine on this and other mentioned buffers.
(6) CLAMPS – Clamps may be helpful for some operations. For example, I use clamps I made from plywood ( https://www.instructables.com/id/SMALL-PARTS-HOLDING-CLAMP/ ) to hold small parts when cutting them on the bandsaw, for sanding some items and even for certain shaping operations.
I, certainly, would use a clamp to hold pieces I was routering, to keep them from being flung across the room AND to keep my fingers far from the bit.
[STEP THREE – WORKING THE PROJECT]
1.1 To get started, you need to make a blank to shape, sand and polish. This is done by cutting pieces of wood and plastic, then gluing them together.
NOTE: This instructable focuses on a simple blank made up of two pieces of wood and one piece of plastic, but the final step includes notes about other design ideas.
1.2 Regarding cutting the plastic and wood to length, for safety purposes and if using a tablesaw, it’s safer to run longer pieces through a table saw. Shorter ones (e.g., 5") are more likely to catch and result in dangerous kickbacks.
1.2.1 If you do find it necessary to cut shorter pieces on a tablesaw, remember to stand to the side of and not behind the blade, AND use a push shoe, rather than a common push stick, to hold the entire piece down.
1.3.1 Cut a piece of plastic to the width you need to make your ornament. For example, if you intend it to be 3/4" in diameter, cut the plastic to 3/4" wide.
1.3.2 When sizing pieces, over sizing them will not, generally, cause problems. Of course, it will result in more waste, and could require more care and effort during shaping, depending on the equipment used.
NOTE: If using a fine tooth wood cutting blade (e.g., a sixty to eighty tooth ten inch blade), you can use the same blade to cut both the plastic and the wood in the next steps. If you do, you can, also, use the same set up for cutting the plastic to make the first cuts in the wood.
1.4.1 Cut the two pieces of wood that will sandwich the plastic to the same width you cut the plastic. For the example mentioned in “1.3.1,” above, that would be 3/4" wide.
1.5.2 Cut the wood for the two sides to thickness. The two pieces of wood and the plastic should all have equal thicknesses. Their thicknesses added up should equal the width of the plastic and the wood. Again, for the example in “1.3.1,” above, that would be 3/4", or 1/4" each.
NOTE: If you will have to dress the wood to get rid of saw marks, for a flat surface, allow just a little more thickness to account for stock removal in that process.
1.5.3 If it helps, the thickness is half of the 3/4" (6/8") width of the plastic, which is 3/8", minus half the thickness of the 1/4" (2/8") plastic, which is 1/8", or 1/2".
NOTE: Again, cutting oversized would not pose a significant problem. As such and to simplify things and if stock removal will not be a problem (e.g., you will be using a wood lathe to shape the blank), you can just cut the wood to a thickness that is half the width of the plastic and expect to remove a bit more wood.
1.6.1 When done cutting the wood, the sides you will glue to the plastic must be flat, to insure a good glue joint. Of course, pieces this size SHOULD NOT be ran on a jointer, so I resort to one of my sanders. I find my drum or belt sander do an adequate job.
1.6.2 To avoid having to hold, for example, a 1/4" thick piece of wood on drum sander, you can just finish the two outside faces of a piece of wood sized to the plastic, then cut it down the middle, leaving the two smooth outsides for a glue joint.
1.7 While you want flat surfaces for the glue joints, you do not want them too smooth, so sand both sides of the plastic and, if necessary, the glue joint sides of the wood using eighty or one hundred grit sandpaper.
1.8 Protect the work area. Remember than the glues you will be using WILL soak through paper. Use painters plastic, visquine, wax paper or other suitable material on your work surface.
1.9.1 You can use either a two part epoxy or cyanoacrylate glue, also known as CA glue. SuperGlue is an example of CA glue, but is not as strong as the commercial versions. When buying CA for this project, I recommend the medium thickness.
1.9.2 If using epoxy, mix enough to cover both sides of the plastic. Follow directions carefully for amounts and be sure to scrape the sides and bottom of the mix container well so you do not get any soft spots in the glued surfaces.
NOTE: You may want to warm your epoxy, if it’s been in a cold shop or garage. To do this, you can warm water on a stove, THEN remove the water from the stove and set the containers (don’t use a pan or pot you’ll use for cooking) in the heated water to warm. Alternately, keep it in a warm part of the house or shop until ready to use. Something in the area of seventy-five degrees will help it flow.
1.9.3 Spread the glue on one of the flattened sides of one piece of wood, then lay the plastic on that and press it down to remove air (you’ll be able to see it).
1.9.4 Add another layer of glue to the side of the plastic facing you, then press the flattened side of the second piece of wood on.
1.9.5 Set the three pieces on their sides and clamp using moderate pressure. For a five inch long piece, I use two clamps. Use your good judgement.
NOTE: If your wood pieces are thin, it might be a good idea to have a couple pieces of wood that will go between the two sides of the clamp and the project so pressure will be even across the piece.
NOTE: The epoxy acts as a slippery lube and your wood and plastic may shift, so adjust accordingly to keep everything in alignment, as you add pressure.
1.9.6 Whether using CA or epoxy, give the project twenty-four hours, for the glue to fully cure, before beginning the shaping process.
1.10.1 To make the blank easy to mount on a lath, or in a drill press, you need to find center on each end and drill shallow mounting holes.
1.10.2 If not already square, square the ends. This can be done with a miter saw, by pressing them against a sander, cutting them on a band saw using a miter gauge, using a sled and your table saw, or even using a hand saw and a fine tooth blade.
1.10.3 Measure half way across and as close to center as you can on the plastic and make a mark for center. I use a combo square or a marking gauge and check for center from both sides, then mark the center point, at the center of the plastic, using an awl.
NOTE: Normally, I find center by drawing an X by making lines from corner to corner, but this works only if the blank is square. Since seldom worry about subtracting half the thickness of the plastic from each wood side or even worry overly much about insuring both sides were of an equal thickness, this will give me a center that lands center of the plastic.
1.10.4 Once you’ve marked center, drill a small hole for the drive and live ends of the lathe or other item that will hold the piece for turning/shaping the blank. About a 1/16th inch (.0625") bit, give or take a little, should be sufficient, and you need only drill about 1/8" deep.
1.11.1 Mount your blank on your lathe, on your drill press, or clamp it in a soft jaw vice (e.g., wrap it in cloth or foam) and begin shaping it.
1.11.2 If using a lathe:
(a) Keep your knives sharp and take light cuts.
(b) Experiment with different knives to see which one(s) give you the smoothest cuts. For example, I find roughing gouges rough blanks to cylinders well, and detail gouges do great for intricate shaping. I limit my use of skews to detail lines, and scrapers seem to be better for rough shaping than finishing.
© When near the final shape, take light cuts and keep your knives sharp to avoid chipping the plastic.
1.11.3 If using a drill press:
(a) Mount a drive center. If your drill press accepts Morris tapers, use one sold for uses on a lathe. If your Drill press uses a screw mounted chuck, a spur or Forstner bit may do the job of acting as a drive center.
(b) For the table end, you need something that will allow the blank to turn, without generating heat. A common live center (the pointed head turns freely because it is mounted using a bearing), that will accept a bolt on the end would suffice, though you’d have to mount it through 2x scraps to support it, before bolted to the table.
© Since the drill press turns slow, compared to a lathe, you’ll have to use files and rasps to shape your blank. I have used a Rotozip or a router and a LIGHT touch, but those will only be good for roughing in the shape.
(d) Keep in mind, your drill press was engineered for downward and not side pressure, so, if using it for these processes, try to avoid putting anymore side pressure on the chuck/drive than required to get the job done. In other words, it’s the usual advice “let the tools (e.g., rasps, files, sandpaper) to the work and be patient.
1.12.1 To finish your shaped blank, you’ll have to sand and polish it. When you do:
(a) Use a light touch with sand paper, meshes and so forth.
(b) Keep moving around the piece AND around the sandpaper, to avoid building up heat either.
© If you have trouble getting rid of lines, consider slowing the lathe or drill press down.
(d) While the piece is mounted on a lathe or drill press, you can stop the machine and sand in the opposite direction (i.e., end to end). Often, this will remove even significant scratches quickly.
1.12.2 Usually, 150 grit sandpaper will get you very near where you need to end up. If it doesn’t and is taking too long, back up to 100 grit, then move to 150 grit again.
1.12.3 Though other turners I know work through sandpaper grits, to around 1,500, I never bother going over 320 grit. Even then, I don’t work my way to 320 by first using 180 and 220. I just go straight to it, then move to buffing. Of course, if you desire to work through the grits and up to the higher grits, nothing prohibits it, but I think you’ll be surprised and happy with the results you get from my approach.
1.13 Once sanding is complete, buff your piece using a buff compound of your choice on a soft, spiral sewn buff wheel to bring out the high optical impact of the plastic, and smooth up the wood:
(a) At about 1,500 RPM [and even slower], you MUST keep moving, or you will melt the plastic. If you melt the plastic, it will still shine, but the melted areas will be conspicuous and will detract from the end product.
(b) You can use swirl mark remover for automotive paint jobs, which is sold at auto parts stores, to bring the plastic [and resin] back to crystal clear from a 320 grit and better sanded surface.
© The ornaments in the photos were buffed, while still on my lathe, using buff compounds I made using wax from toilet rings sold in hardware stores mixed with diatomaceous earth (my favorite), pumice and rottenstone thinned with just enough turpentine (paint thinner might work too, I haven’t test driven it yet) to allow me to mix the ingredients.
NOTE: Home made buff compounds using beeswax and diatomaceous earth, pumice, cerium oxide, baking soda and so on are cheap, easy to make, and can speed your project to a final, high shine. However, be aware rotten stone makes the mix dark, so can pose a problem when buffing light, porous wood.
1.14 Apply the final finish of your choice:
(a) While the beeswax left by the buffing processes, initially, looks nice, it fades VERY QUICKLY and has no durability. The sheen from beeswax can fade in hours. As such, you need a more durable finish, like lacquer, shellac and so on.
(b) Since the beeswax based homemade buff compounds leave a film, and do not provide an ideal end finish, clean the turning with a rag dampened with turpentine or paint thinner, then applying a final finish. However, merely buffing the finished piece with a clean rag seems sufficient to achieve a good finish with spray or dipped lacquer. [STEP FOUR – ADDING COPPER PLATED TURNINGS]
1.0 As can be seen in the photos, adding copper plated turnings greatly adds to the ornaments.
These are merely turnings I have sealed with lacquer, coated with a conductive paint, then electroplated in a copper sulfate and sulfuric acid bath using about one half volt and under a half amp of direct current.
2.0 Mounting the plated turnings to the wood-plastic turning.
2.1 Most items I turn have centers already found on the ends, because they were used to mount the item on my lathe. Usually, this applies to the plated turnings too, but it frequently happens that I remove the portion that had the mounting hole for aesthetic reasons. As such I have to mark center again.
2.2 To find center, I use a center finding gauge like those found in Try-square kits, or I use one of the marking gauges I made. Regardless which one I use, I make several FINE pencil marks to get as close to dead center as I can. If I have to, I erase lines and start over using the last setting I had on the marking gauge.
2.3 Once I’ve found center and marked it, I use an awl to mark center. This insures my drill bit will not wander when I drill the end.
2.4 Among the various roles of solid wire I keep around for projects is a role of baling wire. I’ve found pieces of the wire makes great dowels for mounting the copper plated turnings to the ornament.
2.5 I use a bit that gives a snug fit between the wire and wood and drill the end of the ornament and the plated turning, where both will mount together. I allow about 1/4" in the wood and about 1/8" in the plastic of the ornament (the deeper the hole, the more it can be seen when the wire dowel is inserted).
2.6 Once the holes are drilled, I press the wire into either the ornament or the copper plated turning.
2.7 I dry fit the two pieces by pressing the other piece onto the wire dowel. Often I find I am just a smidgen off, but by turning either the ornament or the plated turning, the two will line up. If the two were too far off of center, I would fill the hole on the plated turning with epoxy and try a better aligned hole.
2.8 When I am happy with the fit, I add a dab of glue to hold the two together and in the position that best aligns the two pieces, then let it set overnight. I had been using epoxy, but find the E6000 glue sold in hobby stores and on line more convenient. [STEP FIVE – TIPS, TRICKS and IDEAS]
(1) Keep in mind:
(a) You are limited only by your materials, equipment, imagination and the energy you put into the project.
(b) You can make your ornaments any shape or size you desire.
© You can use different colors of plastic and plastics that have different levels of transparency.
(d) You can use different woods for different grains and colors.
(e) You can use stains, dyes, thinned or straight paint and inks to lightly or greatly color the wood.
(f) Depending on how many pieces you choose to use and how you arrange and glue or weld them, your ornaments can be simple or complex.
(g) You can stack plastic and weld it together using solvents or glue. I recommend the former, since, properly done, it will not leave a glue line.
(h) When welding pieces of plastic together, you can stack different colors of plastics.
(i) When shaping the blanks, you can simply sand and polish the laminated piece to produce squares and rectangles and use them as is, or for other projects. If using a wood lathe or other means of creating what is called a spindle turning (e.g., a drill or drill press and lathe), you can turn only parts of the blank, then sand and polish the result.
(j) You can position the finished ornament in front of LED lights and play with fiber-optic like effects.
ON A LIGHTER NOTE:
Correctly displayed, these can be presented throughout the year:
- Made large enough and displayed during Halloween, these can be passed as reusable zombie killers, or one shot vampire killers (the wood portion MUST be imbeded and the “stake” must be left in place.
- Displayed throughout the home or business, these can be “in plain sight” self defense weapons passing as mere decorations.
- During the Christmas season, these can be tree or other ornaments
- During Thanksgiving, these ornaments can be incorporated into fall leave displays
3 Comments

Kelly,
Thanks for all the detailed information. You included a great deal of good general information to use on many plastic and woodworking projects even if we never turn a Christmas ornament.
We appreciate all the time you put into making the information available and understandable.
L/W
“Those who would give up essential Liberty, to purchase a little temporary Safety, deserve neither Liberty nor Safety.” Benjamin Franklin
Welcome

Very nice. I’m going to give it a try. I have plenty of clear acrylic and epoxy.
By the way, I often use epoxy as a finish (on my fishing lures because it also seals them). I built a spinner to keep the epoxy from sagging and dripping. It spins at 1 RPM with a small electric motor and a couple of incandescent lights to keep the temperature up in my cold garage. This gives a very nice clear glossy finish that’s thick and hides dings and dents well. Not that I’m expecting dents on hardwood, but I am expecting small chipping on the acrylic edges.
Anyway, great idea! Time is running out and I needed a gift idea.
Losing fingers since 1969