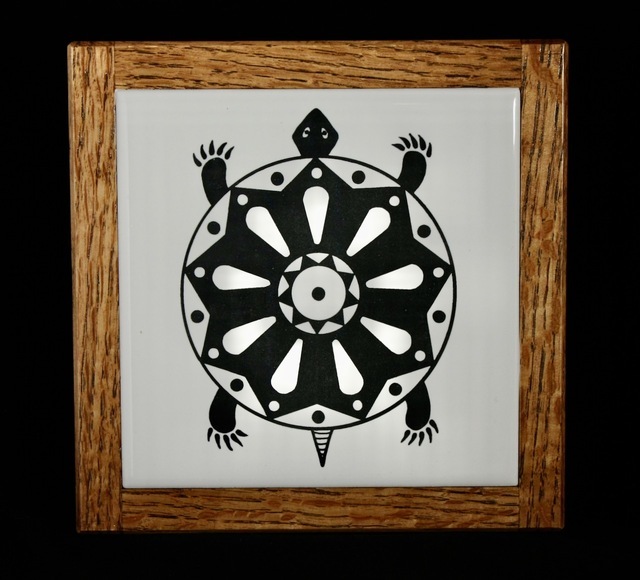
I made some trivets with simple images on the cheap home center plain white tiles in another project.
Simply put, this black on the tile is as good as a glaze, it is actually part of the glaze and will not scratch or chip.
Some more info on how I got there.
My equipment is an "Ortur Laser Master 3", a 10W optical power diode laser. The power levels used were <50% so even a 5W laser can do this. I use Lightburn and I am fascinated by the capabilities of everything this software can do. This type of lasing is one of the simplest things that can be done.
There is a 30 day full-feature trial available to road test. $60 for a year of updates, then you are frozen at the latest version (and all earlier versions) but still can use it at that version (and lower) forever without further charges.
On to the test!
Titanium Dioxide (TiO2) is the colorant in lots of stuff, primarily white paint. From what I've gathered, TiO2 is actually a jet black mineral but when turned to powder it reflects/refracts light to appear Snow White. The laser melts the powder back into black (queue AC/DC).
The challenge is to somehow apply this black to a glazed tile.
The laser will fuse (melt) the TiO2 with the tile glaze. Too little power (heat) and the TiO2 will turn black, but not adhere to the glaze. Too much heat and you'll start burning a pit into the tile and evaporate the TiO2.
The first goal is to coat the tile with the TiO2.
Two approaches, Make your own method to apply TiO2 powder (available on Amazon and everywhere else), or use some paint with enough TiO2 already Included.
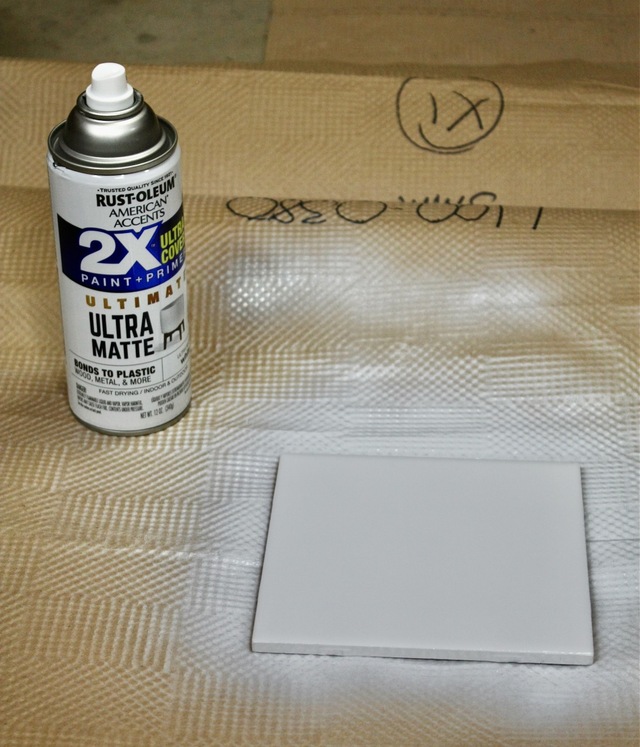
Kilz primer is a good source and for this test I'm trying out Rustolium "2X" white primer.
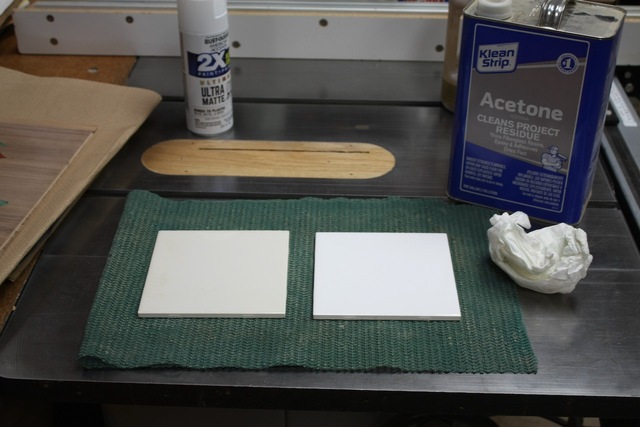
Some 6"x6" white tiles for the test, about $0.30 each.
Step 1: Good cleaning of all the fingerprints, snot, and everything else found on items bought from a public store. Acetone works! For the Rustolium test, I applied 3 good coats with about an hour of drying between and overnight after all coats applied I noticed that this primer flakes easily off the slick glaze so handle with care.
The mix-your-own TiO2 powder method
The powder doesn't like to stay suspended in most solvents, so a carrier is needed. There is a method developed (or at least championed) called the "Norton White Tile Method".
He used ordinary PVA glue to help keep the powder in suspension and as a bonus, the excess "paint" after the lasering can be removed with just water. The Rustolium needs solvent to remove.
Another fellow (Ron Clarke) has further developed a recipe:
The soap releases any surface tension and lets tiny bubbles pop.
What I found out is it needs more TiO2 powder. Use TB I or some non "waterproof" glue or you'll defeat the ability to rinse off with plain water
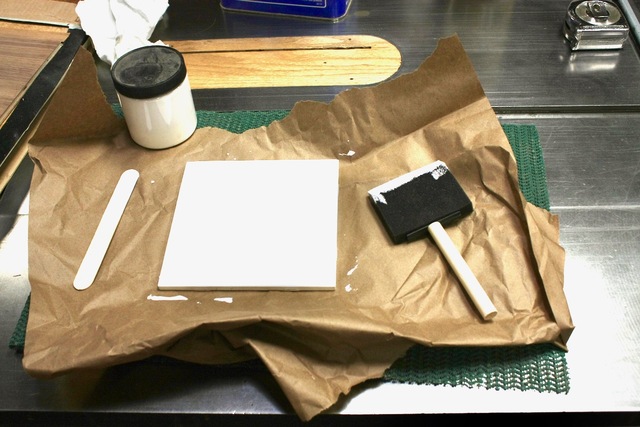
I mixed up the above, but then added about another 50% more TiO2. I then thinned it out with more water until it was slightly thinner than latex paint. Stir the crap out of it for several minutes to get all the powder in suspension and all clumps broken up.
I use the tip of a foam brush to apply (light touch).
Four coats, hour dry in between with alternating up/down and right/left brush strokes. Some people add a touch of food coloring that contrasts with the tile so they can see any missed or thin areas. Personally If I was preparing a bunch of tiles I'd explore spraying it on for ease and consistency.
So now we have two test tiles, Rustolium and home-brew mix. In the long run the home brew its a lot cheaper than the paint and washes off with water.
On to finding the correct laser power and speed.
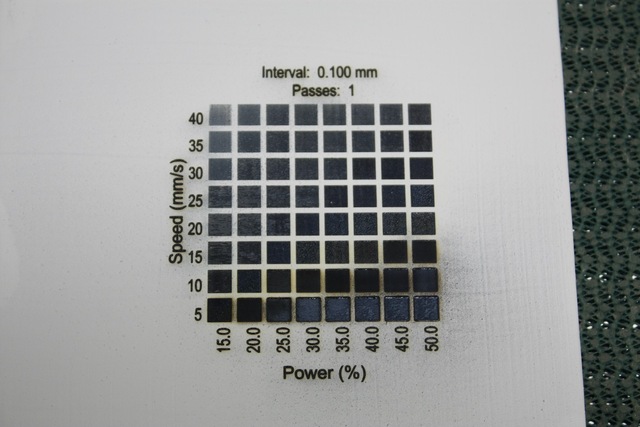
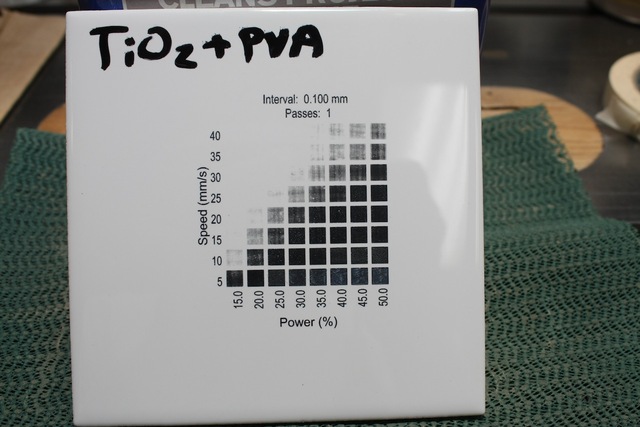
Lightburn has a built in grid test that lets you create test squares at a range of power and speed.
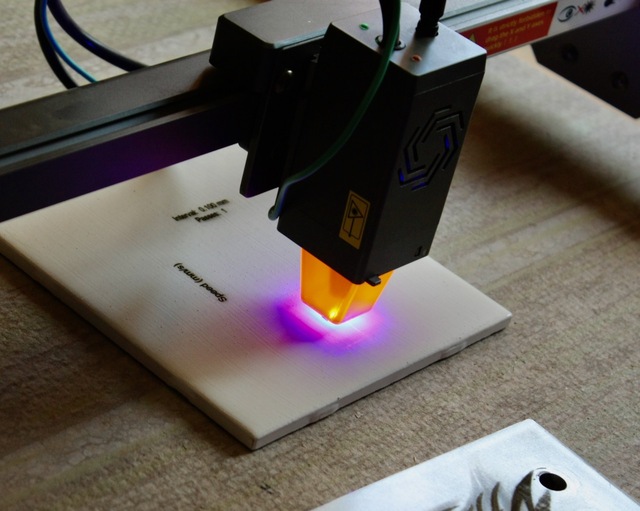
Into the laser! You will want a small amount of "air assist" which is some airflow down the barrel of the laser to keep backsplash from getting on the lens and keep the smoke out of the beam.
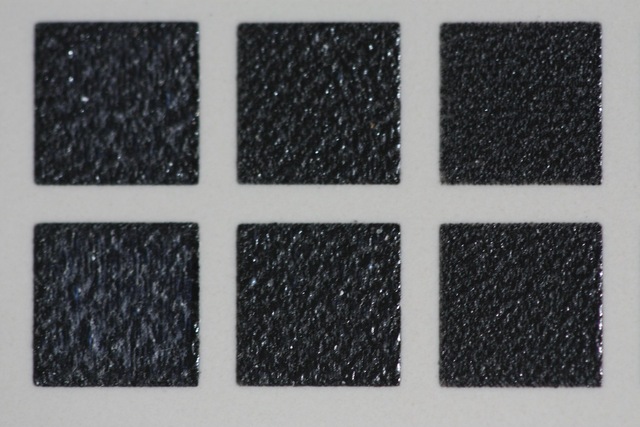
The result straight out of the laser:
The lower row at 5mm/second speed actually burned a pit into the tile after about 25% power (1.5 Watts - 5 Watts tested).
A quick compressed air cleaning and a brush off removes the dust for a better view In the diagonal between the upper left light area and lower right dark area, you can see some vertical "streaking". This is where the powder mix thickness was uneven due to brush strokes (no worries!)
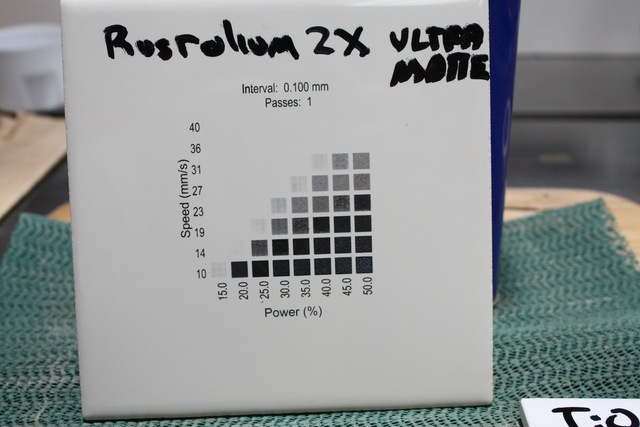
Same process with the Rustolium except I eliminated the 5mm/second row since that was overkill. I also stopped midway through the top row since it was already too weak.
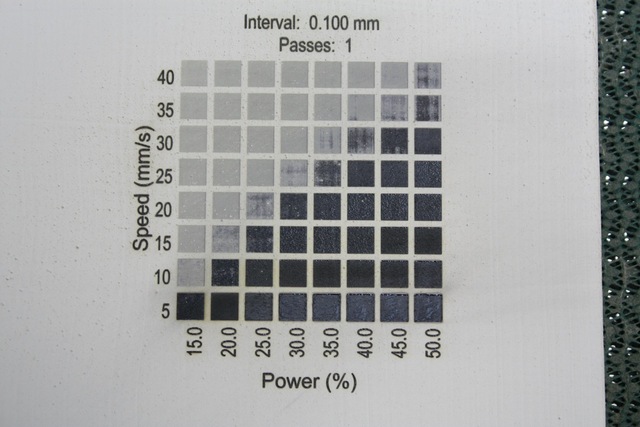
Now I removed the paint on both tiles. Acetone for the Rustolium and a soak in a tub of water and a scrubber sponge for the home-brew. The powder near the edges of the squares gets heated and can get stubborn, don't be afraid to scrape it with a razor blade or use more aggressive scrubbing.
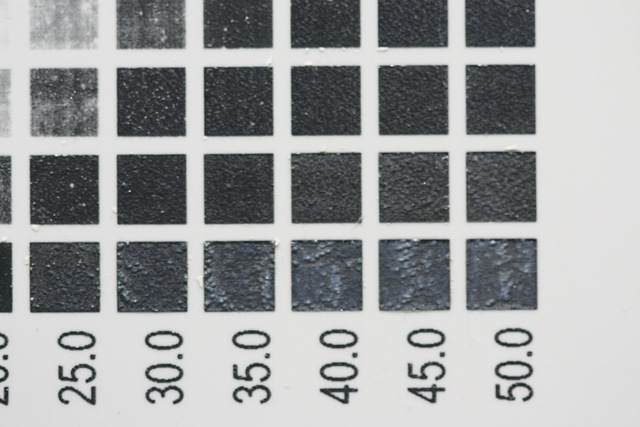
One thing to notice after the cleaning is some former dark squares are completely gone. This is due to the TiO2 turning black, but not fusion with the glaze. They literally flaked off. Now for a closer look at the test squares This is the home-brew mix. The overcooked area (lower row, right side) can be seen. The area directly above looks good and the black is flush with the tile surface The Rustolium has similar quality in the same power/speed area which means either method can probably use the same laser settings You can see the black gets "grainer" with the greater power or speed.
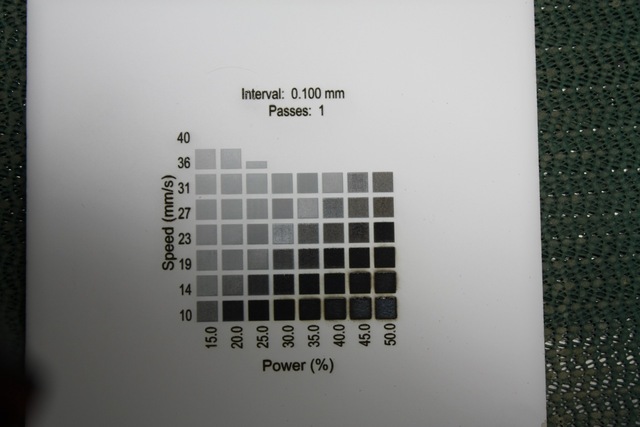
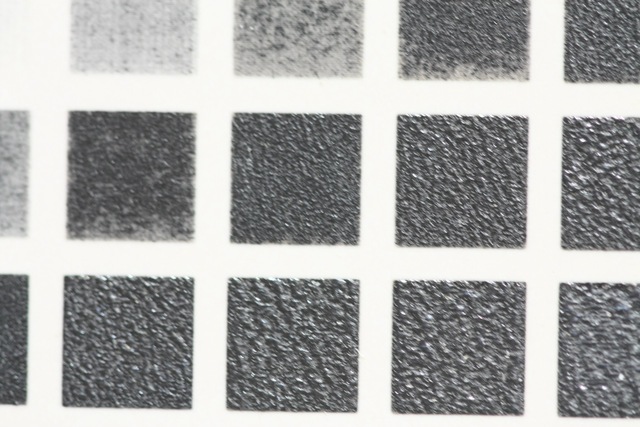
A close up of the sweet spots:
Pretty much the 15mm/sec row and anywhere from 35% - 50% power. Not quite linear, but higher power at a higher speed or lower power at a slower speed relate. This is important since faster speeds (at higher powers) will get a project done quicker, but using lower power (slower speeds) will let your laser diode last longer.
This process can do more than just black/white, you can also do grayscale photos. The thing to keep in mind is that the TiO2 only reacts with the glaze at a relatively narrow power/speed range. Best results are using some form of dithering that tricks the eye into seeing various shades of gray (like a newspaper).
What's up next?
No Idea! I'll think on it or entertain any ideas you followers have in mind
Interesting! Far too close to some of the laser printing patents I learned about early in my career for me to want to play with it, but if you’re interested in doin grayscale stuff, I can probably point you to some references.
LightBurn has 10 built in dithering/toning algorithms which are quite good. If I need something fancier that allows for black dots to turn into a grayscale I'll typically go to a Photoshop library or even those in GIMP. Back in the 80's I worked with some of the people now at HP who worked on that stuff. Fascinating!
You are right in that it works just like a laser printer, though I'm limited to about 300 dpi.
Interesting and thanks for all the info. I have the Ortur Lasere Master 2 and use Lightburn also. Have not done what you have shown above. Thanks for the post.
I've been on a veneer cutting trip as of late and really digging the ability to pimp up my projects. Cutting out router templates is another thing that has made life easier in the shop.
Thanks for the information. Some day I may buy one for someone to teach me how to run it. I'm not a digital person. Will this model at 10W cut very deep into wood for engraving?
Cheers, Jim ........................ Variety is the spice of life...............Learn something new every day
I haven't really tried engraving wood but I'd guess it would burn easily but it would be difficult to control the depth since the wood grain all reacts differently to the beam. Certainly doing a logo or some 2D type insignia would be a piece of cake since the black/burnt pit wouldn't really need to be a constant depth, just a form of etching with a blackish area.
LBD has done etching to depth with a CO2 laser (more $$) in MDF. The consistent material makes it easy compared to wood with grain. He then will fill it flush with colored filler to get a great "solid" color that is beyond just a painted monochrome pattern. A diode laser can do that, just needs more time to blast a pit deal enough.
Great info! Thanks for posting it. My little laser engraver probably won’t have the power to get it done, but it’s an awesome tool you’ve got available to you! Well done.
Ryan/// ~sigh~ I blew up another bowl. Moke told me "I made the inside bigger than the outside".
Yeah, the patent I referenced basically turned a 400 dpi laser printer into a 1000dpi horizontal printer by controlling the placement of the dots more accurately. I worked at LaserMaster back before they changed names a bunch of times and got bought by HP. But I also worked with a bunch of people at HP in Idaho and San Diego.
Nowadays I still play with printers, but haven’t written any software in almost four years.
It has it's own unique software... Q&As advise that LB doesn't work...
I basically use CorelDraw (or any graphics package) that will print vectors. In Corel I just print to Jobcontrol (which is Trotec's software) much like any printer.
Apparently I could use Ruby, however, time is too short to start learning new languages/software.
SplinterGroup ..... James, I really want to stick my finger in the beam (the kid still in me!) or mount it on a pan/tilt head and zap flies.
What about a tattoo on your inner arm?
If your first cut is too short... Take the second cut from the longer end... LBD
Yeah, my little engraver won’t cut it. I think it’s 1.6W.
For anyone who’s interested, Ortur is having a flash sale on their lasers for another day or two on their website. Really good savings if you’re in the market.
Ryan/// ~sigh~ I blew up another bowl. Moke told me "I made the inside bigger than the outside".
Seems there are quite a few manufacturers selling these machines nowadays. Best bet is to avoid the fly-by-nights so you'll have a machine that can be supported for a long time.
Splint, have you had that LM3 for a while? What are your thoughts on it? It’s got amazing pricing right now and it’s putting me on the edge…I’ve got no place to put it, but still.
Pros? Cons? Waddya think?
Ryan/// ~sigh~ I blew up another bowl. Moke told me "I made the inside bigger than the outside".
Hi Ryan, I've had it for almost a year. I like the 10 Watts optical power, this is a spec that is difficult to filter out since many/most vendors only list the power used by the laser module and not the actual light output.
Overall the unit I have (Ortur Laser Master 3) is well built but there have been a few issues. Originally I had difficulty getting it to work over WiFi and had to rely on a direct USB cable connection, but this has been resolved with a firmware upgrade.
There were problems with the laser stopping mid job which seemed to be related to static build up based on lots of other various laser users experiencing the same issue. I installed an earth grounding wire from the laser module, to the frame, then to a power cord that only has the ground prong connected which I plug into the grounded outlet.
Most serious problem was the laser powering off, just like disconnecting the power plug. The Ortur tech guy was very good about getting me service and sent out a new set of cables, power brick, and updated CPU board. Initially this seemed to work, but then the problem came back.
Those small power bricks are always suspicious to me since most of them are really just old laptop chargers that the Chinese repackage into new cases. I haven't opened up mine to check, but I just went ahead and bought a good industrial type supply and things have been fine since (fingers crossed).
Other "missing" features are outputs to turn on an external air solenoid and ventilation fan. The connector is there, but the firmware does not yet allow those to be machine controlled. Convenience item.
If I was to buy again I'd consider going to a CO2 laser since they can cut more materials with their much higher power and different wavelength, but that is a whole other minefield of vendor issues to navigate along with the big jump in price.
I'm still a happy camper and for a first laser I feel this one has fulfilled my expectations.
I think Splinter has said it much better than I possibly could, however, as he mentioned at the end, if you can squeeze a few extra shekels from the wallet, cutting ability is an over the top bonus. No idea what is out there in the market, however, if you can squeeze in something with enough grunt to cut 3mm MDF/ply (even settle for that imperial 1/8")... Ideal for routing templates, marquetry and you can always laminate 3mm sheet goods to build up thickness.
If your first cut is too short... Take the second cut from the longer end... LBD
This is a good point LBD, I can cut 1/8" masonite (the darker the better). The laser I have states it can cut 7/16" pine, which it can but only with a lot of passes.
Diodes are great for etching, CO2 is a master of cutting.