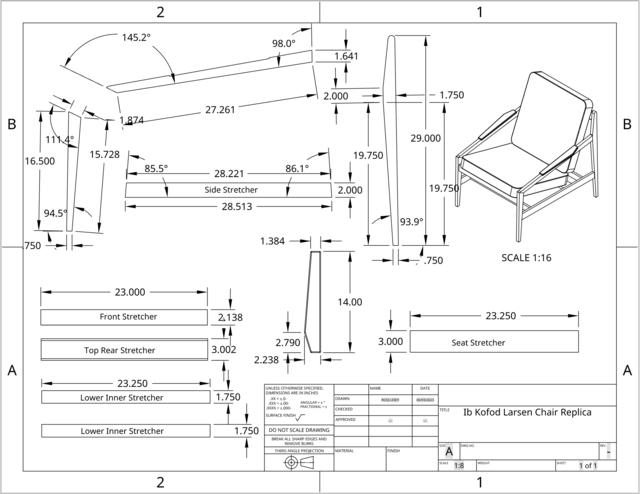
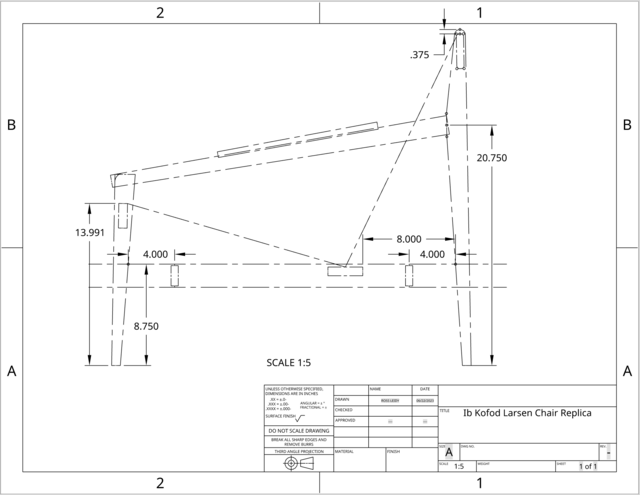
As with the other replica chairs I've made, it requires spending quite a bit of time looking at example photos from different angles in order to make guesstimates for its angles and dimensions. Here are drawings that show where I landed.
There are a lot of angles and odd lengths on the parts that make up the side assemblies, and none of their ends have a 90° angle. Cutting the parts with perfectly accurate lengths and miter angles is probably not going to happen. The plan is to make custom sleds to cut the miters and tapers as close to spec as possible, using an interior jointed edge on each as a reference when possible. I'll leave the lower side stretchers long initially so that when fitting the side assembly together, if I'm off anywhere, I can fiddle with the side stretcher to compensate.
For the armrests, since they were fairly thin, I decided to notch out the arms by 1/8" in order to add that thickness back to the armrests. They'll have a gradual thickness taper, from 1/2" at the rear to 3/8" at the front.
I'll not be making this a break-down chair like the original. I'm keeping this simple.
Joinery will all be floating tenons.
Conveniently, the same 22"x22" cushions used on the GE-375 chairs will also fit this chair.
While I won't be cutting part templates on the CNC, I will be using it for the following:
A small cross-cut sled with custom angle templates for cutting the miters
A router template for cutting the mortises on the side stretchers.
To cut the paracord lacing channels in the front, rear, and seat stretchers. This will allow me to lace the paracord by anchoring one end and pulling directly off the spool as I lace a serpentine pattern back and forth from one side of the chair to the other. (It works in my head.)
Lots of angles there. I’m sure you know exactly how you’re going to build your taper jigs and crosscut sleds, but I thought I’d mention two things.
Awhile back, I made a MatchFit 3-in-1 jig (https://www.microjig.com/post/3-in-1-tall-fence-jointing-sled-tapering-jig). I put a runner on mine, so it’s a 2-in-1 jig (no tall-fence capability). I’ve found it useful for making angled cuts. It’s easy to position the two L-shaped stops to enable repeatable cuts. It might work for your tapers.
I also just finished building a crosscut sled with removable bottom/fence inserts (tool-free) for different angles. I’m a few days away from posting it, but I can PM you a mostly-complete SU model if you’re interested.
Nice drawings Ross. As for a sled, make your sled for the TS and have a single fence that pivots to set the angle, locking it in with a screw to the sled bed. A bit like for a wedgie sled for cutting segments, and something simple.
Ron Stewart commented about 3 hours ago new Lots of angles there. I’m sure you know exactly how you’re going to build your taper jigs and crosscut sleds, but I thought I’d mention two things.
Awhile back, I made a MatchFit 3-in-1 jig (https://www.microjig.com/post/3-in-1-tall-fence-jointing-sled-tapering-jig). I put a runner on mine, so it’s a 2-in-1 jig (no tall-fence capability). I’ve found it useful for making angled cuts. It’s easy to position the two L-shaped stops to enable repeatable cuts. It might work for your tapers.
I also just finished building a crosscut sled with removable bottom/fence inserts (tool-free) for different angles. I’m a few days away from posting it, but I can PM you a mostly-complete SU model if you’re interested.
Hi Ron. I will take a look a the MatchFit jig as a general-purpose tapering jig. For this project, I went with dedicated tapering jigs just because it was simpler to throw them together than pausing the project to build a more general purpose tapering jig. I think I'll get better repeatability this way if I end up making multiples.
I'm interested to see your take on the crosscut sled. I'm sure it's going to be more refined than what I did. Since I've already built and used mine, I'm not in need of the SU model now, but thanks for the offer. I'll look forward to seeing your post.
Eric - the "Loft" commented about 1 hour ago new Nice drawings Ross. As for a sled, make your sled for the TS and have a single fence that pivots to set the angle, locking it in with a screw to the sled bed. A bit like for a wedgie sled for cutting segments, and something simple.
Hi Eric. I did consider making a sled with a pivoting fence, but I knew that I'd struggle with repeatability with setting very precise angles for this project. But it would be nice to have something like that in my arsenal.