Share your craft projects
Make new craft buddies
Ask craft questions
Blog your craft journey

Steve Rasmussen
5494 posts
and
58 followers
in over 3 years
in over 3 years
More from Steve Rasmussen
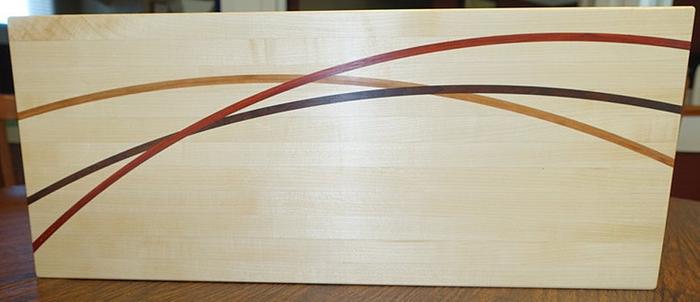
Inlaid cutting board sized for a rack of ribs
I built this board for my son's birthday. He loves to barbeque ribs (over coals). I finally occurred to me that we were always dealing with ribs that were way bigger than his boards. I asked permission to give him another one as he already has 4 cutting boards. He agreed that another board was the best solution.
I used a process outlined in an issue of Fine Woodworking. I haven’t been able to find it so far. (Update: SplinterGroup found the link. Here it is.)
Here are the steps (sorry – no pictures on this part):
Here are the steps (sorry – no pictures on this part):
1. Create a groove with a ¼” router bit mounted on a trammel to swing an arc. The groove only needs to be between ¼ and ½ inch deep.
2. Then cut through the rest of the board with a bandsaw.
3. Use a pattern bit to clean up the bandsaw cut.
4. Glue in an accent strip that is ¼” thick.
5. Repeat steps 1-4 for each accent strip.
This board is maple 1.25"x9"x21.75" with 1/4" inlays of cherry, walnut, and padauk. Each inlay is two layers 1/8" thick. The finish is a couple coats of Clarks Cutting Board Finish.
Some lessons learned:
1. After cutting the channel with the router make 2 bandsaw cuts close to each side of the channel. The maple was somewhat brittle and tore out a bit cleaning up after a single bandsaw cut down the channel. Setting the bandsaw cut to leave less than a 1/16" on each side seemed to take care of that.
2. The padauk was a bit oily. When I glued up the padauk inlay the glued gripped well between the padauk and the maple but was a complete failure between the two layers of padauk. I cleaned off the glue including a wet rag wipe down. I then dried the padauk and gave a good rub down with denatured alcohol. I clamped the glue up (with TiteBond III) over night. That left a solid result.
3. The one thing that caught me by surprise was that the Cutting Board Finish did not protect from staining. It has worked well on other boards but this is the first one that is maple. The light colored wood shows stains more easily. If I had to do it over, I would probably give it a base coat of a more durable finish.
I built this in about 11 hours over 4 days.
19 Comments
Nice clean lines Steve
I like that style 👍
Made a few that way and even still have templates for getting the router grooves smooth before band sawing.
Made a few that way and even still have templates for getting the router grooves smooth before band sawing.
Looks great!
So, did you make the other 4 cutting boards he has as well?
So, did you make the other 4 cutting boards he has as well?
Curved inlays reminiscent of ribs? 😀 nice looking cutting board, Steve.
Nice!
Ryan/// ~sigh~ I blew up another bowl. Moke told me "I made the inside bigger than the outside".
very beautiful
a very nice gift Steve GR8 JOB 😍😎👍
*TONY ** Denver * ALWAYS REMEMBER TO HAVE FUN
Nice Job Steve! Appreciate the knowledge you shared.
Petey
Very nice work, all the glue joints are nice & tight, that must have been difficult to achieve. 👍👍
Very nice, with a graceful look, Steve!
Gorgeous Steve!
Ribworthy for sure Steve, I don't see the staining you mentioned.
Albert
Thank you all for the comments.
BB1 - I made one of their other boards. I helped my son make one.
Ross - I hadn't thought about the connection between the curves on the board and the curve of the ribs!
Albert - These photos were taken before any use. The board now has a clean side and a stained side.
BB1 - I made one of their other boards. I helped my son make one.
Ross - I hadn't thought about the connection between the curves on the board and the curve of the ribs!
Albert - These photos were taken before any use. The board now has a clean side and a stained side.
Nice and clean finish! Thank you for sharing the experiences/lessons, too.
No name noobie here
Beautiful. Quite a few glue ups. I imagine using the router bit keeps the cuts smoother to aid in the glue ups matching much better. The video I saw to make one years ago just used the bandsaw to cut the arcs, that ended in a lot of cleaning up to get a good fit.
I think it was more from how he wove the scenes together, rather then any tilt angle it was shot from. Kept feeling like I was stepping off the flat Earth....
Oh wait, they disproved that. :-)
Oh wait, they disproved that. :-)
It's been proven that the Earth is not flat. if it was, cats would have swatted everything of by now.
That's the article I was thinking of. Thanks for finding it Splint!
I'll add the link it the description.
I'll add the link it the description.


