Kinda getting into a rut with making boxes, but I do like doing it!
This box is empty, no trays or other stuffings, just an empty vessel to fill with junk.
Woods are Russian Olive and Walnut. Outer dimensions are 8"x8", about 4" tall
I had made the "box" of the box years ago and never finished it, probably wasn't sure where it was going design-wise.
Didn't take long to piece it together and it's nice to clear out some old ideas gathering dust (to make room for new ones!).
Corners are lock miters with an oak plywood bottom.
The Russian olive is from a stash I chain-sawed from a batch of dead trees. Planked on the bandsaw, sealed, then left to dry. Probably almost 10 years ago. The worst smelling wood I've ever cut, but fortunately it doesn't smell anymore once the torturing with the shop tools has stopped
Corner legs are just "V" notched sticks that have been tapered top to bottom and a facet added to the outer edge.
Bottom edge rimmed with some thin walnut.
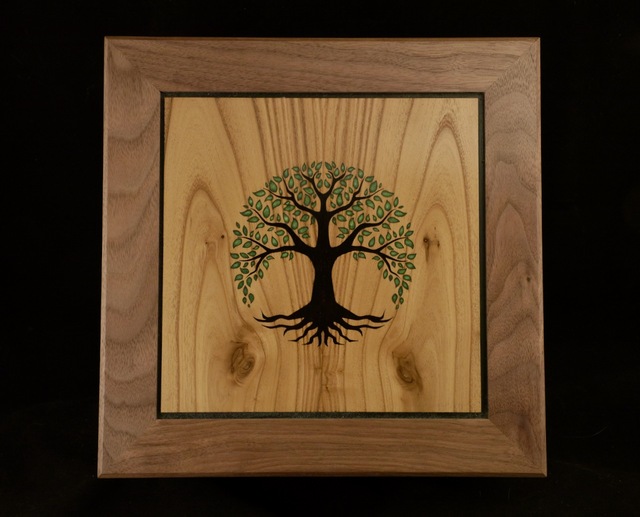
The lid is new, using some themes from previous projects. Bookmatched Olive with a laser etching and colored resin fill (the black is really just uncolored and shows the burned etch)
Framed with cove profiled walnut and floated into a groove. I leave the gap for movement but color it so it doesn't look too weird.
Interior is walnut lined and the lid just slips over the upper lip.
Finished with some trusty Homer's mystery varnish.
Also am ditching the old brass branding tool and trying to create a laser version.
I love your box with the tree of life. was that tree done with a lazer printer? I just bought one and almost have it ready to start printing. You are Irish maybe? I am 80% Irish. great work!
Thanks Robin! I've posted a few blogs and other projects with more detail on the laser work. It really doesn't take much power to etch the wood so even a really cheap laser could do it.
Irish? Don't really know 🤔 Family rumor is everyone ran off to Poland when the tater famine hit and the sausage was smelling good, but I do like green and of course yummy stouts!
Learning that with the mica mixed into the resin, the cool swirling color can get muted if the top layer of the resin is sanded away. This time I just filled the leaves part way (below the wood surface), then "capped" them with clear when filling the trunk.
Lovely! Your designs always include "little" details that flow together to create amazing final projects. Your posts teach me to slow down and see what features can be added to improve my projects; I appreciate all the background you provide.
I learn new stuff every time. I always had issues with doing the cove undercuts on mitered frames. I use a 3/4" box core bit in the router table but the exit cuts will expose end grain across the bit and tear/splinter. I'd use a backer but once the cove is partially cut on all sides, the backer will no longer make full contact with the workpiece.
I set the bit height to my target and move the fence back to expose more of the bit, usually about 3-4 small cuts to get to the final profile.
In a "duh!" moment, I finally figured it out.
What I do now is I still use the backer as before (as thick or thicker than the workpiece). This is butted against the outfeed side of the mitered frame and used as a push block plus provides a surface to support the end grain as it gets cut. What is different is I do all the required passes on only two opposite sides. Push the part through and into the pusher block about 1", flip 180, then repeat. This means the backer is always supporting the wood fibers as it exits the cut. Fence is adjusted and I continue until the final pass is made. At this point I have two sides coved with zero chip out.
I will then clamp a stop block on the table up against the back side of the fence. I now reset the fence to start the first pass on the two remaining sides. For this, the bit will only encounter long grain as the corners have already been undercut. I make the multiple passes moving the fence back until it hits my stop block. After this pass (on both sides), the cove meets exactly on the miter joint line. Zero splintering.
Fun thing is as I get older I'll forget and then get to "discover" this method all over again! 🤠
Gonna send you a bunch of wood pieces for "box tops" and a check, so you can grow some of those really cool trees on them. That Shaker tree is da bomb.
I am smitten with what you described as " Framed with cove profiled walnut and floated into a groove. I leave the gap for movement but color it so it doesn't look too weird." I am referring to the dark line around the lid panel that is etched with the tree, and looks like a grown up shadow line around the panel. It just sucks my eyes right into the panel, and the tree. KILLER surround. Anyhow it speaks to me.
All of the features are just the ticket to make an empty box jump up and say HI whatchadoing.
Nice box Bruce.
Oh yeah.... Gonna split my box top order between Shaker trees, and Celtic crosses, both are bad azz.
The panel (about 1/4" thick) is flush with the top, the groove in the frame is 1/8" down so the edge of the panel was a saw cut rabbet around the edge. Almost a full depth fit into the groove top/bottom but a gap of about 1/8" on the sides (3/16" deep groove). Small tack of glue centered top/bottom to hold it centered but allow it to move sideways with humidity.
So, panel edge rabbeted, painted black and any paint on the top gets sanded away for that shadow line.
No Coiff LBD, it'd just scare any kids and catch the bottom on fire. Although, thinking about it, a large banner with my image mounted up high and glaring down at people might encourage customers to look, but not touch!
The entire bottom of the etch gets burned so I just blow away any loose ashes and leave the blackness to get entombed with the resin. I recently did a focus test on my laser and found it stays quite focused for +/- 3mm or so. Thinking about these large fields of "black" area and I think I could actually defocus and crank the power a bit so it'd take a lower LPI in the cuts for the same result. At least it'd go faster!


.jpeg)
.jpeg)
.jpeg)