RyanGi
in over 3 years
More from RyanGi
Shou Sugi Ban box experiment - softwood
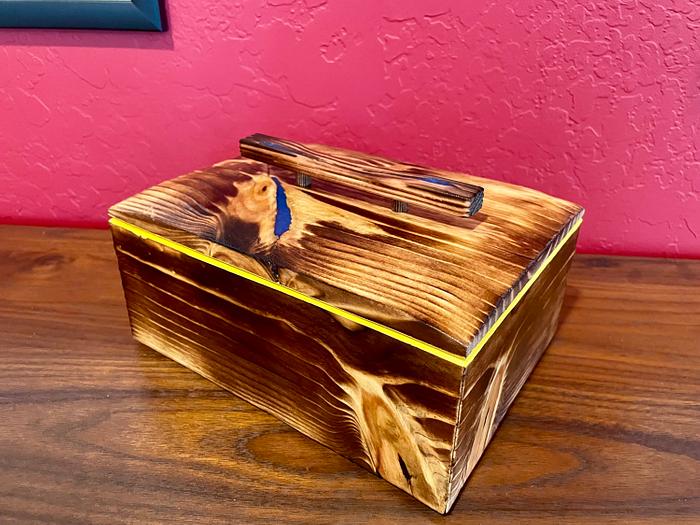
Well, the ‘project mode’ got the better of me and I started doing some detail work with it. Sloping the edges of the lid, creating a floating base, creating a slight floating lid design and scrapping together a Japanese inspired handle on top. As it was coming together, I was thinking about what the end product might look like, and it struck me that the dark burned exterior reminded me of looking at weathered wood before the sun comes up. Now I’m not an artsy kind of guy, but Japanese woodwork often has themes, or tendencies, towards mimicking nature. I thought I might take advantage of that and have the exterior of the box look something like pre-dawn, with small pools of water where I backfilled with epoxy, and the interior look like the bright sunlight first thing in the morning.
Since I did this as a two-piece box, not a one piece cut in half, when I put the torch to it it caused some really interesting changes that I wasn’t anticipating. The first was how much of the wood mass was lost. Especially in the softer annular ring sections. This created a scallop effect that I wasn’t expecting, but it is actually very pleasing when you put your hands on it. The other, less pleasing, was that I lost mass in the corners… made worse because this was thin resawn material. It caused quite a bit of wood movement and degradation. I didn’t go anywhere near full alligator with the torch, rather just a nice solid black burn across everything, but I still saw quite a bit of mass lost. I’m assuming this is due mostly to the soft nature of the wood.

In fact, it caused so much movement where the lid meets the body that I actually went back and recessed that line all the way around to try to give it a more uniform appearance, then, keeping with the sunrise aesthetic. I put some sunflower milk paint along the edge to brighten it up. Kind of like the break of dawn.

It’s by no means show-quality, but as a test piece I’m happy with what I learned!
Ryan/// ~sigh~ I blew up another bowl. Moke told me "I made the inside bigger than the outside".
21 Comments
working with my hands is a joy,it gives me a sense of fulfillment,somthing so many seek and so few find.-SAM MALOOF.
Will ya be doing more?
May you have the day you deserve!
Always great to have another option with woodwork!
Ryan/// ~sigh~ I blew up another bowl. Moke told me "I made the inside bigger than the outside".
I'm learning vicariously through all you guys about how this all can work. I really want to try for the gator skin but makes me think I need a hardwood and perhaps even do the burn, then cut the miters for best fit.
Well done! I like the touches you added.
Petey
Mike
*TONY ** Denver * ALWAYS REMEMBER TO HAVE FUN
Ryan/// ~sigh~ I blew up another bowl. Moke told me "I made the inside bigger than the outside".
BTW, this coat rack hung in the hall for years.
Charring all sides of the wood will help minimize the wood movement though it does not help with the mass loss problem.
I really like the color variations you ended up with, especially with the epoxy. Did you epoxy before or after the burn?
Ryan/// ~sigh~ I blew up another bowl. Moke told me "I made the inside bigger than the outside".
Give it to your wife and she will have to say she likes it, like Dutchy's mother did.
"Duck and Bob would be out doin some farming with funny hats on." chrisstef
Ryan/// ~sigh~ I blew up another bowl. Moke told me "I made the inside bigger than the outside".
-- There is nothing like the sound of a well tuned hand plane. - https://timetestedtools.net
I tried the same thing a few years back out of necessity (SWMBO wanted something to have liming wax on it, then changed her mind, easiest way to remove it was to melt it off and I kept going a bit)
Ryan/// ~sigh~ I blew up another bowl. Moke told me "I made the inside bigger than the outside".


