RyanGi
in about 3 years
More from RyanGi
Game Box - 2024 BeerBq Swap
I started with the double hinges, since this was going to be the major technical challenge to the whole build. Essentially, the wooden ‘hidden hinge’ design I like is a stop hinge, that only goes to about 100° or so…so I’d need two of them work together to give the box the ability to open and lay flat. I wanted a central ‘playing field’ with two side ‘fields’ (to hold drinks and the like), so that meant two sets of long, double hinges. I started by cutting dowels from my sapele blanks, then routed the hinge channels in the side wall sections. Since I was doing a double hinge, I had to size the recess and not let the whole thing get too wide, otherwise the sidewall would end up very tall. The recess are cut with a bullnose bit on the router table, but you’ve gotta sneak up on it, since too shallow means the axel rod would might be exposed after the dowels are shaved down in the finishing step, or there will be gaps on the sides since the dowel is round and if the recess is cut deeper than the radius depth it’s no longer ‘round’ but has flat sides (which is what creates the gap). Once the side pieces were properly cut and routed, I sized and cut the dowels into sections (after creating alignment marks so I could reassemble them to look as seem-less as possible), and drilled them out on the lathe to accept an axel. The trick with these is to keep all the parts in order and aligned all the way through assembly and glue up, which can be like herding cats if you’re not careful!
Next came glue up for the hinges, one hinge at a time so they don’t flex against each other. The trick here is to clamp the reassembled dowel back together so individual sections can’t twist and ruin the alignment. I also waxed anywhere I didn’t want glue to stick, since that obviously makes it hard for the hinge to move!! There’s a lot of checking and double checking, alignment marks, numbering, lettering, etc etc to keep everything lined up for glue up…and I had to do it four times on this project! Welding rod for the hinge pins.
After getting the first hinges done, I added the second hinge sections…doing all the steps over again. Once dry, I flattened off the excess dowel, leaving the flat hinges.
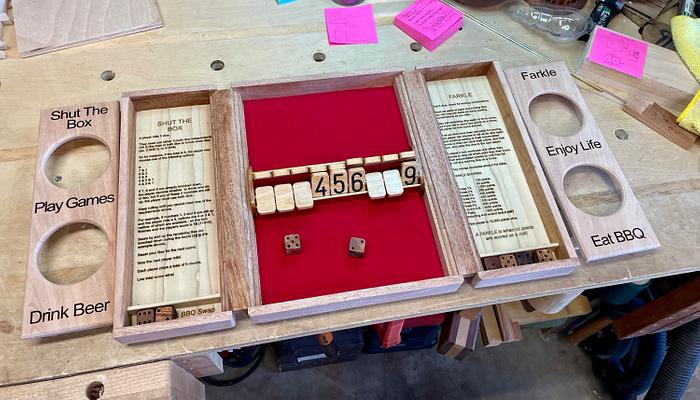
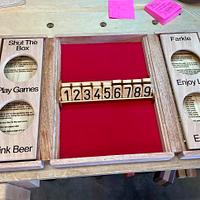
Since these hinge ‘walls’ run the long axis of the Game Box, I needed to figure out the width. I knew I wanted to make flipping tiles as a center piece of the game field, so it made sense to completely build the tile-flipping apparatus first and use that to size the overall width of the box. So I set about building tiles. The Shaper Origin made pretty quick work of this, cutting the tiles and engraving them. I back filled them with black Timber Mate and sanded it all down. Then I did some sizing work to figure out where the axels needed to be spaced to allow the tiles to stand upright during play, but flip down and lay flat for storage. I built the flip apparatus sidewalls, then finished the sizing by building a jig to drill out the tiles to accept the brass axel rods. This was harder than I thought it would be owing to grain direction and the propensity for a narrow bit to wander, but it worked out for the most part. I did split two tiles, but was able to glue them back together and hide it. All the tiles were hand finish sanded and then dressed with Odie’s Oil, as was the plan with the majority of the project, then assembled with brass mini washers between the tiles to allow smooth movement. The rest of the flip assembly was finished up and was now available to be used to size the width of the Game Box!
Now that I had a way to properly size the box’s width, I set about assembling the frame of the Game Box. I used double sided tape with braces to keep the hinge walls from flexing during glue up, sized the front and real walls, and simply butt jointed them together in a glue up (using the flip apparatus as a sizing device/brace). At that point, I pinned the coroners together using polished brass pins cut down from the same axel rods, and cleaned everything up a bit. As the box was still stable and not yet cut apart, I took this opportunity to cut the rabbets for the top and bottom panels, which were going to be made from an opposing color to lend some depth to the project. Then after cleaning up the corners, it was time to cut up the box!
As simple as this part was, it was nerve wracking as all hell. I had to cut through the top of the box’s walls, down to the joint between the two halves. But it had to be very straight, and not damage the wall section sitting below. I just took my time with a Japanese pull saw, using a folded post-it note as a guard for the bottom section. It all worked out and I had a box with two leaves forming the top! I glued in the long axis bracing for those sections and now had a fully functioning box ‘skeleton’.
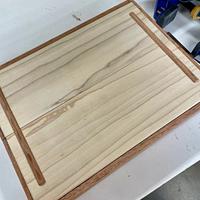
Next I resawed the top and bottom panels, beveled them, and fit them to each side. I ended up adding a veneer piece of mahogany to the bottom panel so that it mimicked the split in the top panel. Then moved on to lasering the game instructions onto the inside of the top panels. Since I wanted to finish the top panel’s interior with poly (since they’re designed to have beers sitting on them), I had to do things a little out of order and finish them almost completely before they were installed. This ended up being a major problem as the poly on the inside section of the panels dried overnight and warped the hell out of the panels. I had a similar problem with the bottom panel since I had installed the red game felt on it before installing it. Doh! I was able to get them all to bend back flat during glue up because they were so thin, but it freaked the hell out of me! I split another one of my dowels to act as ‘feet’ for the bottom and top panels when they’re open so the whole thing lays flat and the panels themselves are protected. I also had a full on flub on a couple letters during lasering, but we were way too deep to go back now, so it’s just a ‘character mark’ for the project I guess.
So, at this point, the box was pretty much together. I set about making the dice. Cut from sectioned sapele, then hand formed and rounded since there was no real good way to do it otherwise! Lastly, I lasered the pips into them. I tried backfilling them with white, but it just looked bad, so they stayed black. Lastly, I built up the removable drink trays using resawn sapele. I mounted magnets to they’ll stay in place, and double as a lid to hold the dice in the small recesses I formed for them when the box is closed and put away. I used my favorite magnet alignment trick of taping on small ball bearings and pressing them into place to create precise points to drill out on both faces. This took more fiddling than I thought and it wasn’t perfect, but it worked out. A little more laser work and those were done. I went full-on OCD and wiped the inner rims of the drink holders with Poly, since they’ll be in contact with beer cans and condensation, and it’s open end grain in some places. It actually blended away with the rest of the Odie’s finish later on, so that’s nice.
I did some pre-finishing prior to installing the flip apparatus, then finished the whole thing with Odie’s oil and buffed it up!

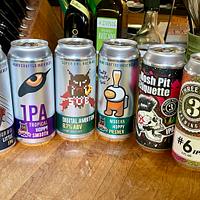
Lastly was choosing the beers. Since my recipient likes IPAs, I toured our local breweries and came up with a good assortment for him. At least I hope he enjoys them!

Another BeerBQ swap in the books!
Ryan/// ~sigh~ I blew up another bowl. Moke told me "I made the inside bigger than the outside".
24 Comments
Lincoln - "Give me six hours to chop down a tree and I will spend the first four sharpening the axe." Dave in AZ
working with my hands is a joy,it gives me a sense of fulfillment,somthing so many seek and so few find.-SAM MALOOF.
The entire setup is great, lots of moving parts but you crafted each one successfully!
Ryan/// ~sigh~ I blew up another bowl. Moke told me "I made the inside bigger than the outside".
No name noobie here
Ron
Ryan/// ~sigh~ I blew up another bowl. Moke told me "I made the inside bigger than the outside".
How you did some of the operations to make it work makes my head hurt.
You have too many cool tools.
Nice write-up. Well done sir!
"Duck and Bob would be out doin some farming with funny hats on." chrisstef

What can I say, I'll have to post a monster project if only to try to match the quantity, as I'm sure I'll miss the quality.
Great detail and I've just gotta mark it for the method of those "wow" hinges.
Were the douses' spots drilled or engraved? Cool touch... when I made my first douse, I didn't realise that opposite sides add up to 7... do yours?
If your first cut is too short... Take the second cut from the longer end... LBD
Ryan/// ~sigh~ I blew up another bowl. Moke told me "I made the inside bigger than the outside".
Cheers, Jim ........................ Variety is the spice of life...............Learn something new every day
Ryan/// ~sigh~ I blew up another bowl. Moke told me "I made the inside bigger than the outside".
The beers have been fabulous as well so far. I still have a couple to go!
Ryan/// ~sigh~ I blew up another bowl. Moke told me "I made the inside bigger than the outside".


