


Share your craft projects
Make new craft buddies
Ask craft questions
Blog your craft journey

kdc68
373 posts
and
22 followers
in over 12 years
in over 12 years
More from kdc68


Curved Lid Treasure Box


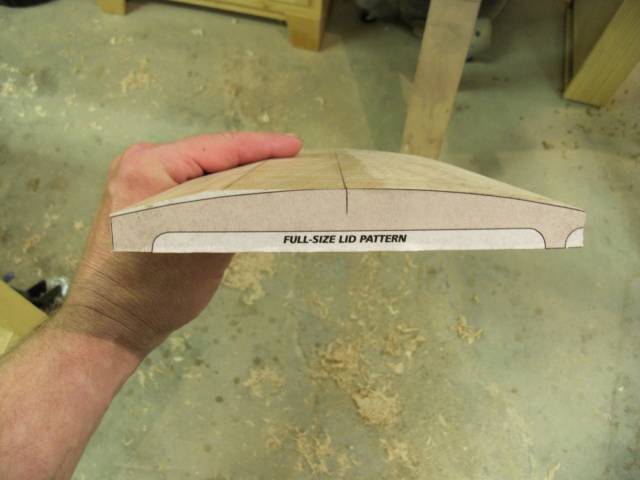
I made this project using the plans titled Curved Lid Treasure Box from Woodsmith Magazine (link below). Although I deviated some from the plans, I took advantage of their full size template for the lid as seen in the picture below. In the picture, the portion that I have in my hand was cut on the table saw removing most of the waste. The side opposite was shaped to match the curve of the template with a low angle block plane.
I deviated from their version when I made the ends. I chose to use walnut for the ends. In the plans maple was used. I chose to use a dark walnut lacquer toner, carefully applying light coats until I got a rich dark brown color. I managed to get it dark enough but not too dark obscuring the grain. In the plans, they ebonized the maple with India ink. I changed the shape of the ends by using a large ½” roundover and a ¾” cove to create the profile. In the plans, they chamfered the top edge at the table saw and used a 1” cove to create the profile.
I deviated from their version in the maple finish. I chose to use Transtint Vintage Maple Dye. In the plans they used Transtint Orange and Reddish Brown. My goal was a light golden brown to contrast the dark brown ends, so I needed a relatively weak dye concentration. Mine a much weaker concentration of dye and distilled water than the cherry dye that was used in the plans.
The last deviation was the hinges. I chose to use Brusso Stop Hinges. In the plans, they used Precision Box Hinges from Horton Brasses. This is my first time using these Brusso’s, only because they are pricey. My experience from using them for the first time is a good one and will use them again in the future.
I used similar or if the not the same self-adhesive felt for the bottom of the box. I adhered an oversized piece of felt to an oversized piece of poster board. I then cut a piece of ¼” hardboard to fit inside the box, and used it to trace around with a razor blade cutting the felt to size.
I applied several coats of gloss lacquer to the entire box. I rubbed it out starting with 600 grit wet/dry and working to 2000 grit wet/dry. I then used Maguire’s rubbing compound, followed by Maguire’s polishing compound to regain that high gloss.
This was a 2013 Christmas present for my mother to add to her collection of lacquered boxes.
Materials used
4/4 Walnut
4/4 Curly maple
Transtint Vintage Maple and distilled water
Behlens Dark Walnut Lacquer Toner
Behlens Gloss Lacquer
Brusso JB103 Stop Hinges
Self-adhesive black felt and poster board
http://www.woodsmithshop.com/download/502/curved-lid-box.pdf
Measure "at least" twice and cut once
22 Comments

That is one beautiful box.
I'm the one with the beard

Very nice!
-- Michal, http://WoodworkingWeb.com
Thanks for the compliments !
Measure "at least" twice and cut once

Nice polish. I really like the design. I checked out those hinges. Pricey but a great touch for a clean look.
Involve your kids and grandkids. They'll love you for it!
GaryL….Thanks for the compliment. I think the hinges cost more alone than everything else combined…
Measure "at least" twice and cut once

Very striking combo.
It’s a great box.
Abbas, Castro Valley, CA
Thank you lanwater for the compliment !
Measure "at least" twice and cut once
Older project but I entered this into Curves -aliciousness contest. I didn’t see in the rules where I couldn’t. Hope my entry is fine with everyone
Measure "at least" twice and cut once

Beautiful box! Love the contrasting colors and the shapes. Way to go.
Keith "Shin" Schindler
Thanks Shin for the compliment !
Measure "at least" twice and cut once

Beautiful box very nice work
woodworking classes, custom furniture maker
Thank you Jim !
Measure "at least" twice and cut once

I just found your projects and you've done some beautiful work. I really like this piece.
.................. John D....................
Thank you
Measure "at least" twice and cut once

One of the many things I like about this site is how old projects jump to the top of the project list if someone comments on them so everyone can appreciate them.
That is a beautiful box, kdc68. The wood combination is pleasing to the eye, and the finish is gorgeous.
That is a beautiful box, kdc68. The wood combination is pleasing to the eye, and the finish is gorgeous.
Thank you
Measure "at least" twice and cut once

i agree that box is gorgeous. old projects pop up all the time because there beautiful work. sadly most of the time the creator is long gone.
working with my hands is a joy,it gives me a sense of fulfillment,somthing so many seek and so few find.-SAM MALOOF.
Thank you and I’m still around! Hopefully for awhile longer!
Measure "at least" twice and cut once
hey if your still in contact with some of the old regulars invite em back ? there was some great woodworkers here in the beginning.
working with my hands is a joy,it gives me a sense of fulfillment,somthing so many seek and so few find.-SAM MALOOF.
I’m not in contact with anyone unfortunately.
Measure "at least" twice and cut once
More from kdc68