


Share your craft projects
Make new craft buddies
Ask craft questions
Blog your craft journey

MsDebbieP
1395 posts
and
54 followers
in over 12 years
in over 12 years
More from MsDebbieP


Bag #3 ... The Purse


A month ago, I made a shopping bag, which I absolutely love. It is so convenient and holds so much stuff, whether it is groceries or a sweater or jacket. My daughter loved it and so I made bag #2.
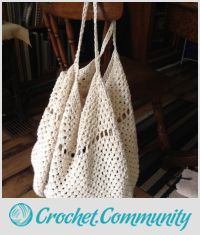
I love the bag so much, I have started using it as my purse as well as the shopping bag (which really doesn’t work well, as my purse stuff is then at the bottom of the bag, underneath the other items.)
I also wanted something that…
- I could put the strap not only over my shoulder but around my neck as well… this gives me “hands free” grand-kid walking without having the bag slip off my shoulder. …
- plus a pocket would be nice, to keep the keys and the phone at the top for easy access
- and … I wanted something big enough to hold my ipad, in its protective bag.
So back to the drawing board, for version #3.
Yarn: I used the same cotton as with the other two.
Hook: 5mm
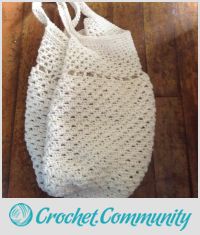
The Stitch: I used the tunisian stitch for the pocket and I’m not sure if there is a name for the pattern that I used for the main body. I like the end result — I love the look of the inside (picture 3) as well as the outside (picture 4). I think the pictures show the difference. It is quite noticeable in real life.
The Pattern
The Bottom
Chain 36. NOTE: I should have started with a longer row so I wouldn’t have needed to do as many rows for the bottom, to make it long enough to hold the ipad. My original plan was narrow and long. My end result is a large bag, as you can see…. but, I like the large bag as well, so maybe I would do this same pattern again.
Make 6 rows of increases, as follows:
Row 1. Sc along the chain and put 3 sc in the end stitch; continue to sc along the other side of the chain and again put 3sc in the end stitch.
Row 2: Sc around, with 3sc in the first and last stitches of both 3sc clusters in row 1. This creates the beginning of the four corners.
Row3: Sc around, with 3sc in the centre stitch of each of the 3sc clusters, at both ends
Row 3-6. repeat row 2 until you get the desired width of the purse
Row 7. sc around, no increases
The Body
Row 8. dc around.
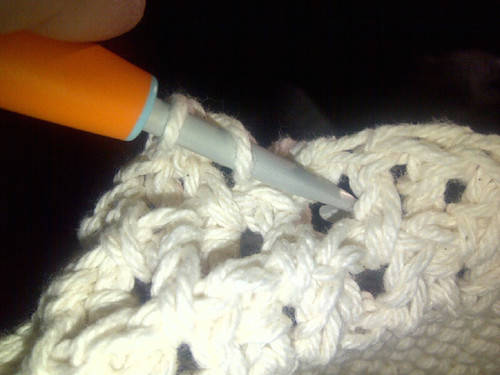
Row 9. Dc in space before first dc in row 8; Triple crochet around the post of the next dc, from behind, pulling that dc “behind” … repeat around, no increases (unless you have to add the final triple crochet before joining to the first double crochet, completing the pattern.) Then chain 3 and begin hop the next row.
The Double Stitch
The Triple Stitch
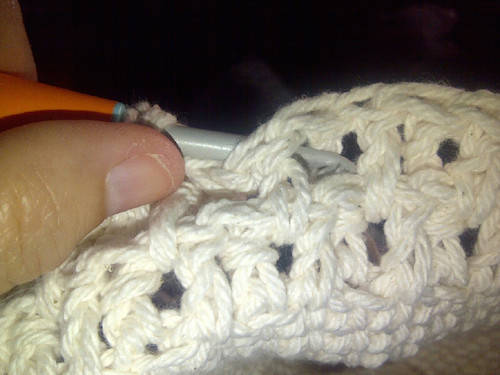
(NOTE: I tried just using a double stitch but the yarn was so bulky that it was too short and pulled the row down.. so the triple stitch allows it to stretch out. Also, you will notice in the photos originally posted that this pattern creates a different look inside and out. My goal for the posts was to create something on the inside that I could attach a pocket or two. I had planned on attaching the pocket to the bottom part of the bag but ended up putting it at the top and just attaching it across the top rather than down the sides) << this also gives some options for the bag.
Row 10. DC in space before “forward dc stitch” and Triple Crochet around post of “back” triple crochet stitch, again from behind. repeat around
Row 11 – (?). repeat pattern until desired height of purse
The Top
Sc around the top of the bag.
You can repeat this row if desired.
The Strap
For this bag, I experimented with two different patterns for the straps
1. I did a “chainless foundation stitch” (http://crochet.community/topics/87-foundation-row-single-crochet) and made it long enough to go over my shoulder/neck plus enough to go around the bag.
2. I did a tunisian stitch, 2 stitches wide ..
The tunisian stitch was a little quicker to do, I found, and created a little thicker strap, but not much.
The end result is about the same but I think I’d choose the tunisian for next time.
3. Starting at one end of the bag, I wove one strap between the double and triple crochet posts, all the way around and then joined the ends.
4. I wove the other strap in the same way but starting/ending at the opposite end of the bag.
I can now use the straps as drawstrings.
The Pocket
I created a patch double the size of my phone, big enough to create a pocket. I used the tunisian stitch for this as well. I can now toss small things into it, as needed, and the tight weave of the tunisian will hold it.
I kept the first half of the patch even and then increased at the ends, to widen the patch.
In the last 3 rows, I decreased, in the middle, several stitches (I kept 5 stitches on each end normal). This created a “pouch” that would help keep the contents from falling out. .. or that’s what I am thinking, anyway.
I then sewed up the sides, using single crochets and then crocheted it to the bag by single crocheting around the first/straight end of the pocket and around the posts of the last row — making sure to leave the drawstring straps free.
And… you may notice in the pictures that there is a couple rows of single crochets in the middle of the main body. I thought I was ending it there but when I used the drawstrings it was too small for my ipad folder so I had to add more rows of the double/triple crochets.
JAGO - just a grandma’s opinion
0 Comments
More from MsDebbieP