


Share your craft projects
Make new craft buddies
Ask craft questions
Blog your craft journey

Ron Stewart
953 posts
and
24 followers
in over 3 years
in over 3 years
Mini Tetrahedral Tensegrity Table Details #1: Introduction: Overall Design, and Fun with Geometry
This is
part 1
in a
10 part
series:
Mini Tetrahedral Tensegrity Table Details
-
Introduction: Overall Design, and Fun with Geometry
-
Preparing the Pyramid Stock
...
- Introduction: Overall Design, and Fun with Geometry
- Preparing the Pyramid Stock
...
This series of blog posts describes the design and construction of the Mini Tetrahedral Tensegrity Table I built recently. The SketchUp model is available on the 3D Warehouse.
When I started thinking about this project, all I knew was that I wanted to build a miniature tensegrity table. I had no real use for it, so I didn't want to build an actual, full-sized side/accent table; I was thinking more along the lines of a desktop conversation piece. In other words, I wanted to build something small and visually interesting.
I looked at a ton of tensegrity tables on the web, and the one that I liked the most was from the YouTube video How to make a regular tetrahedron pyramid Type Tensegrity Table. I've always liked geometry, and I liked how this table's internal components were three dimensional, not the flat pieces I saw in most tensegrity tables.
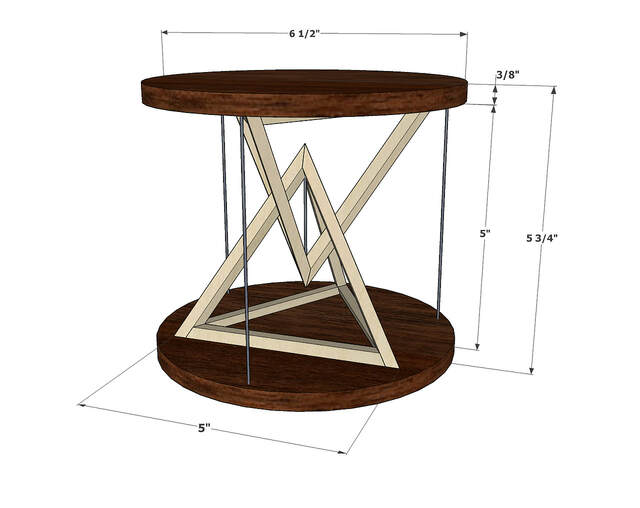
Once I saw that table, I knew I wanted to build something similar. I wanted top and bottom disks, with tetrahedrons in between. I realized that building the tetrahedrons would be the most challenging part of this project. (I also knew that attaching and tensioning the wires that hold everything together was another challenge. I wasn't sure how I was going to do that, but I decided to worry about that later.)
I didn't understand the derivation of all of the angles the video's creator used in the video, and I don't have any software to view the associated AutoCAD model he thoughtfully provided. I also wanted the pieces of the tetrahedrons in my table to look slightly different, so I decided to start from scratch and create my own model with SketchUp. (I actually had to start by revisiting some high school geometry.)
A regular tetrahedron is composed of four equilateral triangles, and the key measurement is the (dihedral) angle between any two adjacent sides: approximately 70.53 degrees. It took me an embarrassingly long time to figure out how to model a tetrahedron, but things eventually clicked and I was able to draw one.


When I started thinking about this project, all I knew was that I wanted to build a miniature tensegrity table. I had no real use for it, so I didn't want to build an actual, full-sized side/accent table; I was thinking more along the lines of a desktop conversation piece. In other words, I wanted to build something small and visually interesting.
I looked at a ton of tensegrity tables on the web, and the one that I liked the most was from the YouTube video How to make a regular tetrahedron pyramid Type Tensegrity Table. I've always liked geometry, and I liked how this table's internal components were three dimensional, not the flat pieces I saw in most tensegrity tables.
Once I saw that table, I knew I wanted to build something similar. I wanted top and bottom disks, with tetrahedrons in between. I realized that building the tetrahedrons would be the most challenging part of this project. (I also knew that attaching and tensioning the wires that hold everything together was another challenge. I wasn't sure how I was going to do that, but I decided to worry about that later.)
I didn't understand the derivation of all of the angles the video's creator used in the video, and I don't have any software to view the associated AutoCAD model he thoughtfully provided. I also wanted the pieces of the tetrahedrons in my table to look slightly different, so I decided to start from scratch and create my own model with SketchUp. (I actually had to start by revisiting some high school geometry.)
A regular tetrahedron is composed of four equilateral triangles, and the key measurement is the (dihedral) angle between any two adjacent sides: approximately 70.53 degrees. It took me an embarrassingly long time to figure out how to model a tetrahedron, but things eventually clicked and I was able to draw one.
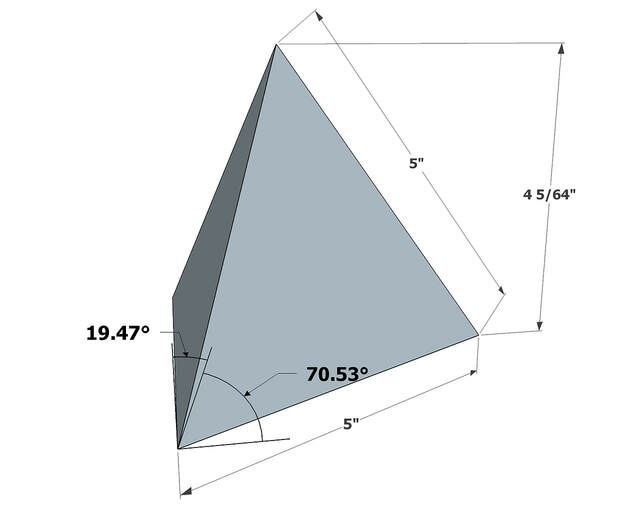
From there, I decided to base the edge segments of my pyramids on a parallelepiped whose cross section is a rhombus with angles matching the tetrahedron's. In other words, each edge part was like a deformed square bar.
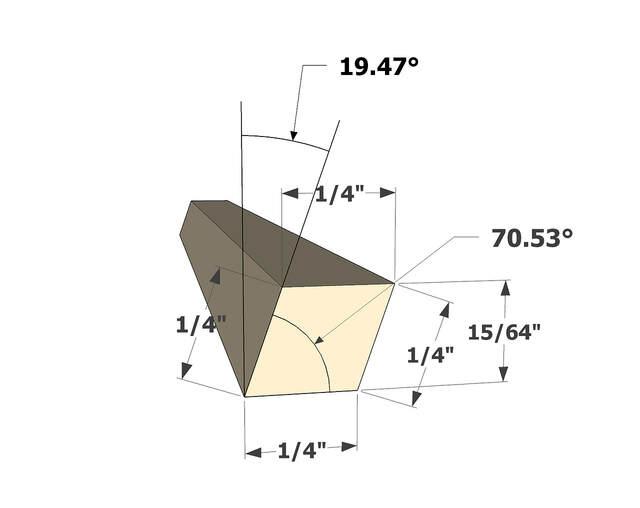
The next step was deciding how the ends of the pieces should look. In theory, both ends of each edge part of the tetrahedron could be identical. (They are in the video I mentioned.) After playing around a bit, I decided that it would be easier to cut and glue things together if the parts that formed the base differed from those that form the sides.
From now on, I'll ditch the geometric terms and refer to the tetrahedrons as pyramids, and I'll talk about pyramid base segments and side segments.
Now that I finally understood how to construct the pyramids, I played around for a few days with the overall sizes of the pyramids and disks, plus the thickness of the segments, until I was happy with the table's overall size and proportions. I wanted to keep the various parts thin to give the overall table a light, delicate look. I thought that was appropriate given that the top parts of tensegrity tables appear to float
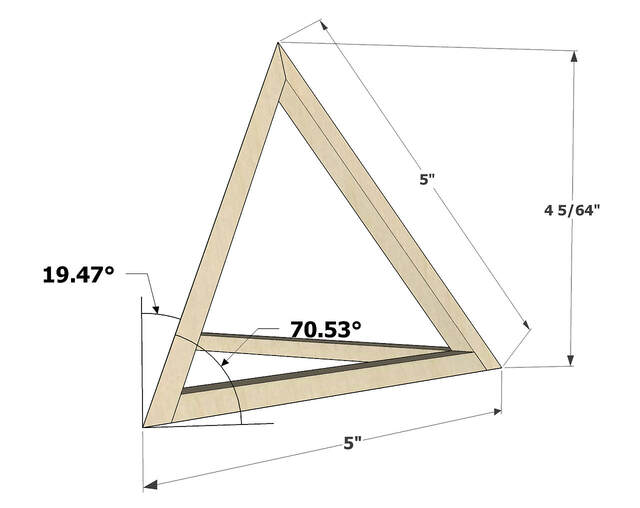
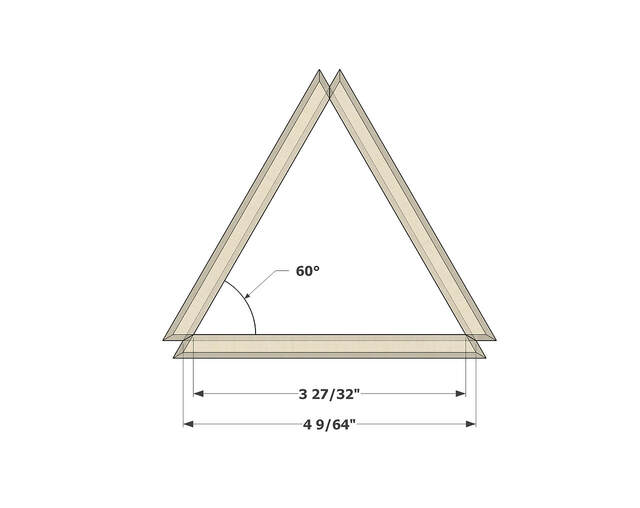
Before starting construction, I also modeled two templates that I thought would help double check the sizes and angles of the cut segments and support the parts during glue ups.
The first was a template for the base segments.
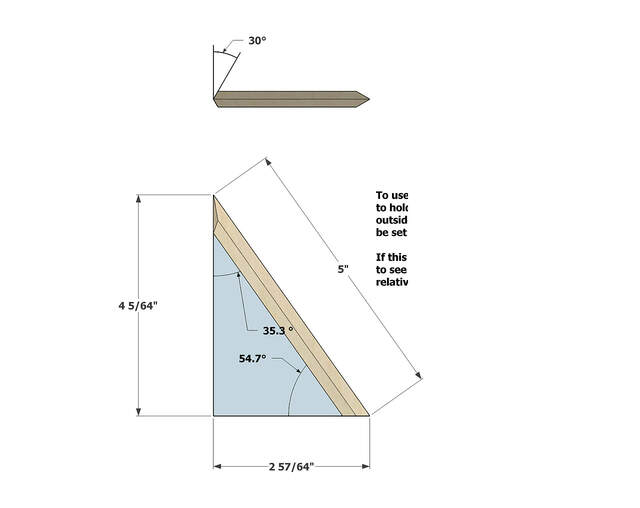
The second was a template for side segments.
At this point in the project, even though I didn't know how I was actually going to cut and glue the segments or wire everything together, I was finally ready to start the actual woodworking, starting with the pyramids.
As you will see if you continue reading, building this table was an iterative process. I'd figure out just enough to make some progress, pause and figure out how to proceed, and continue. Then I'd do it again.
1 Comment

.
working with my hands is a joy,it gives me a sense of fulfillment,somthing so many seek and so few find.-SAM MALOOF.