


Share your craft projects
Make new craft buddies
Ask craft questions
Blog your craft journey

Smitty
430 posts
and
26 followers
in over 12 years
in over 12 years
Nail (Screw) Cabinet #2: Forward Progress
This is
part 2
in a
6 part
series:
Nail (Screw) Cabinet
This cabinet is essentially a crate with wood-frame exoskeleton and hinged door. Dimensions were set because the crate is what it is… The depth of the cabinet was somewhat variable. My version sets the framing forward of the crate walls to define the opening depth for the door to be added, and also allows the cabinet to be mounted flush to the wall via 'hidden' French Cleat. A major component of the build was creating the wood frames for the top, bottom and sides. After ripping the 1x stock to suitable (and equal) width, it was planed a bit thinner for aesthetic reasons; 3/4" frames stood out too much from the crate, and looked out of proportion. That done, I decided on dowelled butt joints to hold the frames together at the corners, a first for me. Especially the way I chose to cut the dowel holes: via a Stanley #59 dowelling jig, brace, and bit.
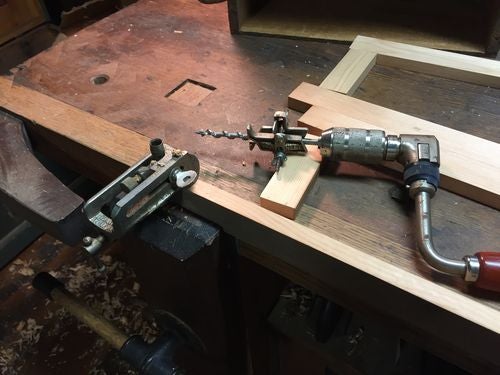
My Stanley #59 came in a box of 'what not' junk a long enough time ago that I don't remember getting it. The jig has only one of the seven (or so) tube sizes that shipped with it originally, so that's what I used (3/8") for the dowels. I drilled the holes via brace and No. 6 bit, and added a Stanley #49 depth stop gauge to the bit for consistency. Dowels were cut on the Stanley No. 150.


So, for those of you who are counters, to place pairs of dowels in the frames required a total of 32 holes. Needless to say I'm pretty comfortable using the #59 / 6 / #49 combo of tools at this stage.


Two pairs of frames completed, it was time to explore ways the dividers would be incorporated. I decided at that point better access to the crate's interior sides would come by removing the bottom of the crate. That was done with a 5-in-1 painter's took and the nails saved for later re-install.

Then, without too much difficulty, I stepped off equal interior height and width segments via dividers; this resulted in two columns of four drawers each. That'd be fine. Next, the partition material was located. This ended up being three pieces of poplar drawer side material from a busted up carcase of one kind or another that I keep on hand for situations just like this one. I didn't like the thickness of the stock, so the alien head planer was pulled into quick action. Some smoothing with the T13 #4 and everything was looking good. A few pencil marks approximately centered the three horizontal dividers to the marks made earlier, and from there I used several scores of the marking knife to create clean sides for the six dados to be completed. I finished them to depth via Stanley #271 router. Horizontal partitions were then cut the length. Here's an in-process picture.

It was time to order the bin pulls at this point, as having those in-hand allows me to establish the set-back required to completely close the cabinet door when all is said and done. I ordered them on a Monday afternoon and continued with the vertical partition. And here again there was a decision to be made: do I match the vertical and horizontal pieces via 'egg crate divider,' or half-lap joints, or cut the vertical into pieces that in turn ride in dados of their own? I made six dados in pine; this would be eight more in poplar. It's either that, or 12 perfect cuts with a handsaw. While we ponder this choice, how about a diversion to my shop's Inspiration Piece for so many things: the Vintage Wall Cabinet (http://lumberjocks.com/Smitty_Cabinetshop/blog/23904) that's been in my shop for five+ years now.
The cabinet is completely hand made, and one of the build details that catches my eye is the dado work of the cubbies. About a third of the interior space is divided into pigeon / cubby holes that I've since filled w/ various tools. Each dado has very crisp / clean side walls, and many times the amount of material remaining between opposing dado cuts is incredibly small.
So maybe the right choice for my tool cabinet is to replicate what the Inspiration Piece has, and that's a solid vertical and side dados. But then the article says to use the egg-crate divider method. Analysis paralysis set in, as the prevailing winds move to and fro between the alternatives. While I waited a week for the pulls and screws to arrive (I ain't paying for expedited shipping!), I even did a test cut of the egg-crate variety. Alrighty then, that's what I'll do! Top and bottom dados were cut using the same process as the sides were created.


And with those cuts made, a more complete preview of the finished cabinet comes together. Here's the horizontal partitions…

And the vertical. Note this one has 1/4"overhang of divider, past the stopped dado. That's a detail I really like from Roy's original.

Oh, and just for grins, the front edge of that vertical divider got a bit of roundover using the #45 and No. 12R.

I'll talk about setting that reference point for stopped dados in the next installment…
So a number of things move the forefront, re: build activities: Matching up the interior partitions for final placement, working the panel door; choosing stock for and building eight (8) drawers; and final carcase assembly. More to come, and thanks for looking!
Don't anthropomorphize your handplanes. They hate it when you do that. - OldTools Archive -
2 Comments

I am enjoying this Smitty.
"Duck and Bob would be out doin some farming with funny hats on." chrisstef
Thanks Duck!
Don't anthropomorphize your handplanes. They hate it when you do that. - OldTools Archive -