


Share your craft projects
Make new craft buddies
Ask craft questions
Blog your craft journey

Ron Stewart
953 posts
and
24 followers
in over 3 years
in over 3 years
Wenge and Zebrawood Speakers (Curt Campbell's Invictus) #1: Introduction: Design Concepts and Planning
This is
part 1
in a
6 part
series:
Wenge and Zebrawood Speakers (Curt Campbell's Invictus)
This blog series provides some details about the Wenge and Zebrawood speakers I built in 2013.
I didn't design these speakers; I built them from a kit. The kit includes cabinet plans, but I (with my wife, of course) worked out the overall look, and I designed and built the grills.
Long before I ordered the kit, I modeled the cabinet in MicroStation. My first model was pretty conservative and understated, with a full-length cloth grill. My wife's first comment was that she didn't want plain cabinets, and that she wanted something more interesting. Our room decor is contemporary, so I started playing around with architectural looking designs. At the time, I had no idea if I could actually execute these designs, but I didn't let that bother me. (It gave me a chance to improve my modeling and rendering skills.)
 - Project by Ron Stewart")
 - Project by Ron Stewart")
 - Project by Ron Stewart")
I didn't design these speakers; I built them from a kit. The kit includes cabinet plans, but I (with my wife, of course) worked out the overall look, and I designed and built the grills.
Long before I ordered the kit, I modeled the cabinet in MicroStation. My first model was pretty conservative and understated, with a full-length cloth grill. My wife's first comment was that she didn't want plain cabinets, and that she wanted something more interesting. Our room decor is contemporary, so I started playing around with architectural looking designs. At the time, I had no idea if I could actually execute these designs, but I didn't let that bother me. (It gave me a chance to improve my modeling and rendering skills.)
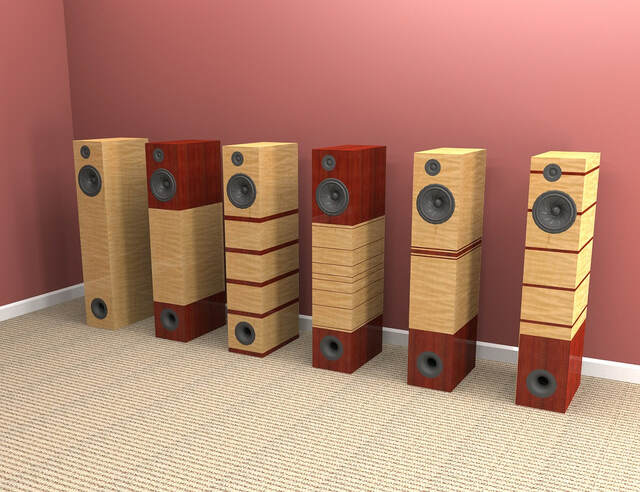

As you can see by the project thumbnail at the top of this page, the final design isn't anywhere near any of these concepts. The final design was much more influenced by Taylor Speakers. A lot of their cabinets have thick side panels with contrasting wood in the center. I simulated that design with veneer (more about that in a later post).
The other interesting thing about this particular design is that it can be built three ways: a large (43.5" tall, 8.5" wide, 15.5" deep) floor-standing "transmission line" design, a smaller (36" tall, 8.5" wide, 9" deep) floor-standing sealed design, or an even smaller stand-mounted design that I wasn't interested in. The bigger design offers deeper bass, while the sealed designs are easier to integrate with a subwoofer (and some people prefer the tauter sound of sealed designs).
In my case, I was most interested in the large transmission line design. I had read about them but had never actually listened to one. But I wanted to make provisions for going with the sealed design (without sawing off the back third of the cabinet). I also knew of other ported designs using the same woofer that use an in-between sized cabinet.
To create a cabinet that would allow me to experiment with three different designs, I made on minor change to the cabinet's internal bracing. The original design specified a vertical "ladder" brace in the middle of the cabinet. I shifted the brace backward slightly so I could create two different cabinets-within-the cabinet.
Here's a cutaway view of the largest cabinet. It has an internal volume of 67 liters.
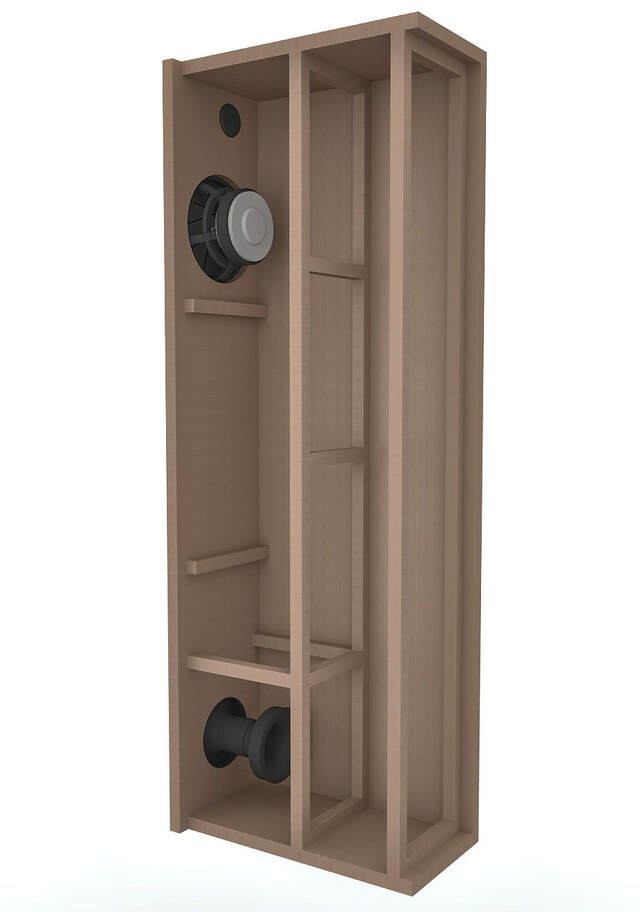
If I wanted to try the sealed version, which has a 29 liter internal volume, I could attach an inner back panel to the back of the ladder brace and an inner floor to the top of some horizontal braces near the bottom of the cabinet. The inner floor would cut off access to the big port tube at the bottom of the cabinet, creating a sealed box.
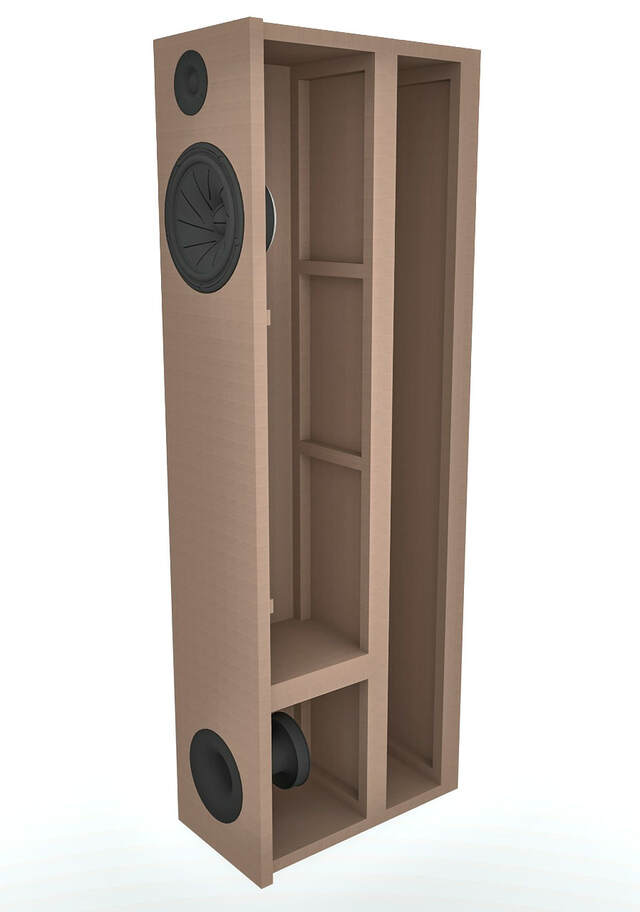
Finally, if I wanted the medium sized (38 liter) ported cabinet, I could omit the inner floor.

With all of that planning done, I ordered the kit and, when it arrived, started building.